Custom Reporting
In addition to the standard HTML reports, Serenity provides additional reports for more specific usages. These include
-
Emailable HTML reports
-
Archivable PDF reports (coming soon)
Serenity emailable reports
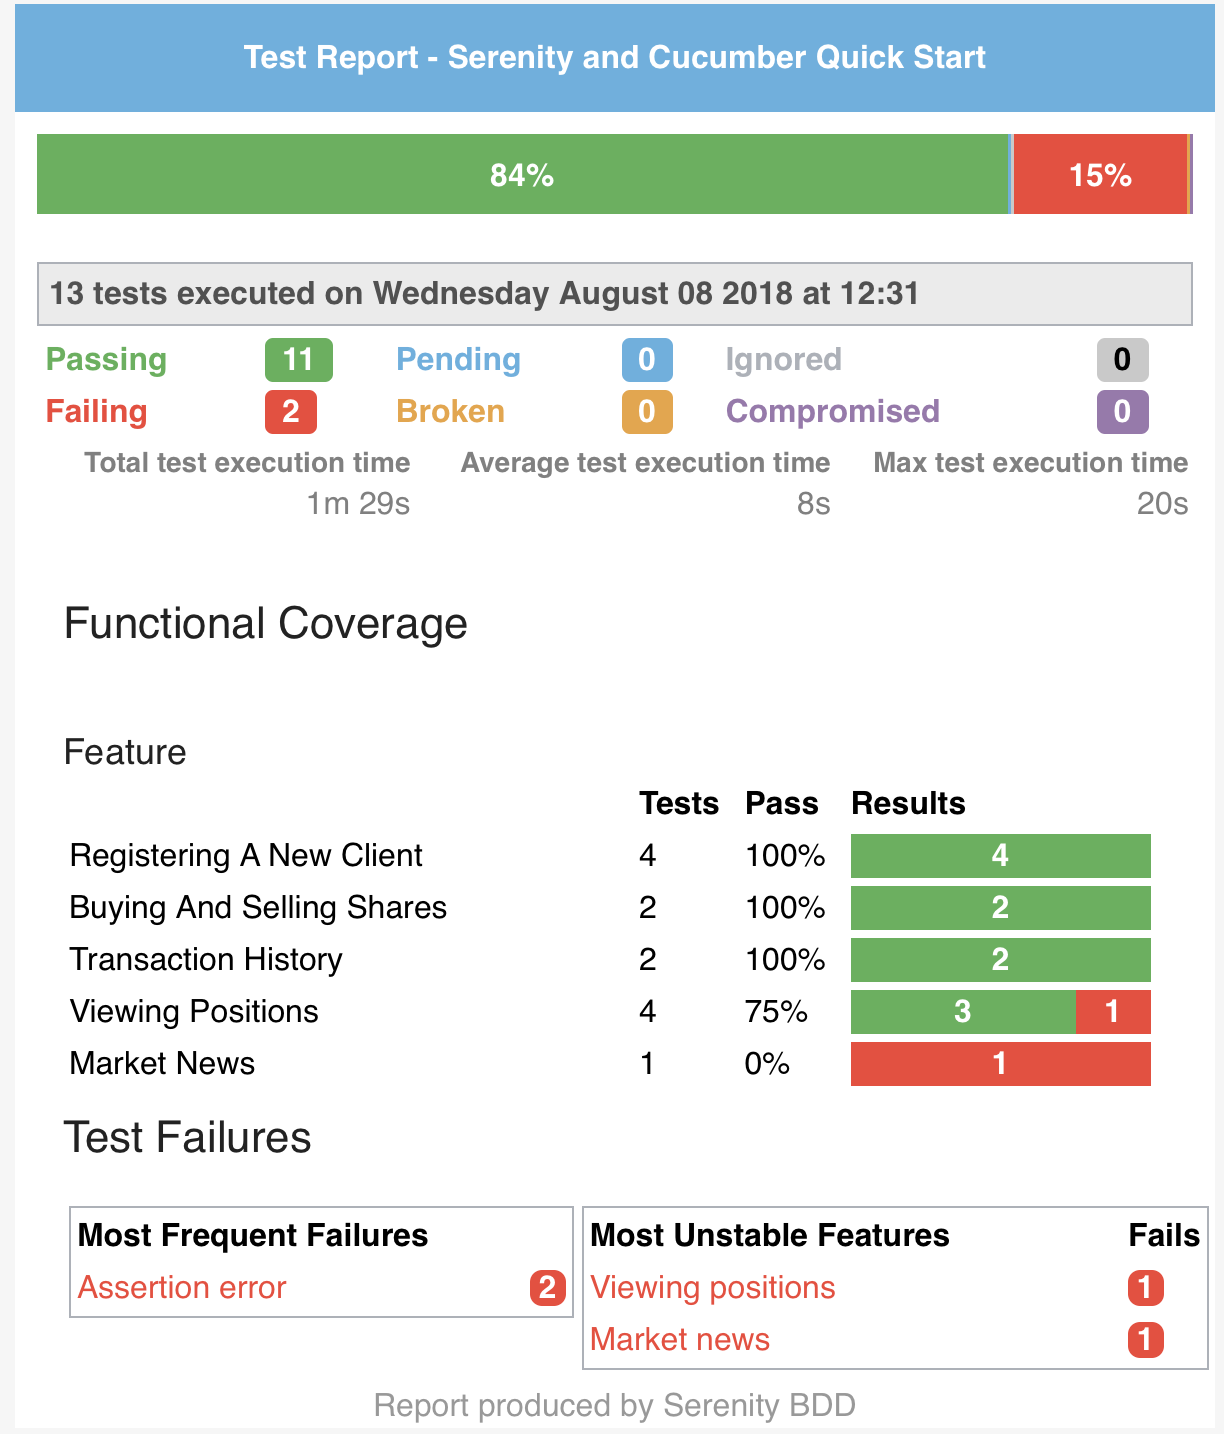
Serenity BDD produces rich reports that act both as test reports and living documentation. But often it is useful to be able to send a short summary of the test outcomes via email.
Serenity allows you to generate a single-page, self-contained HTML summary report, containing an overview of the test results, and a configurable breakdown of the status of different areas of the application. You can see a sample of such a report here:
Setting up Maven
These reports are configured in the Serenity Maven plugin, where you need to do two things. First, you need to add a dependency for the serenity-emailer module in the plugin configuration. Then, you need to tell Serenity to generate the email report when it performs the aggregation task.
The full configuration looks something like this:
<plugin>
    <groupId>net.serenity-bdd.maven.plugins</groupId>
    <artifactId>serenity-maven-plugin</artifactId>
    <version>${serenity.maven.version}</version>
    <dependencies>
        <dependency> (1)
            <groupId>net.serenity-bdd</groupId>
            <artifactId>serenity-emailer</artifactId>
            <version>${serenity.version}</version>
        </dependency>
    </dependencies>
    <configuration>
        <tags>${tags}</tags>
        <reports>email</reports> (2)
    </configuration>
    <executions>
        <execution>
            <id>serenity-reports</id>
            <phase>post-integration-test</phase>
            <goals>
                <goal>aggregate</goal>
            </goals>
        </execution>
    </executions>
</plugin>| 1 | Add a dependency to the serenity-emailer module |
| 2 | Produce the emailable summary report when we run the aggregate goal |
If you are using Maven, you can also generate these reports directly using the reports goal and by passing the serenity.reports system property:
mvn serenity:reports -Dserenity.reports=email
Setting up Gradle
If you are using Gradle, you can use the reports task to generate any configured extended reports. First of all, you need to add the dependencies to the extended reports you want to run in the buildscript section of your build.gradle file, e.g.
buildscript {
    repositories {
        mavenLocal()
        jcenter()
    }
    dependencies {
        classpath "net.serenity-bdd:serenity-gradle-plugin:1.9.36"
        classpath "net.serenity-bdd:serenity-emailer:1.9.36"
    }
}
Next, you need to configure the report you want to generate in your build.gradle file using the serenity section, as shown here:
serenity {
    reports = ["email"]
}
Now you can generate these reports by invoking the reports task:
$gradle reports

> Task :reports
Generating Serenity Reports for bdd-bank to directory /Users/john/Projects/SerenityDojo/bdd-bank/target/site/serenity
PROCESSING EXTENDED REPORTS: [email]

BUILD SUCCESSFUL in 2s
1 actionable task: 1 executed
Custom field Reporting
Custom fields can be included in the reports, using values that are either taken from the environment variables or passed into the build via system properties. This can be useful if you want to include the product or build version, the environment the tests were run on, or the test run date.
You can add custom fields to your report by setting system properties with the special prefix report.customfields. These can go in your serenity.properties file in the root directory of your project, or you can pass them in as command-line options.
For example, you could add the following properties to your serenity.properties file.
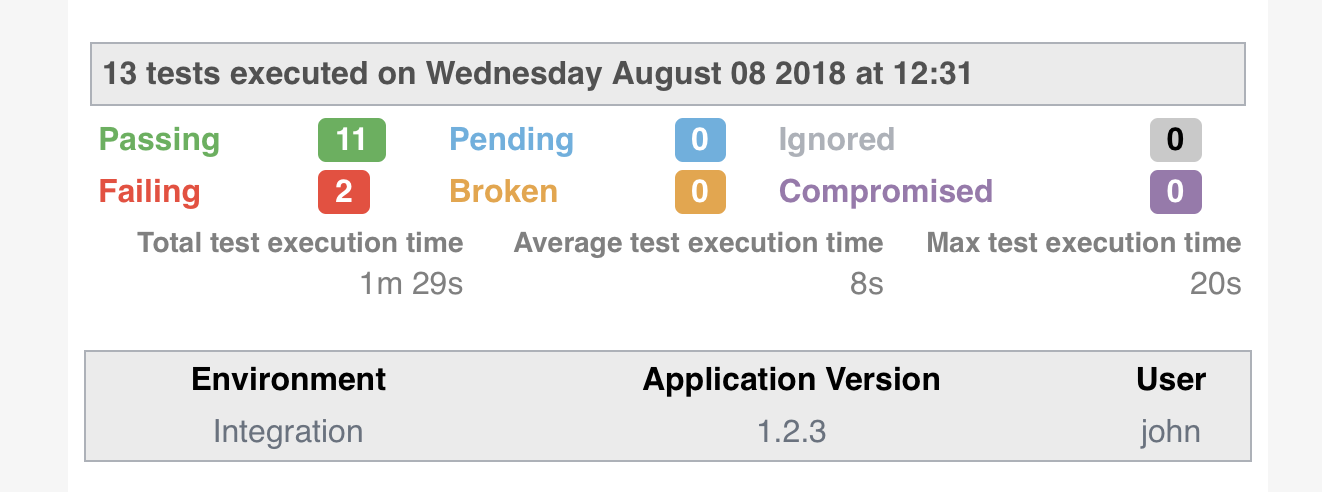
report.customfields.environment = Integration
report.customfields.ApplicationVersion = 1.2.3
This would produce a report containing these values, as shown here:

Accessing system variables
We can also access any system variables that Java has access to. For example, we could include the name of the user who ran the test run with the ${USER} system variable:
report.customfields.user = ${USER}
This property would result in a report like the following:
Not all system properties are available to Java. For example, on Linux systems, the $HOST variable gives the name of the local machine. We could include this in our report by adding the following property:
report.customfields.host = ${HOST}
However, since this variable is not available to Java, we would need to pass it to Serenity from the command line, like this:
mvn serenity:aggregate -DHOST=$HOST
Overriding property values

You can of course pass in other properties, to override the ones in your serenity.properties file. Here we override the application version:
mvn serenity:aggregate -DHOST=$HOST -Dreport.customfields.ApplicationVersion=1.2.4
But a more elegant solution, if you know you will always be passing in a variable, is to use a shorter variable in your serenity.properties file and then pass this one in. For example, here we use the environment property to display the current environment in the custom properties:
report.customfields.environment = ${environment}
We can set this value from the command line as shown here:
mvn serenity:aggregate -DHOST=$HOST -Denvironment=INT5
Ordering the custom properties
By default, the fields will appear in an arbitrary order. You can force the fields to appear in a pre-determined order using the report.customfields.order field:
report.customfields.order=ApplicationVersion,environment,user,host
A complete example
A complete example of these properties and their various usages is shown here:
report.customfields.ApplicationVersion = 1.2.3
report.customfields.environment = ${environment}
report.customfields.user = ${USER}
report.customfields.host = ${HOST}
report.customfields.order=ApplicationVersion,environment,user,host
Functional Coverage Reporting
The Functional Coverage section lets you highlight key areas of your application. By default, this section will list test results for each Feature. But you can configure the report to group results by other tags as well.
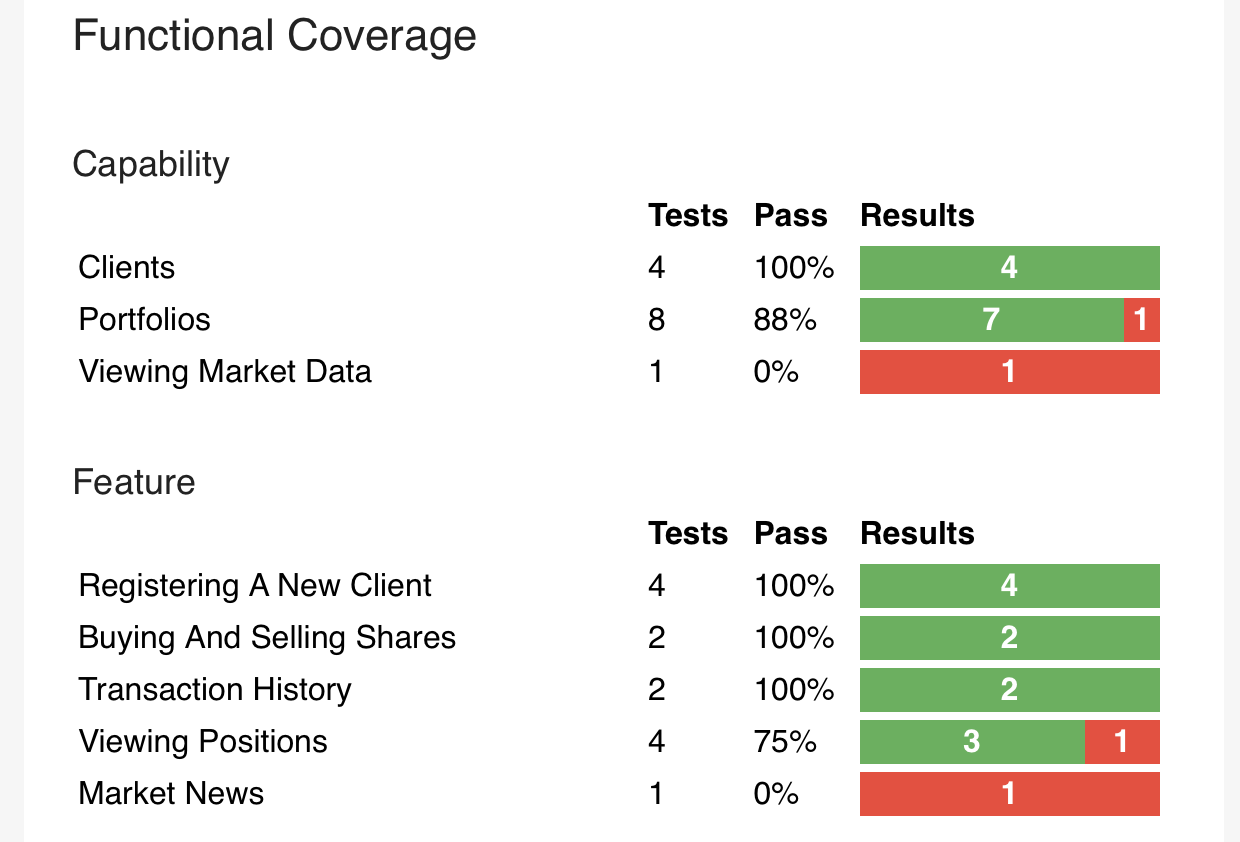
You can specify what categories should appear on this page using the report.tagtypes system property. For example, if want to list capabilities as well as features, you would add the following line to your serenity.properties file:
report.tagtypes=capability,feature
Now both capabilities and features would appear in the Functional Coverage section of the report:
Functional coverage by tag
You can also configure functional coverage to report coverage by tags, rather than by requirements hierarchy. Suppose you are using a @department tag to define the key stakeholders for each feature. You could flag features to belong to different departments using tags like @department:Trading, department:Sales or department:Marketing.
@department:Trading
Feature: Buying and selling shares
In order to make my investments grow
As a trader
I want to be able to buy and sell shares to make a profit
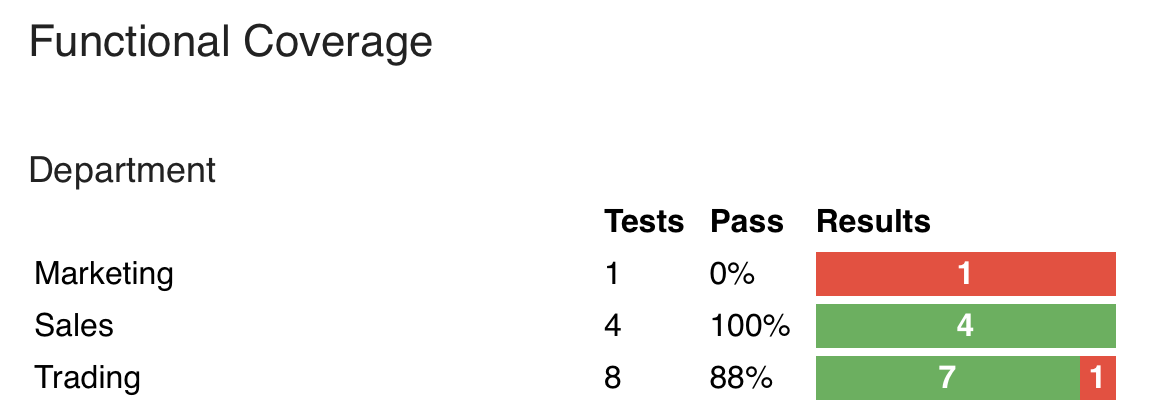
...You could tell Serenity to produce coverage for these tags by including the following line in your serenity.properties file:
report.tagtypes=department
When you generate the summary report, the results will be aggregated by each tag value (Marketing, Sales and Trading), as shown here:
Deep links
You can include a link back to your Serenity report, and links to the individual scenario results,
by setting the serenity.report.url property. You can do this in the serentiy.properties file (if it is fixed),
or pass it in from the command line (if you are pointing the the reports for a specific build, for example):
serenity.report.url=http://my.jenkins.server:8080/job/my-project/serenity-reports/