First Steps with Serenity BDD
In this section, we will help you get going with your first Serenity BDD project. We will be using the simplest of all Serenity BDD setups - Serenity with pure JUnit. Later on, you will learn how to use Serenity with BDD tools like Cucumber and JBehave, and also the powerful Screenplay plugin. But let’s start with something simple.
What you need to start
Java 8
Test Automation is a development activity, so you will need some familiarity with Java. Serenity BDD uses Java 8, so make sure you have a JDK 1.8 or later installed.
An Integrated Development Environment
You will need a modern IDE to work with Java. We recommend IntelliJ (you can download the Community Edition, which is free, from here. But Eclipse will work fine as well.
A Build Tool
You will also need a build tool, either Gradle or Maven, to run your tests and generate your reports. Make sure you have either Gradle 3.x or higher or Maven 3.3.x or higher installed.
Getting Started
The quickest way to create a new project is to take one of the starter projects on Github. You can find the starter project for JUnit at https://github.com/serenity-bdd/serenity-junit-starter.
You can clone this repository:
git clone https://github.com/serenity-bdd/serenity-junit-starter.git
cd serenity-junit-starter
Or simply download a zip file from here.
If you are using Maven, you can also create a new project using one of the Serenity Maven Archetypes.
So far so good?
The starter project comes with a demo test that you can run. From the command line, run either
$ mvn clean verify
or
$gradle clean test
This should produce something like the following:
gradle clean test
Starting a Gradle Daemon (subsequent builds will be faster)

> Task :test

starter.ASimpleTest STANDARD_OUT
    07:45:30.512 [Test worker] INFO  net.serenitybdd.core.Serenity -

    -----------------------------------------------------------------------
         _______. _______ .______       _______ .__   __.  __  .___________
        /       ||   ____||   _  \     |   ____||  \ |  | |  | |
       |   (----`|  |__   |  |_)  |    |  |__   |   \|  | |  | `---|  |----
        \   \    |   __|  |      /     |   __|  |  . `  | |  |     |  |
    .----)   |   |  |____ |  |\  \----.|  |____ |  |\   | |  |     |  |
    |_______/    |_______|| _| `._____||_______||__| \__| |__|     |__|


     News and tutorials at http://www.serenity-bdd.info
     Documentation at https://wakaleo.gitbooks.io/the-serenity-book/content
     Join the Serenity Community on Rocket Chat
         at https://serenity-bdd.rocket.chat
     Serenity BDD Support and Training
         at http://serenity-bdd.info/#/trainingandsupport
     Learn Serenity BDD online at http://serenity-dojo.com
    -----------------------------------------------------------------------

    07:45:30.540 [Test worker] INFO  net.serenitybdd.core.Serenity - Test Suite Started: A simple test
    07:45:30.737 [Test worker] INFO  net.serenitybdd.core.Serenity -
     _____ _____ ____ _____   ____ _____  _    ____ _____ _____ ____
    |_   _| ____/ ___|_   _| / ___|_   _|/ \  |  _ \_   _| ____|  _ \
      | | |  _| \___ \ | |   \___ \ | | / _ \ | |_) || | |  _| | | | |
      | | | |___ ___) || |    ___) || |/ ___ \|  _ < | | | |___| |_| |
      |_| |_____|____/ |_|   |____/ |_/_/   \_\_| \_\|_| |_____|____/


    TEST STARTED: addingSums
    -------------------------------------------------------------------
    07:45:30.737 [Test worker] INFO  net.serenitybdd.core.Serenity - TEST NUMBER: 1
    07:45:30.738 [Test worker] INFO  net.serenitybdd.core.Serenity - TEST PENDING
    07:45:30.766 [Test worker] INFO  net.serenitybdd.core.Serenity -
    -----------------------------------------------------------------------
              __  _____ _____ ____ _____   ____  _____ _   _ ____ ___ _   _
     _       / / |_   _| ____/ ___|_   _| |  _ \| ____| \ | |  _ \_ _| \ |
    (_)____ / /    | | |  _| \___ \ | |   | |_) |  _| |  \| | | | | ||  \|
     |_____/ /     | | | |___ ___) || |   |  __/| |___| |\  | |_| | || |\
    (_)   /_/      |_| |_____|____/ |_|   |_|   |_____|_| \_|____/___|_| \_


    TEST PENDING: Adding sums
    -----------------------------------------------------------------------

> Task :aggregate
Generating Serenity Reports for serenity-junit-starter to directory /Users/john/Projects/OpenSource/serenity-junit-starter/target/site/serenity


BUILD SUCCESSFUL in 14s
6 actionable tasks: 6 executed
Take a look in the target/site/serenity directory. You should find an index.html file, which will be the home page of the Serenity Reports
The project structure
Now import the project into your IDE (be sure to import the project as a Maven or Gradle project). The project structure looks something like this (some less interesting files and directories have been left out):
├── pom.xml                                 (1)
├── build.gradle                            (2)
├── src
|   ├── main
|   ├── test                                (3)
|       ├── java
|           ├── starter                     (4)
|               ├── ASimpleTest.java        (5)
|               ├── steps                   (6)
|                   ├── MathWizSteps.java   (7)
| 1 | Maven POM file |
| 2 | Gradle build script |
| 3 | Test code |
| 4 | Root package |
| 5 | A sample test case |
| 6 | Step library package |
| 7 | A sample step library |
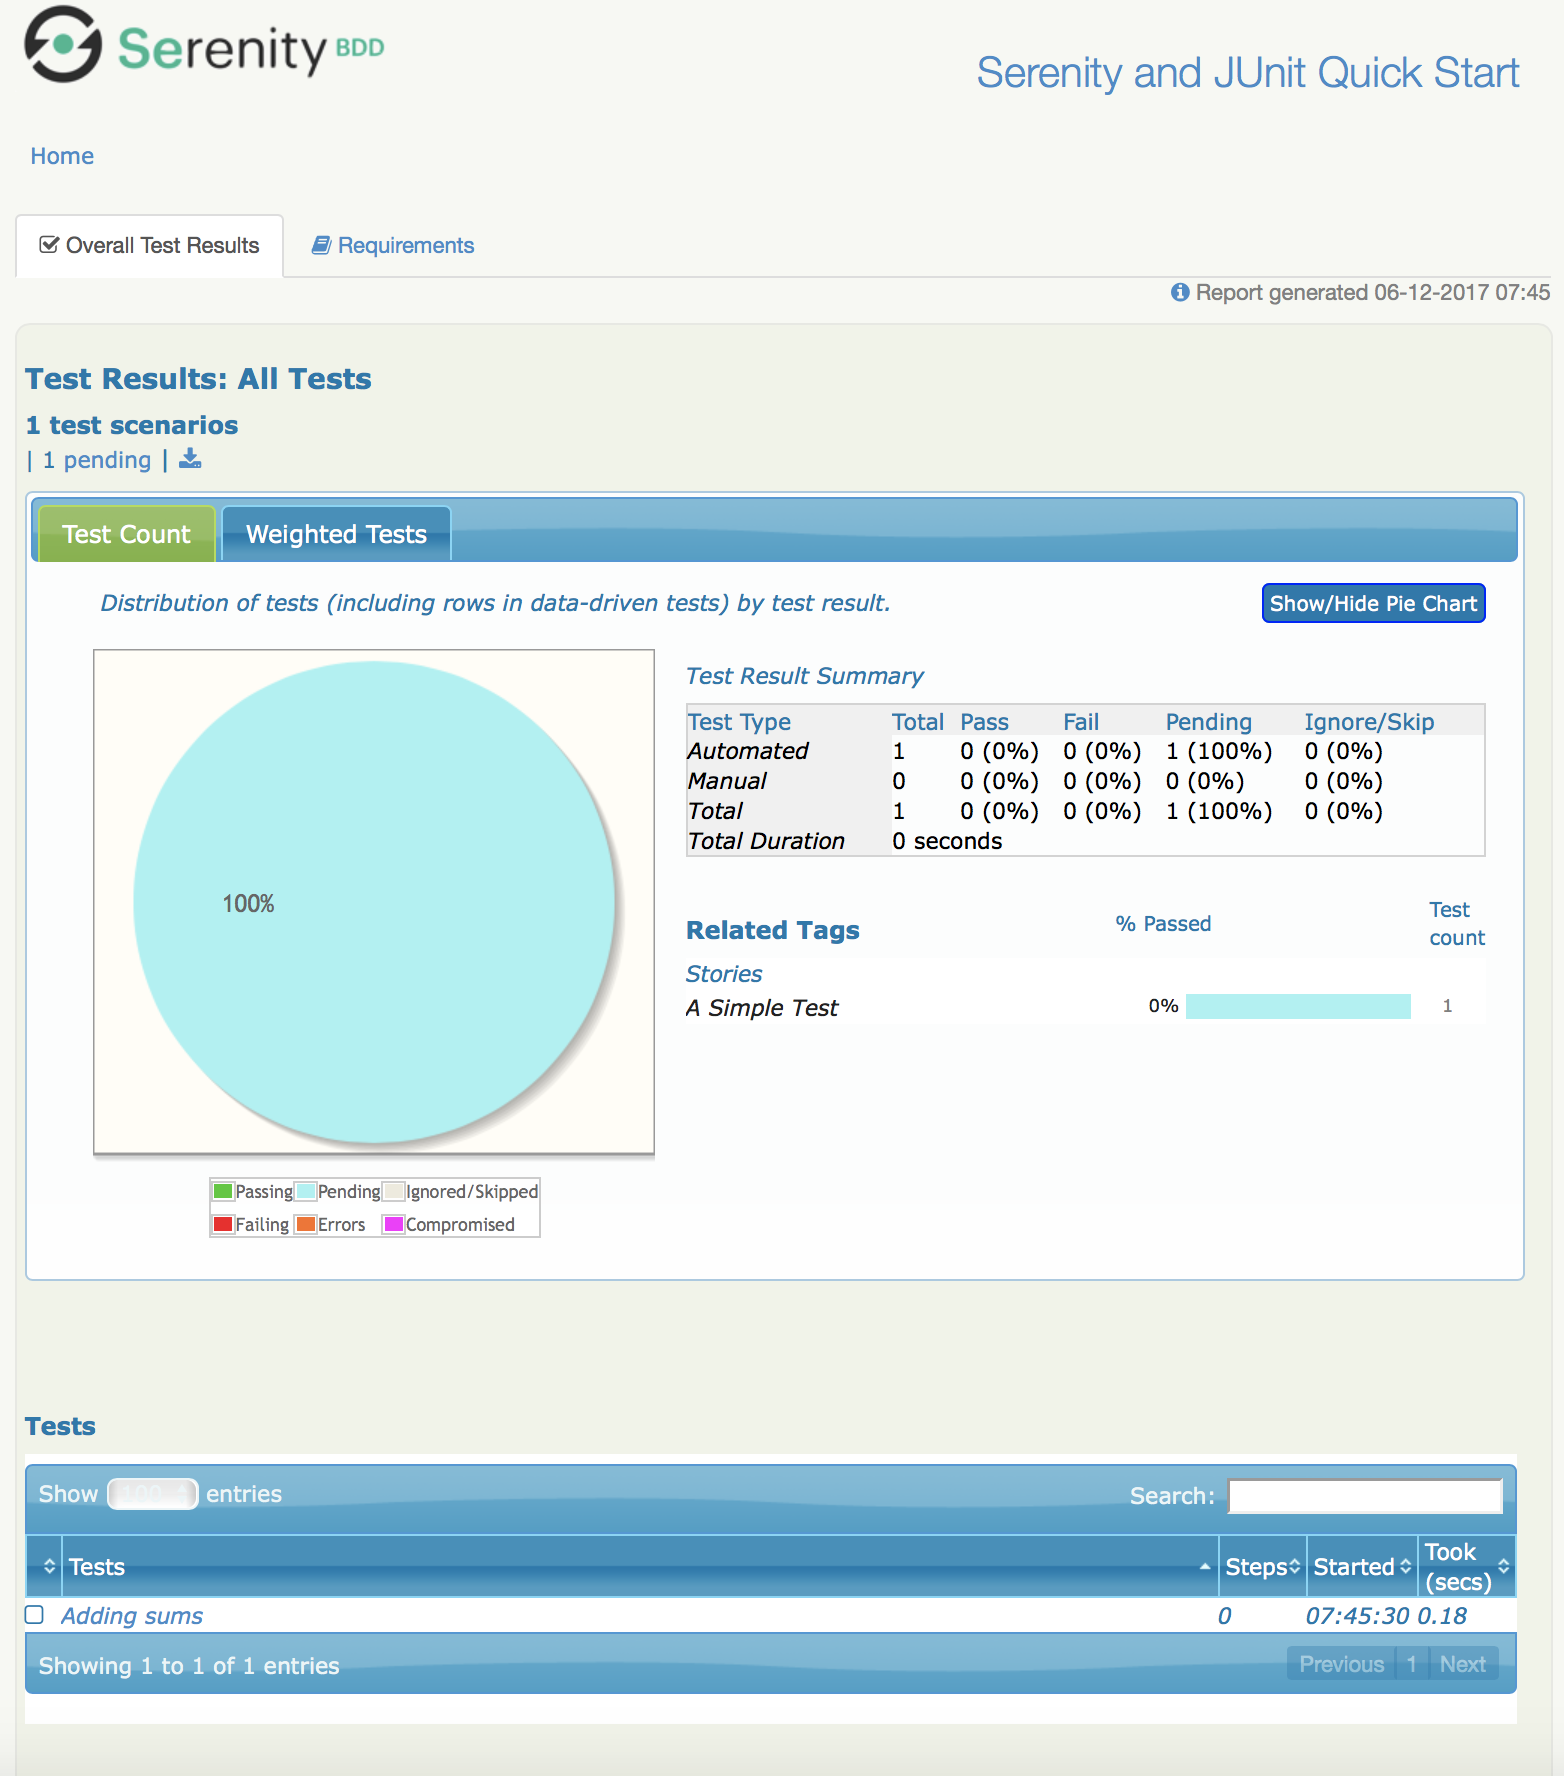
Your first test
You may have noticed that the test we just ran was marked as "PENDING". This means that this test is still work-in-progress, and hasn’t been completed yet. That’s why the reports appear as light blue (Serenity’s colour for pending tests), and not green.
So let’s start out by making this test pass.
A simple Serenity test class
Open up the ASimpleTest.java class and take a look. You should see something like this:
@RunWith(SerenityRunner.class)          (1)
public class ASimpleTest {

    @Steps                              (2)
    MathWizSteps michael;

    @Test
    @Pending                            (3)
    public void addingSums() {
        // Given
        michael.startsWith(1);

        // When
        michael.adds(2);

        // Then
        michael.shouldHave(3);
    }
}| 1 | The SerenityRunner class tells JUnit that this is a Serenity test |
| 2 | A Serenity step library |
| 3 | This test is work-in-progress, so it won’t be executed yet |
Serenity tests try to describe a user’s journey through the application, and the outcome that we expect at the end of this journey. But we rarely interact directly with the application within the test. Interacting with an application directly within a test (for example, by making WebDriver calls or REST API calls) is a big testing anti-pattern as it leads to code duplication and code that is hard to maintain. It also makes it harder to understand what the feature or requirement the test is checking.
So instead, our tests model the user journey at a higher level. We describe the system user and the actions he or she takes. So in this case, we describe how our system user, Michael, performs a complex calculation:
-
He starts with a value of 1
-
He adds 2
-
We expect him to find a result of 3
At this level, we are not concerned with where he gets the calculator, what web page he navigates to or what REST-API calls he makes. We are only interested in his high-level actions. This helps make our tests more readable and easier to maintain.
|
Later on, you will learn how to model user journeys in an even more flexible manner using the Screenplay pattern. |
To achieve this layering, we use step libraries.
A Serenity step library
The MathWizSteps class is what we call a step library. Step Libraries in Serenity are where we model the behaviour of our users. Tests model how a user interacts with our system, and the step libraries typically model how a particular user does a particular job. In this case, our user (Michael) is a maths wiz doing some complex calculations.
Notice how the step library field (michael) is annotated with the @Steps annotation. This tells Serenity to inject the step library into the test. We never create instances of the step libraries ourselves, as Serenity needs to instrument the step libraries so that the methods we call (like startsWith, add, and shouldHave) appear in our reports. But more on that later.
Open up the MathWizSteps.class. You should see something like this:
public class MathWizSteps {

    String actor;                               (1)

    @Step("#actor starts with {0}")             (2)
    public void startsWith(int amount) {
        // TODO
    }

    @Step("#actor adds {0}")
    public void adds(int amount) {
        // TODO
    }

    @Step("#actor should have {0}")
    public void shouldHave(int expectedTotal) {
        // TODO
    }
}| 1 | The name of this step actor |
| 2 | How this step will appear in the reports |
As you can see, it is a rather ordinary looking class, but with a couple of additions.
Firstly, there is the actor field. The actor field is an optional field that you can add to your step libraries. If you do, Serenity will pass in the name of the variable (so michael in this case) into the step library.
Secondly, each method has a @Step annotation. These tell Serenity to add a corresponding entry in the test report whenever this method is called.
The text in the annotation (such as "#actor starts with {0}") tells Serenity how to render the step. Any fields with the "#" prefix will be rendered (so #actor will be replaced by the value of the actor field). Any parameters can be reported using positional variables ({0} for the first parameter, {1} for the second, and so forth).
If you use the @Step annotation alone, Serenity will use the name of the method, in a more human-readable form, in the reports. For example, suppose you have the following step declaration:
@Step
public void adds(int amount) {...}
This will be rendered as "adds: 2"
Make the test fail
For the moment, these step methods are empty. Let’s fix that.
We’ll start with the first step, startsWith(). Let’s imagine the calculator API we would like to have. Update the start of the MathWizSteps class so it looks like this:
public class MathWizSteps {

    String actor;

    Calculator calculator;                      (1)

    @Step("#actor starts with {0}")
    public void startsWith(int amount) {
        calculator = new Calculator(amount);    (2)
}| 1 | Add a new Calculator field |
| 2 | Create a new calculator with a given amount |
The Calculator class doesn’t exist (we are designing it here), so create a Calculator class in the src/main/java/starter directory:
public class Calculator {
    private int total;

    public Calculator(int amount) {
        this.total = amount;
    }
}
Next, we can flesh out the adds() method in the MathWizSteps class:
@Step("#actor adds {0}")
public void adds(int amount) {
    calculator.add(amount);
}
Add the add() method to the Calculator class, but don’t implement it yet (we need to see the test fail before we can trust it when it passes):
public class Calculator {
    private int total;

    public Calculator(int amount) {
        this.total = amount;
    }

    public void add(int amount) {

    }
}
Next we need to implement the shouldHave() method. We will use AssertJ to make a simple assertion. The full class will now look like this:
import net.thucydides.core.annotations.Step;
import static org.assertj.core.api.Assertions.assertThat;

public class MathWizSteps {

    String actor;

    Calculator calculator;

    @Step("#actor starts with {0}")
    public void startsWith(int amount) {
        calculator = new Calculator(amount);
    }

    @Step("#actor adds {0}")
    public void adds(int amount) {
        calculator.add(amount);
    }

    @Step("#actor should have {0}")
    public void shouldHave(int expectedTotal) {
        assertThat(calculator.getTotal()).isEqualTo(expectedTotal);
    }
}
But we still need to implement the getTotal() method in our Calculator class. Add a method that returns 0 for now:
public int getTotal() {
    return 0;
}
Now, remove the @Pending annotation from the class. This will tell Serenity to execute the test, and not skip it.Run the test again, using mvn clean verify or 'gradle clean test'. You should see a failing test like this:
starter.ASimpleTest > addingSums STANDARD_OUT
    08:47:25.760 [Test worker] INFO  net.serenitybdd.core.Serenity - Test Suite Started: A simple test
    08:47:25.836 [Test worker] INFO  net.serenitybdd.core.Serenity -
     _____ _____ ____ _____   ____ _____  _    ____ _____ _____ ____
    |_   _| ____/ ___|_   _| / ___|_   _|/ \  |  _ \_   _| ____|  _ \
      | | |  _| \___ \ | |   \___ \ | | / _ \ | |_) || | |  _| | | | |
      | | | |___ ___) || |    ___) || |/ ___ \|  _ < | | | |___| |_| |
      |_| |_____|____/ |_|   |____/ |_/_/   \_\_| \_\|_| |_____|____/


    TEST STARTED: addingSums
    -------------------------------------------------------------------
    08:47:25.836 [Test worker] INFO  net.serenitybdd.core.Serenity - TEST NUMBER: 1

starter.ASimpleTest > addingSums FAILED
    java.lang.AssertionError at ASimpleTest.java:25

starter.ASimpleTest STANDARD_OUT
    08:47:26.159 [Test worker] ERROR net.serenitybdd.core.Serenity -
               __  _____ _____ ____ _____   _____ _    ___ _     _____ ____
      _       / / |_   _| ____/ ___|_   _| |  ___/ \  |_ _| |   | ____|  _
     (_)_____| |    | | |  _| \___ \ | |   | |_ / _ \  | || |   |  _| | | |
      _|_____| |    | | | |___ ___) || |   |  _/ ___ \ | || |___| |___| |_|
     (_)     | |    |_| |_____|____/ |_|   |_|/_/   \_\___|_____|_____|____
              \_\

    TEST FAILED: Adding sums
    -----------------------------------------------------------------------
    08:47:26.239 [Test worker] ERROR net.serenitybdd.core.Serenity - TEST FAILED AT STEP Michael should have 3
    08:47:26.239 [Test worker] ERROR net.serenitybdd.core.Serenity - expected:<[3]> but was:<[0]>

1 test completed, 1 failed

> Task :aggregate
Generating Serenity Reports for serenity-junit-starter to directory /Users/john/Projects/OpenSource/serenity-junit-starter/target/site/serenity


FAILURE: Build failed with an exception.
This is good, because it means our test works. Now let’s make the test pass.
Make the test pass
Complete the Calculator class like this:
public class Calculator {
    private int total;

    public Calculator(int amount) {
        this.total = amount;
    }

    public void add(int amount) {
        total = total + amount;
    }

    public int getTotal() {
        return total;
    }
}
Now run the test again. With any luck, you should see the following:
starter.ASimpleTest STANDARD_OUT
08:50:05.156 [Test worker] INFO net.serenitybdd.core.Serenity -
__ _____ _____ ____ _____ ____ _ ____ ____ _____ __
_ \ \ |_ _| ____/ ___|_ _| | _ \ / \ / ___|/ ___|| ____|
(_)_____| | | | | _| \___ \ | | | |_) / _ \ \___ \\___ \| _| | |
_|_____| | | | | |___ ___) || | | __/ ___ \ ___) |___) | |___| |
(_) | | |_| |_____|____/ |_| |_| /_/ \_\____/|____/|_____|__
/_/
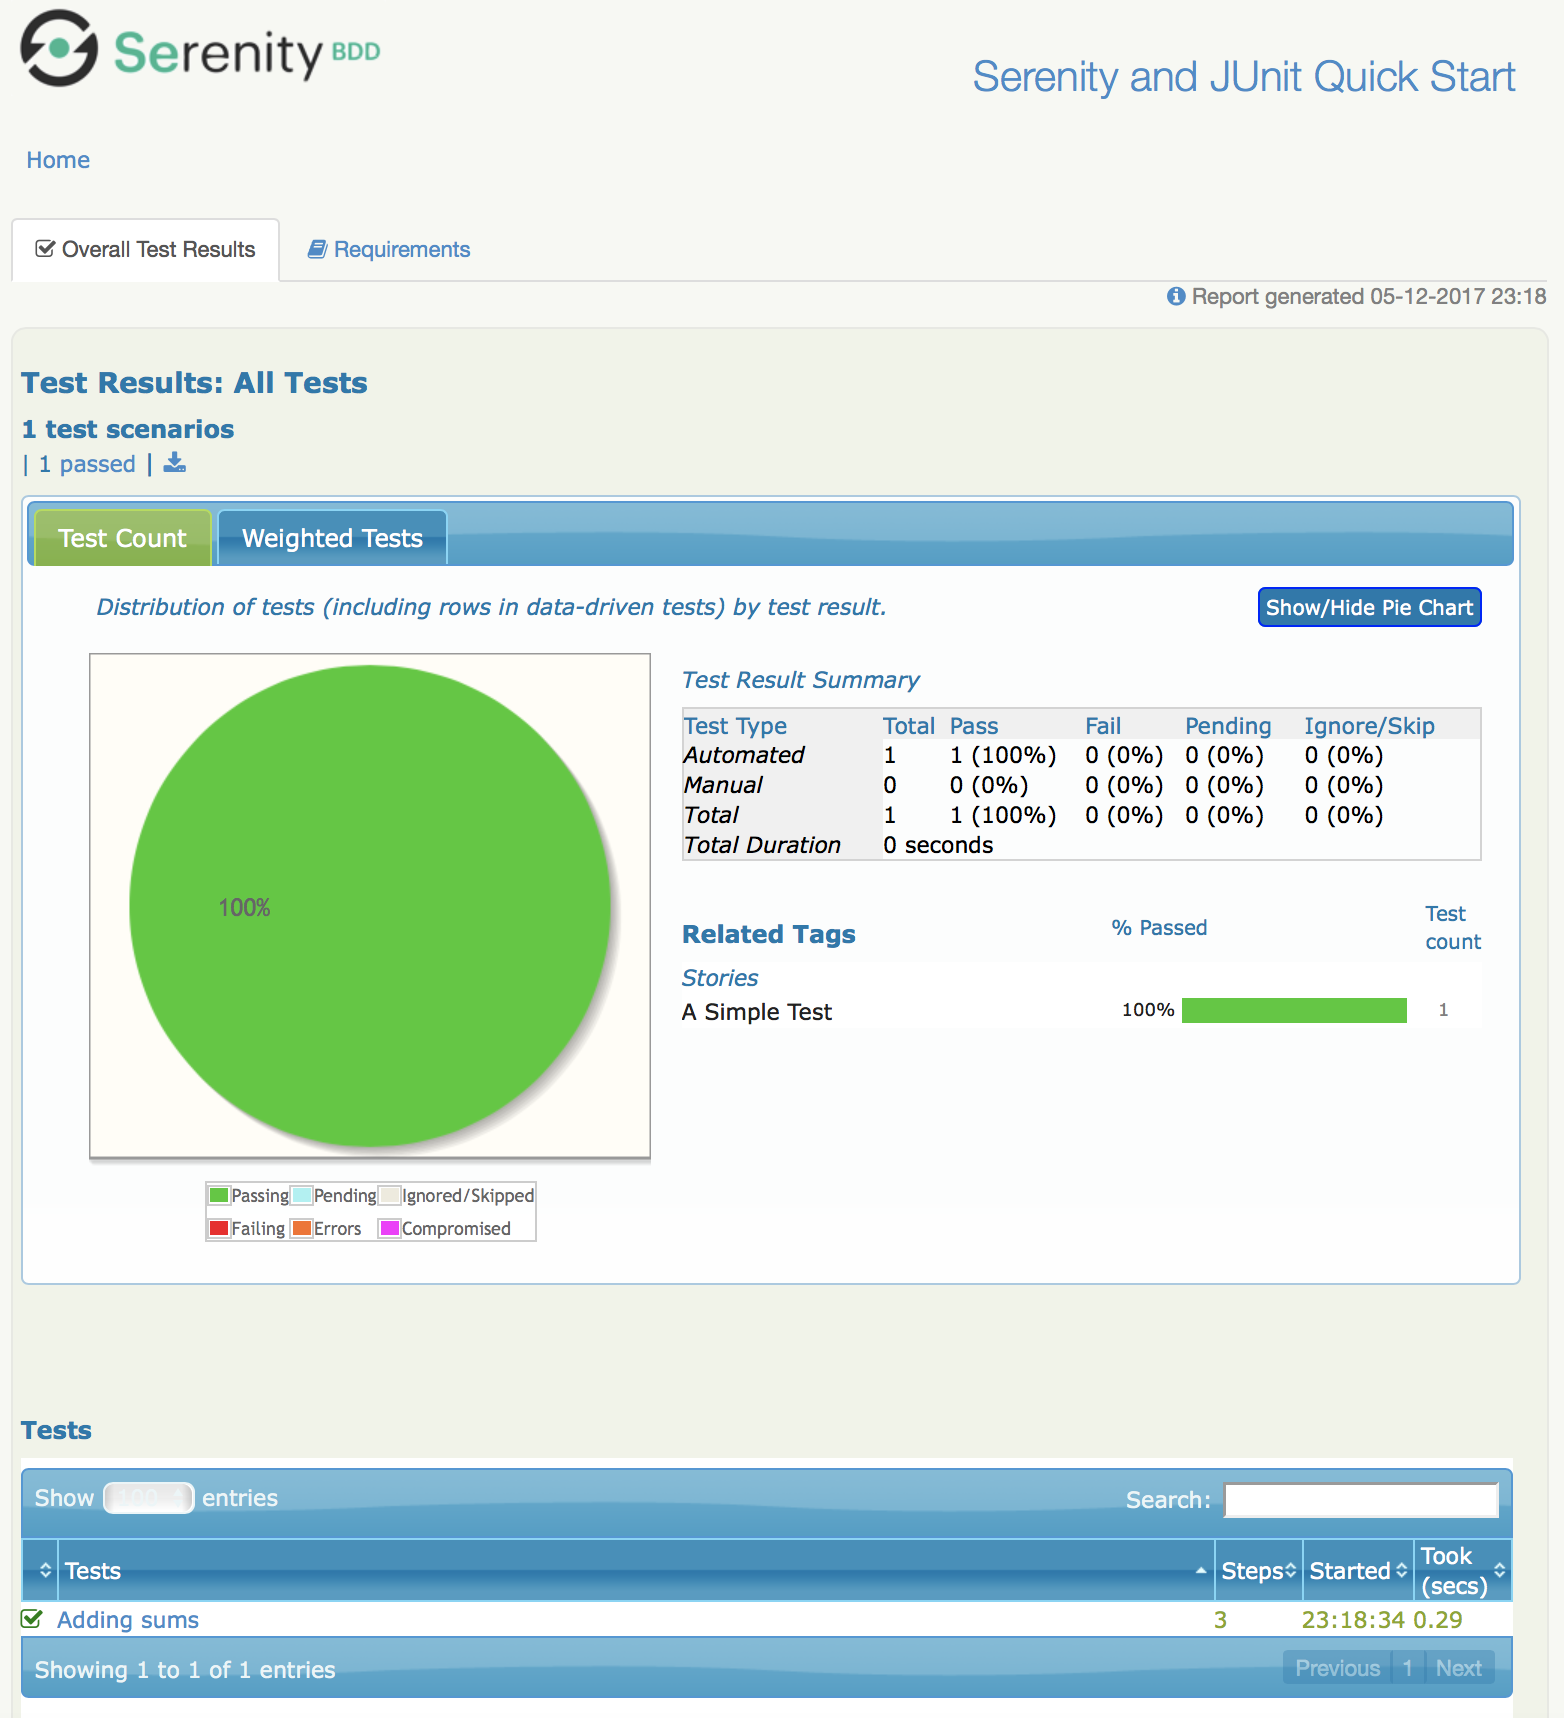
TEST PASSED: Adding sums
-----------------------------------------------------------------------
Open the report in target/site/serenity/index.html. You should see something like this:
Step into the test report by clicking on the "Adding sums" row. You should see a report like this, describing Michael’s calculation adventures:
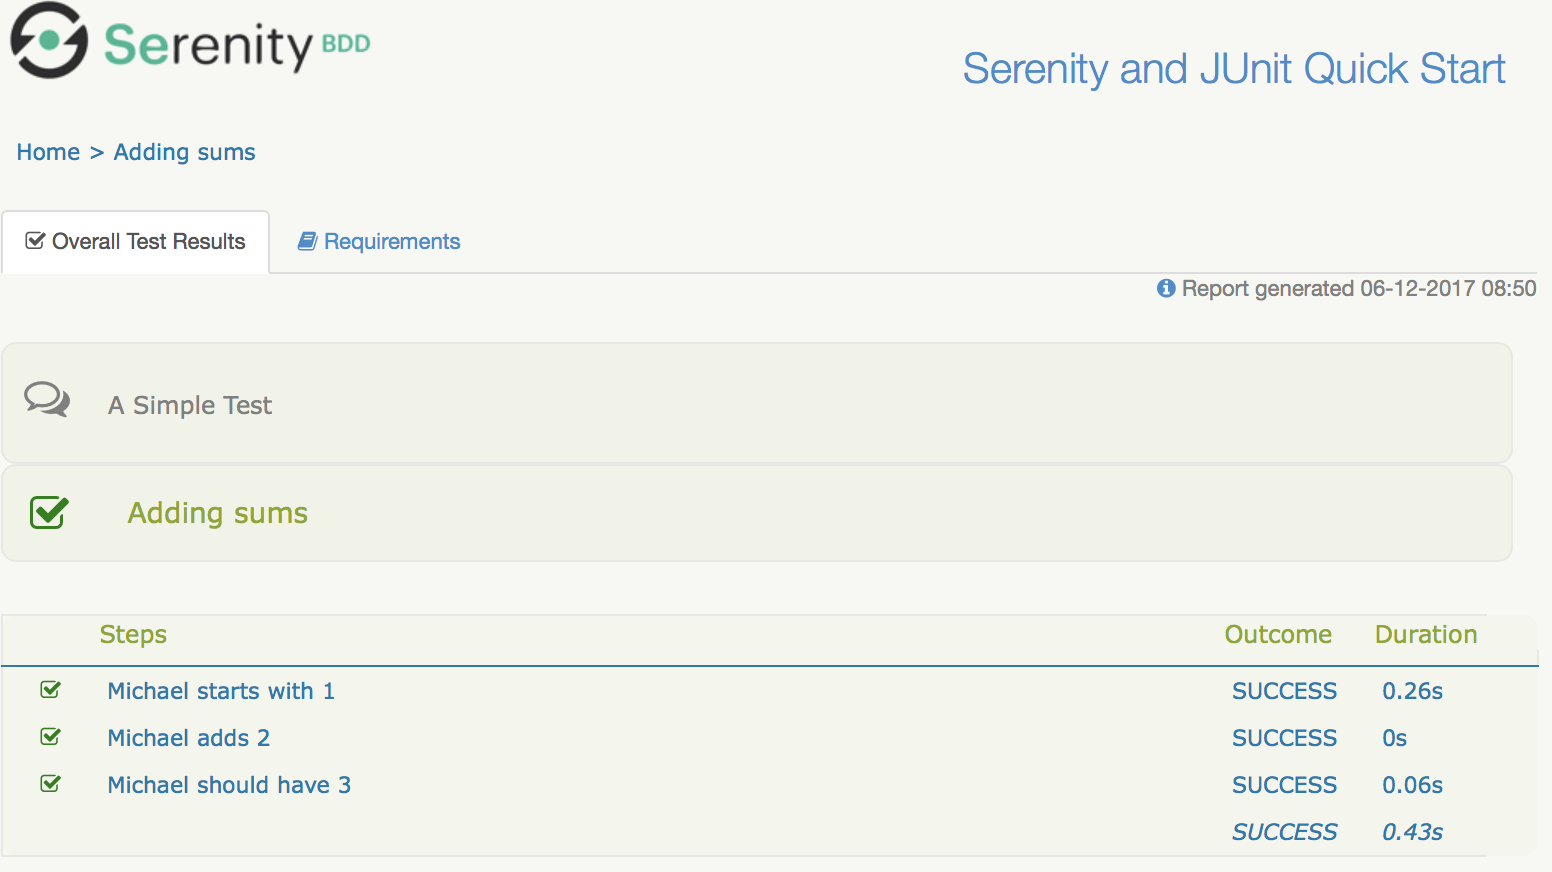
If you have got this far, congratulations, you have just written your first Serenity BDD test!
|
Check out the sample code for this example on Github. |
Personalise the starter project
Now that you have seen how a simple Serenity test works, we can get onto some serious work. First of all, make yourself at home. To personalise this project, just rename the starter package into one that represents the root package for your own project, and delete the sample test and step library.
In the next chapter, you will see how to write your first web test with Serenity.