Tools and Features
Console (REPL)
MicroPython has an interactive code tool known as the REPL (Read Evaluate Print Line). The REPL allows you to run code on your device, line by line. To begin coding, go to the Pymakr Plugin Console and start typing your code. Start by making the LED change colour.
import pycom # we need this module to control the LED
pycom.heartbeat(False) # disable the blue blinking
pycom.rgbled(0x00ff00) # make the LED light up green in colour
You can change the colour by adjusting the hex RGB value.
pycom.rgbled(0xff0000) # now make the LED light up red in colour
The console can be used to run any python code, also functions or loops.
Use print() to output contents of variables to the console for you to read. Returned values from functions will also be displayed if they are not caught in a variable. This will not happen for code running from the main or boot files. Here you need to use print() to output to the console.
Note that after writing or pasting any indented code like a function or a while loop, the user will have to press enter up to three times to tell MicroPython the code is to be closed (this is standard MicroPython & Python behaviour).
Also be aware that code written into the REPL is not saved after the device is powered off/on again.
Run
To test code on a device, create a new .py file or open an existing one, type the desired code, save the file and then press the Run button. This will run the code directly onto the Pycom board and output the results of the script to the REPL.
Changes made to files won’t be automatically uploaded to the board upon restarting or exiting the Run feature, as the Pycom board will not store this code. In order to push the code permanently to a device, use the Sync feature.
Projects
Pymakr Plugin supports user projects, allowing for pre-configured settings such as default serial address/credentials, files to be ignored and folders to sync.
pymakr.conf
Pymakr Plugin supports local project settings using a file called pymakr.conf. This can be used to store the default serial address of a device, which files to ignore and other settings. An example pymakr.conf is shown below:
{
    "address": "/dev/cu.usbserial-AB001234",
    "username": "micro",
    "password": "python",
    "sync_folder": "scripts"
}
Sync
The Pymakr Plugins have a feature to Sync and upload code to a device. This can be used for both uploading code to a device as well as testing out scripts by running them live on the device. The following steps demonstrate how to use this feature.
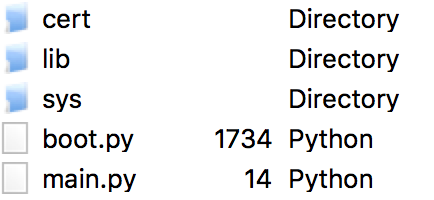
To start using the Sync feature, ensure that a project folder has been created for the device. For example, if using the pymakr.conf from above, this project folder should be named 'scripts'. This folder should have the following structure:

Library files should be placed into the lib folder, certificates into the cert folder and so on. The Sync button will take the highest level folder (currently open) and upload this to the connected Pycom device. The files will be pushed to the device in exactly the same structure as within the code editor's file directory.
More
Clicking the 'More' button within the Pymakr Plugin allows for some additional features. See the options below for specific functionality.
Get Firmware Version
Retrieves the firmware version of the Pycom device connected to the Pymakr Plugin instance.
Get WiFi AP SSID
Retrieves the default WiFi Access Point SSID of the Pycom device connected to the Pymakr Plugin instance.
Get Serial Ports
Retrieves the various serial ports that are available to the Pymakr Plugin instance.