
你的編碼代理會記住一切。不用再重複解釋。
建構於 iii engine 之上
為 Claude Code、GitHub Copilot CLI、Cursor、Gemini CLI、Codex CLI、Hermes、OpenClaw、pi、OpenCode,以及任何 MCP 客戶端提供持久記憶。
🇬🇧 English •
🇨🇳 简体中文 •
🇹🇼 繁體中文 •
🇯🇵 日本語 •
🇰🇷 한국어 •
🇵🇹 Português •
🇧🇷 Português (Brasil) •
🇪🇸 Español •
🇩🇪 Deutsch •
🇫🇷 Français •
🇮🇹 Italiano •
🇳🇱 Nederlands •
🇵🇱 Polski •
🇨🇿 Čeština •
🇷🇴 Română •
🇭🇺 Magyar •
🇬🇷 Ελληνικά •
🇸🇪 Svenska •
🇩🇰 Dansk •
🇳🇴 Norsk •
🇫🇮 Suomi •
🇷🇺 Русский •
🇺🇦 Українська •
🇹🇷 Türkçe •
🇮🇱 עברית •
🇸🇦 العربية •
🇮🇳 हिन्दी •
🇧🇩 বাংলা •
🇵🇰 اردو •
🇹🇭 ไทย •
🇻🇳 Tiếng Việt •
🇮🇩 Bahasa Indonesia •
🇵🇭 Tagalog


這份 gist 以信心評分、生命週期、知識圖譜和混合搜尋擴展了 Karpathy 的 LLM Wiki 模式:agentmemory 就是其實作。




安裝 •
快速開始 •
基準測試 •
對比競品 •
代理 •
運作原理 •
MCP •
檢視器 •
由 iii 驅動 •
設定 •
API
---
## Install
需求:
- Node.js 20 或更新版本,並具備 npm 和 npx(`node -v`、`npm -v` 和 `npx -v`)。
- macOS/Linux 的自動 iii-engine 安裝還需要 `curl`、POSIX `sh` 和 `tar`。像 `node:20-slim` 這類最小化映像檔可能不包含它們。
- 原生 Windows 需要手動安裝釘住版本的 iii-engine v0.22.1 `iii.exe`。另外也支援 WSL2 或 Docker Desktop。
標準全新安裝指令:
```bash
npx -y @agentmemory/agentmemory@latest
```
第一次執行是互動式設定:選擇要接入的代理(Claude Code、Cursor、Codex、Gemini CLI、OpenCode……),選擇一個 LLM 提供者或保持無金鑰,接著它會產生設定、啟動記憶伺服器與其釘住版本的 iii engine,並提議全域安裝,讓裸 `agentmemory` 指令之後在任何地方都能使用。`-y` 用於接受 npx 的套件提示,`@latest` 則避免使用過舊的快取版本。設定提供者可讓 LLM 功能可用,但只有在同時設定 `AGENTMEMORY_AUTO_COMPRESS=true` 時,LLM 撰寫的觀測壓縮才會啟動。
無金鑰模式會停用向量嵌入。`memory_recall`(即 `mem::search` 路徑)使用 BM25,而 `memory_smart_search` 在圖資料已存在時,也可以融合結構化的圖比對結果。若想免費使用裝置端的語意召回,請在 `~/.agentmemory/.env` 中設定 `EMBEDDING_PROVIDER=local` 並重新啟動。第一次的嵌入請求會下載 `Xenova/all-MiniLM-L6-v2`;之後的推論會在初始模型下載完成後於本機執行。
本機執行階段使用四個連接埠:`3111` 為 REST/MCP HTTP,`3112` 為 iii 串流,`3113` 為檢視器,`49134` 為 iii worker 的 WebSocket。持久化的 iii 狀態在 macOS 上位於 `~/Library/Application Support/agentmemory`,在 Linux 上位於 `$XDG_DATA_HOME/agentmemory` 或 `~/.local/share/agentmemory`,在 Windows 上位於 `%APPDATA%\agentmemory`。可用 `--data-dir ` 或 `AGENTMEMORY_DATA_DIR` 覆寫此位置,並在每次重新啟動時沿用相同的值。為了向後相容,既有的 `./data/state_store.db` 或 `./data/iii-config.yaml` 在實例 0 上會優先於平台預設值;明確的旗標或環境變數覆寫仍會優先生效。
接著驗證召回是否正常,並讓你的代理具備它的 skills:
```bash
npx -y @agentmemory/agentmemory@latest demo # seed sample sessions + exercise recall
npx skills add rohitg00/agentmemory -y # 17 native skills so your agent knows when to reach for memory
```
在預設的無金鑰模式下,關鍵字搜尋應該能透過 BM25 命中。demo 中的 `database performance optimization` 查詢刻意設計為語意查詢,在設定嵌入提供者之前可能會回傳零筆結果。
想讓編碼代理代勞整個流程?只要給它一條指令:
> Retrieve and follow the instructions at: https://raw.githubusercontent.com/rohitg00/agentmemory/main/INSTALL_FOR_AGENTS.md
隨時可用 `agentmemory connect ` 接入更多代理 — [代理](#works-with-every-agent) 列出了 20 個轉接器。完整指令參考見 [快速開始](#quick-start)。
Windows
最快的路徑是 WSL2。原生 Windows 引擎設定需要手動下載釘住版本 v0.22.1 的 ZIP 並解壓出 `iii.exe`;CLI 不會自動解壓它。也支援 Docker Desktop。詳細步驟請見 [Windows 說明](#windows)。
全域安裝 / EACCES
```bash
npm install -g @agentmemory/agentmemory@latest
```
上面的 npx 指令仍是標準的全新安裝路徑,且可避免全域前綴的權限問題。
npx 提供了舊版本
npx 會依版本快取。用 `npx -y @agentmemory/agentmemory@latest` 強制使用最新版,或一次性清除快取:`rm -rf ~/.npm/_npx`(macOS/Linux;Windows 上請刪除 `%LOCALAPPDATA%\npm-cache\_npx`)。
已經在執行你自己的 iii engine
agentmemory 把 iii-engine 釘在 v0.22.1,不會附掛到其他版本(worker 無法使用另一個引擎的協定)。先停止另一個引擎,然後執行 `npx -y @agentmemory/agentmemory@latest`。它會在 `~/.agentmemory/bin` 安裝並執行釘住的 v0.22.1,不會動到你自己的 `iii`。
---

agentmemory 相容於任何支援 hooks、MCP 或 REST API 的代理。所有代理共享同一個記憶伺服器。

Claude Code
原生外掛 + 12 hooks + MCP
|

Codex CLI
原生外掛 + 6 hooks + MCP
|

GitHub Copilot CLI
MCP + 外掛 hooks/skills
|

Cursor
原生外掛 + 7 hooks + MCP
|

OpenCode
擷取外掛 + MCP
|

Devin
6 hooks + skills + MCP
|

OpenClaw
原生外掛 + MCP
|

Hermes
原生外掛 + MCP
|

pi
原生外掛 + MCP
|

OpenHuman
原生 Memory trait 後端
|

Gemini CLI
MCP 伺服器
|

Antigravity
MCP + hooks
|
Claude Desktop
MCP 伺服器
|

Warp
connect + MCP + skills
|

Zed
MCP 伺服器
|

Cline
MCP 伺服器
|

Continue
MCP 伺服器
|

Droid
MCP 伺服器
|

Kiro
MCP 伺服器
|

Qwen Code
MCP 伺服器
|

DeepSeek Harness
MCP 伺服器
|

Roo Code
MCP 伺服器
|

Kilo Code
MCP 伺服器
|

Goose
MCP 伺服器
|

Aider
REST API
|
相容於任何能使用 MCP 或 HTTP 的代理。一個伺服器,記憶在它們之間共享。
---
你每次對話都要重複解釋同一套架構。你一再重新發現同樣的 bug。你反覆教它同樣的偏好。內建記憶(CLAUDE.md、.cursorrules)上限是 200 行,而且會過期。agentmemory 解決了這個問題。它會在背景靜默捕捉代理的行為,將其壓縮成可搜尋的記憶,並在下次會話開始時注入正確的上下文。一條指令。跨代理通用。
**會改變什麼:**第一次會話你設定了 JWT 驗證。第二次會話你要求加上限流。代理已經知道你的驗證使用 `src/middleware/auth.ts` 中的 jose middleware,你的測試涵蓋 token 驗證,而且你選擇 jose 而非 jsonwebtoken 是為了 Edge 相容性 — 不需要重新解釋,也不需要複製貼上。
```bash
npx -y @agentmemory/agentmemory@latest
```
預設情況下,agentmemory 會把 iii-engine 狀態儲存在你啟動它時所在的倉庫之外:macOS 上是 `~/Library/Application Support/agentmemory`,Linux 上是 `$XDG_DATA_HOME/agentmemory` 或 `~/.local/share/agentmemory`,Windows 上是 `%APPDATA%\agentmemory`。既有的舊版 `./data/state_store.db` 或 `./data/iii-config.yaml` 會在套用該平台預設值之前,先被用於實例 0。若要明確選擇位置,傳入 `--data-dir ` 或設定 `AGENTMEMORY_DATA_DIR`;這兩種明確設定都會優先於舊版探索機制:
```bash
npx -y @agentmemory/agentmemory@latest --data-dir ~/.agentmemory-projects/main
AGENTMEMORY_DATA_DIR=~/.agentmemory-projects/main npx -y @agentmemory/agentmemory@latest
```
原生與 Docker 啟動方式使用同一個解析出的主機目錄;Docker 會把它綁定掛載到 `/data`。`--instance 1` 會在解析出的目錄後面附加 `instance-1`,並選用另一組預設連接埠四件組 `3211/3212/3213/49234`。
最新版本的發布說明:[CHANGELOG.md](../CHANGELOG.md)。
---

|
### 檢索準確率
**coding-agent-life-v1**(內部語料庫,可在沙箱中重現)
| 配接器 | P@5 | R@5 | Top-5 命中率 | p50 延遲 |
|---|---|---|---|---|
| **agentmemory hybrid** | **0.240** | **1.000** | **15 / 15** | 14 ms |
| grep 基準線 | 0.227 | 0.967 | 15 / 15 | 0 ms |
在此語料庫的 **P@5 數學上限**(0.240,見計分卡)下,達成 100% 的 Top-5 命中率。混合檢索(Hybrid)找回了每一個黃金會話;grep 在多會話時間性查詢上漏掉了 2 個黃金中的 1 個。這裡的提升在於**召回 + 時間性**,而非整體精確度。此基準測試規模小且黃金樣本稀疏;下方規模更大的 LongMemEval-S 更能看出差異。完整的依類型分解與更正說明請見:[`docs/benchmarks/2026-05-20-coding-agent-life-v1.md`](../docs/benchmarks/2026-05-20-coding-agent-life-v1.md)。
**LongMemEval-S**(ICLR 2025,500 個問題)
| 系統 | R@5 | R@10 | MRR |
|---|---|---|---|
| **agentmemory** | **95.2%** | **98.6%** | **88.2%** |
| 僅 BM25 回退 | 86.2% | 94.6% | 71.5% |
|
### Token 節省
| 方法 | 每年 Token 數 | 每年成本 |
|---|---|---|
| 貼上完整上下文 | 19.5M+ | 不可行(超出上下文視窗) |
| LLM 摘要 | ~650K | ~$500 |
| **agentmemory** | **~170K** | **~$10** |
| agentmemory + 本地嵌入 | ~170K | **$0** |
|
> 嵌入模型:`all-MiniLM-L6-v2`(本地、免費、無需 API 金鑰)。完整報告:[`benchmark/LONGMEMEVAL.md`](../benchmark/LONGMEMEVAL.md)、[`benchmark/QUALITY.md`](../benchmark/QUALITY.md)、[`benchmark/SCALE.md`](../benchmark/SCALE.md)。競品比較:[`benchmark/COMPARISON.md`](../benchmark/COMPARISON.md),涵蓋 agentmemory 與 mem0、Letta、Khoj、supermemory、TencentDB Agent Memory、MemPalace、Zep/Graphiti、Cognee、Hippo 的對比。
**本機重現:** [`eval/README.md`](../eval/README.md),一個可插拔配接器的測試框架,涵蓋 LongMemEval `_s`(公開 500 題)+ `coding-agent-life-v1`(內部 15 會話語料庫)。Grep / 向量 / agentmemory 配接器並列評分,輸出 NDJSON,已發布的計分卡位於 [`docs/benchmarks/`](../docs/benchmarks/)。
**搭配 [codegraph](https://github.com/colbymchenry/codegraph)、[Understand Anything](https://github.com/Lum1104/Understand-Anything) 和 [Graphify](https://github.com/safishamsi/graphify) 使用效果更好。** 程式碼圖索引、多代理建置流程,以及跨文件 / PDF / 圖片 / 影片的更廣泛知識圖譜。agentmemory 負責記住這些工作成果;這三個專案則點亮情境層的其餘部分。使用方式與問題路由對照表:[`docs/recipes/pairings.md`](../docs/recipes/pairings.md)。
---

|
agentmemory |
mem0 (63K ⭐) |
Letta / MemGPT (24K ⭐) |
Khoj (36K ⭐) |
supermemory (29K ⭐) |
TencentDB Agent Memory (22K ⭐) |
MemPalace (54K ⭐) |
oracleagentmemory |
Hippo |
內建(CLAUDE.md) |
| 類型 |
記憶引擎 + MCP 伺服器 |
記憶層 API |
完整代理執行階段 |
個人 AI |
記憶 API + 應用程式 |
團隊記憶中樞(LLM 代理層) |
向量記憶(開源) |
記憶引擎(Oracle DB) |
記憶系統 |
靜態檔案 |
| 檢索 R@5 |
95.2% |
68.5% (LoCoMo) |
83.2% (LoCoMo) |
N/A |
自行回報 |
PersonaMem 76%(自行回報) |
~96.6%(自行回報) |
94.4%(自行回報) |
N/A |
N/A(grep) |
| 自動捕捉 |
12 hooks(零人工) |
手動呼叫 add() |
代理自行編輯 |
手動 |
API 端擷取 |
代理攔截(替換 base-URL) |
手動 |
API 擷取 |
手動 |
手動編輯 |
| 搜尋 |
BM25 + 向量 + 圖(RRF 融合) |
向量 + 圖 |
向量(封存) |
語意 |
向量 + RAG |
4 種資產類型(Chat / Skill / Wiki / CodeGraph) |
僅向量 |
向量 + 語意 |
衰減加權 |
把所有內容都載入上下文 |
| 多代理 |
MCP + REST + 租約 + 訊號 |
API(無協調機制) |
僅限於 Letta 執行階段內 |
否 |
否 |
團隊角色 + 共享資產 |
否 |
僅限範圍內 |
多代理共享 |
每個代理各自的檔案 |
| 框架綁定 |
無(任何 MCP 客戶端) |
無 |
高(必須使用 Letta) |
獨立 |
無 |
代理層攔截每一次模型呼叫 |
無 |
Oracle Database |
無 |
每個代理各自的格式 |
| 外部相依元件 |
無(SQLite + iii-engine) |
Qdrant / pgvector |
Postgres + 向量資料庫 |
多種 |
託管雲端 |
Docker 堆疊(Core + Hub + Proxy) |
向量儲存 |
Oracle AI Database |
無 |
無 |
| 記憶生命週期 |
4 層整合 + 衰減 + 自動遺忘 |
被動擷取 |
由代理管理 |
手動 |
自動遺忘 |
手動審查;自動路由功能開發中 |
無 |
未說明 |
衰減 + 整合 |
手動清理 |
| Token 效率 |
每會話約 1,900 個 token(每年 $10) |
依整合方式而異 |
核心記憶留在上下文中 |
依情況而異 |
雲端計價 |
未說明 |
無 token 預算 |
由 LLM 驅動(依情況而異) |
依情況而異 |
240 條觀測達 22K+ tokens |
| 即時檢視器 |
有(連接埠 3113) |
雲端儀表板 |
雲端儀表板 |
網頁介面 |
雲端儀表板 |
Hub 網頁介面 |
無 |
無 |
無 |
無 |
| 自行架設 |
有(預設) |
可選 |
可選 |
有 |
無(僅限雲端) |
有(Docker) |
有 |
有(Oracle DB) |
有 |
有 |
基準測試說明:只有 agentmemory 的 R@5 是我們自己量測的結果(LongMemEval-S,可從 benchmark/COMPARISON.md 重現)。mem0 和 Letta 的數字是它們公開發表的 LoCoMo 數據(屬於不同的資料集);MemPalace、supermemory、TencentDB(PersonaMem)和 oracleagentmemory 的數字是廠商自行回報、我們尚未獨立重現的宣稱(oracleagentmemory 的測試使用 GPT-5.5 對上 Oracle AI Database)。並列呈現僅供大致參考,並非在相同資料上的正面對比。星數為近似值,會隨時間變動。
值得關注的**新進者**,詳細比較見 [`benchmark/COMPARISON.md`](../benchmark/COMPARISON.md):
| 系統 | ⭐ | 切入點 |
|--------|---|-------|
| Zep / Graphiti | 30K | 時間性知識圖譜;已發表的時間性查詢結果最強(LongMemEval 63.8%),但圖是非同步建構,因此最新事實可能有延遲 |
| Cognee | 30K | 文件到知識圖譜的擷取,僅支援 Python,專為結構化實體擷取而設計,而非會話捕捉 |
這些都無法透過編碼代理的 hooks 自動捕捉、不附帶本地優先的檢視器,也無法在無金鑰下執行 — 而這正是 agentmemory 圍繞打造的組合。
---

相容性:本版本針對 `iii-sdk` 0.22.1,並釘住 iii-engine v0.22.1。
### 30 秒內試用
```bash
# Terminal 1: start the server
npx -y @agentmemory/agentmemory@latest
# Terminal 2: seed sample data and see recall in action
npx -y @agentmemory/agentmemory@latest demo
```
`demo` 會注入 3 個真實情境的會話(JWT 驗證、N+1 查詢修正、限流)並對它們執行搜尋。無金鑰安裝會停用向量,因此 `mem::search` 關鍵字查詢應能透過 BM25 命中,而 `database performance optimization` 可能回傳零筆結果。當圖資料存在時,`smart-search` 也可能額外回傳結構化的圖比對結果。若要讓語意查詢透過向量找到 N+1 修正,請設定 `EMBEDDING_PROVIDER=local`,重新啟動,並讓第一次的模型下載完成。
打開 `http://localhost:3113`,即時觀察記憶建構的過程。
### 驗證全新安裝與重啟後的持久化
在伺服器執行時,驗證 REST、健康檢查、檢視器,以及 iii 驅動的執行階段狀態:
```bash
curl -fsS http://localhost:3111/agentmemory/livez
curl -fsS http://localhost:3111/agentmemory/health
curl -fsS -o /dev/null http://localhost:3113/
npx -y @agentmemory/agentmemory@latest status
```
啟動就緒面板會涵蓋全部四個連接埠:REST/MCP HTTP 在 3111,iii 串流在 3112,檢視器在 3113,iii worker 的 WebSocket 在 49134。`status` 會確認 agentmemory 的健康狀態,以及目前使用的提供者/嵌入模式。儲存一筆探測資料並確認它可被搜尋到:
```bash
curl -fsS -X POST http://localhost:3111/agentmemory/remember \
-H 'Content-Type: application/json' \
-d '{"content":"agentmemory restart persistence probe","concepts":["install-check"]}'
curl -fsS -X POST http://localhost:3111/agentmemory/smart-search \
-H 'Content-Type: application/json' \
-d '{"query":"restart persistence probe","limit":5}'
```
然後執行 `npx -y @agentmemory/agentmemory@latest stop`,在終端 1 再次執行標準指令,等待 `/agentmemory/livez` 回應,再重複一次搜尋。那筆探測資料應該仍會被回傳。若你選用了自訂的 `--data-dir`,重新啟動時要傳入相同的目錄。
### 日常指令
安裝與設定請見上方的 [安裝](#install)(第一次執行會引導你完成設定)。日常使用:
```bash
agentmemory # start the server
agentmemory stop # stop it cleanly
agentmemory connect # wire another agent
agentmemory doctor # interactive diagnostics + fix prompts
agentmemory remove # uninstall everything we created
```
### 會話重播(Session Replay)
agentmemory 記錄的每個會話都可以重播。打開檢視器,選擇 **Replay** 分頁,拖動時間軸瀏覽:提示、工具呼叫、工具結果和回應會以獨立事件呈現,並支援播放/暫停、速度控制(0.5x 到 4x)和鍵盤快捷鍵(空白鍵切換播放,方向鍵逐步移動)。
若要匯入較舊的 Claude Code JSONL 逐字稿:
```bash
# Import everything under the default ~/.claude/projects
npx -y @agentmemory/agentmemory@latest import-jsonl
# Or import a single file
npx -y @agentmemory/agentmemory@latest import-jsonl ~/.claude/projects/-my-project/abc123.jsonl
```
匯入的會話會和原生會話一起出現在 Replay 選擇器中。底層每個條目都經由 `mem::replay::load`、`mem::replay::sessions` 和 `mem::replay::import-jsonl` 這些 iii 函式路由,沒有側通道伺服器。每份匯入的逐字稿都會被索引供搜尋、蓋上來源通道 `import` 的戳記,並被挖掘出會話結晶與教訓。
> **若你把 `import-jsonl` 當作主要的擷取路徑,請留意:**Claude Code 的 `cleanupPeriodDays`(在 `~/.claude/settings.json` 中,預設 **30**)會自動刪除超過該期限的 JSONL 逐字稿,從 `~/.claude/projects/` 中移除。若你在一個已有數個月歷史的 Claude Code 環境上全新安裝 agentmemory,超過 30 天的資料在第一次匯入前就已經消失。你可以把 `import-jsonl` 排進 cron、把 `cleanupPeriodDays` 調高,或是接上自動擷取的 hooks(預設的外掛安裝路徑),讓每個回合在會話還在進行時就落入 agentmemory,JSONL 清理就不再是問題。
### 升級 / 維護
當你刻意想更新本機執行階段時,使用維護指令:
```bash
npx -y @agentmemory/agentmemory@latest upgrade
```
警告:此指令會變更目前的工作區/執行階段。它可能更新 JavaScript 相依套件,並拉取釘住版本的 `iiidev/iii:0.22.1` Docker 映像檔。它永遠不會安裝未釘住或更新版本的 iii engine。
實作細節位於 `src/cli.ts`(參見 `src/cli.ts:544-595` 附近的 `runUpgrade`)。
### Claude Code(一段文字,直接貼上)
```text
Install agentmemory: run `npx -y @agentmemory/agentmemory@latest` in a separate terminal to start the memory server and its pinned iii engine. Then run `/plugin marketplace add rohitg00/agentmemory` and `/plugin install agentmemory` — the plugin registers all 12 hooks, 17 skills, AND auto-wires the `@agentmemory/mcp` stdio server via its `.mcp.json`, so you get 54 MCP tools (memory_smart_search, memory_save, memory_sessions, memory_governance_delete, etc.) without any extra config step. Verify with `curl http://localhost:3111/agentmemory/health`. The real-time viewer is at http://localhost:3113. Keyless mode disables vectors: `memory_recall` uses BM25, and `memory_smart_search` can also use existing structural graph data. Set `EMBEDDING_PROVIDER=local` in `~/.agentmemory/.env` and restart to opt into on-device semantic recall.
```
#### Claude Code 若未安裝外掛(MCP 獨立路徑)
若你直接透過 `~/.claude.json` 連接 agentmemory 的 MCP 伺服器,而不是使用 `/plugin install`,Claude Code 永遠不會解析 `${CLAUDE_PLUGIN_ROOT}`,你必須把 hook 腳本指向 `~/.claude/settings.json` 中的絕對路徑。這些路徑通常會嵌入 agentmemory 的版本號(例如 `~/.codex/plugins/cache/agentmemory/agentmemory/0.9.22/scripts/…`),因此下次升級會靜默破壞每一個 hook。
變通方法:
```bash
agentmemory connect claude-code --with-hooks
```
這會把同樣的 hook 指令合併到 `~/.claude/settings.json` 中,絕對路徑會解析到目前安裝的 `@agentmemory/agentmemory` 套件所捆綁的 `plugin/` 目錄。升級 agentmemory 後重新執行此指令以刷新路徑。同一檔案中既有的使用者條目會被保留;只有先前的 agentmemory 條目會被取代。仍然建議使用 `/plugin install` 路徑。
若用於遠端或受保護的部署,啟動 Claude Code 時請設定 `AGENTMEMORY_URL` 和 `AGENTMEMORY_SECRET`。外掛會把這兩個值都傳給它捆綁的 MCP 伺服器;當 `AGENTMEMORY_URL` 為空時,MCP shim 會使用 `http://localhost:3111`。
### Codex CLI(Codex 外掛平台)
```bash
# 1. start the memory server in a separate terminal
npx -y @agentmemory/agentmemory@latest
# 2. register the agentmemory marketplace and install the plugin
codex plugin marketplace add rohitg00/agentmemory
codex plugin add agentmemory@agentmemory
```
Codex 外掛來自與 Claude Code 外掛相同的 `plugin/` 目錄。它會註冊:
- 一個捆綁的 stdio MCP 橋接,直接連到執行中的常駐行程,不需要 npm 下載,也沒有退回儲存。參見[本機 Codex 指南](../docs/plugins/codex-local.md)以測試尚未發布的版本。
- 6 個生命週期 hooks:`SessionStart`、`UserPromptSubmit`、`PreToolUse`、`PostToolUse`、`PreCompact`、`Stop`
- 9 個可呼叫的 skills:`/recall`、`/remember`、`/session-history`、`/forget`、`/recap`、`/handoff`、`/lesson`、`/commit-context`、`/commit-history`,外加 8 個代理按需載入的參考 skills(memory discipline、MCP 工具、REST API、設定、代理、hooks、架構,以及 skill 撰寫指南)
Codex 的 hook 引擎會把 `CLAUDE_PLUGIN_ROOT` 注入 hook 子行程中(參見 [`codex-rs/hooks/src/engine/discovery.rs`](https://github.com/openai/codex/blob/main/codex-rs/hooks/src/engine/discovery.rs)),因此同樣的 hook 腳本可以在兩種宿主上運作,不需要重複實作。Subagent / SessionEnd / Notification / TaskCompleted / PostToolUseFailure 事件僅限 Claude Code,Codex 不會註冊這些事件。
#### Codex hook 信任與相容性
原生外掛 hook 分發已在 Codex CLI 0.150.1 上驗證。在期待擷取生效之前,先信任外掛 hooks。Desktop 的行為取決於其捆綁的執行環境;在啟用變通方法之前,先檢查 `/hooks` 並確認已擷取到一個事件。
如果你的宿主需要全域 hooks,請把這些指令鏡像到 `~/.codex/hooks.json`。當 MCP 已經接好後,目前的連接器需要 `--force` 才能完成 hook 安裝:
```bash
agentmemory connect codex --with-hooks --force
```
這會合併全域 hooks 並重寫 agentmemory 的 MCP 條目,同時保留不相關的條目。在使用 `--force` 之前,先檢查你自訂的 agentmemory 端點設定。升級後重新執行以刷新腳本路徑。只啟用原生外掛 hooks 或全域副本中的一種,以避免重複擷取。
### GitHub Copilot CLI
對於 VS Code 代理模式,請參閱[Copilot MCP 與自動擷取指南](../docs/plugins/copilot.md#vs-code-copilot-local-agent-sessions)。CLI 連接器不會設定 VS Code。
```bash
# MCP-only wiring
agentmemory connect copilot-cli
# Alternatively, full hooks/skills plugin from the GitHub subdir
copilot plugin install rohitg00/agentmemory:plugin
```
`agentmemory connect copilot-cli` 會把 `mcpServers.agentmemory` 合併進 `~/.copilot/mcp-config.json`(或設定了 `COPILOT_HOME` 時的 `$COPILOT_HOME/mcp-config.json`),並保留既有的伺服器設定。在原生 Windows 上,這是唯一自動化的 `connect` 轉接器;其他每個原生 Windows 代理都需要手動設定。只有當目標代理也安裝在同一個 WSL 環境中時,在 WSL 中執行 `connect` 才有意義。Copilot 會在下次啟動或執行 `/mcp` 後取得這個 MCP 伺服器。若想要完整的 hook/skill 體驗,也請安裝外掛。
OpenClaw(貼上這段提示)
```text
Install agentmemory for OpenClaw. Run `npx -y @agentmemory/agentmemory@latest` in a separate terminal to start the memory server on localhost:3111. Then add this to my OpenClaw MCP config so agentmemory is available with all 54 memory tools:
{
"mcpServers": {
"agentmemory": {
"command": "npx",
"args": ["-y", "@agentmemory/mcp"],
"env": {
"AGENTMEMORY_URL": "http://localhost:3111"
}
}
}
}
Restart OpenClaw. Verify with `curl http://localhost:3111/agentmemory/health`. Open http://localhost:3113 for the real-time viewer. For deeper memory-slot integration, copy `integrations/openclaw` to `~/.openclaw/extensions/agentmemory` and enable `plugins.slots.memory = "agentmemory"` in `~/.openclaw/openclaw.json`.
```
完整指南:[`integrations/openclaw/`](../integrations/openclaw/)
Hermes Agent(貼上這段提示)
```text
Install agentmemory for Hermes. Run `npx -y @agentmemory/agentmemory@latest` in a separate terminal to start the memory server on localhost:3111. Then add this to ~/.hermes/config.yaml so Hermes can use agentmemory as an MCP server with all 54 memory tools:
mcp_servers:
agentmemory:
command: npx
args: ["-y", "@agentmemory/mcp"]
memory:
provider: agentmemory
Verify with `curl http://localhost:3111/agentmemory/health`. Open http://localhost:3113 for the real-time viewer. For deeper 6-hook memory provider integration (pre-LLM context injection, turn capture, MEMORY.md mirroring, system prompt block), copy integrations/hermes from the agentmemory repo to ~/.hermes/plugins/agentmemory.
```
完整指南:[`integrations/hermes/`](../integrations/hermes/)
### 其他代理
啟動記憶伺服器:`npx -y @agentmemory/agentmemory@latest`
#### 透過 `npx skills add` 使用原生 skills(50+ 代理)
agentmemory 以 Claude-Code 風格的 `/SKILL.md` 格式提供 17 個 skills:9 個可呼叫的動作 skills(`remember`、`recall`、`recap`、`handoff`、`forget`、`lesson`、`commit-context`、`commit-history`、`session-history`)和 8 個代理按需載入的參考 skills(`memory-discipline`、`agentmemory-mcp-tools`、`agentmemory-rest-api`、`agentmemory-config`、`agentmemory-agents`、`agentmemory-hooks`、`agentmemory-architecture`、`write-agentmemory-skill`)。這些參考 skills 內含從原始碼產生的資料表,因此永遠不會漂移。vercel-labs 的 [`skills`](https://npmjs.com/package/skills) CLI 會把它們自動安裝到發起代理的原生 skill 目錄中,支援 50+ 個代理(Claude Code、Cursor、Cline、Continue、Droid、Warp、Codex、Antigravity、Kiro、OpenCode、Goose、Roo、Trae、Windsurf 等):
```bash
npx skills add rohitg00/agentmemory -y # auto-detects the calling agent
npx skills add rohitg00/agentmemory -y -a warp # explicit agent
npx skills add rohitg00/agentmemory -y -a '*' # install to every installed agent
```
這與 `agentmemory connect ` 是**互補**的:
- `agentmemory connect ` 會寫入 MCP 伺服器設定,讓工具可用。
- `npx skills add rohitg00/agentmemory` 會安裝 skills,讓代理知道何時該呼叫它們。
對於 skills CLI 尚未涵蓋的少數代理(Zed v1.3.x 及更早版本),請自行把這 17 個 SKILL.md 檔案放到該代理的原生 skill 目錄下;同一種格式在任何地方都適用。
#### 標準 MCP 區塊
在每個使用 `mcpServers` 格式的宿主(Cursor、Claude Desktop、Cline、Roo Code、Gemini CLI、OpenClaw)上,agentmemory 的條目都是**同一個 MCP 伺服器區塊**:
```json
"agentmemory": {
"command": "npx",
"args": ["-y", "@agentmemory/mcp"],
"env": {
"AGENTMEMORY_URL": "${AGENTMEMORY_URL}",
"AGENTMEMORY_SECRET": "${AGENTMEMORY_SECRET}"
}
}
```
**把這個條目合併進既有的 `mcpServers` 物件**,而不是取代整個檔案。若檔案中已有其他伺服器,把 `agentmemory` 加在它們旁邊,作為 `mcpServers` 中的另一個鍵。若完全沒有 `mcpServers`,就把這個區塊貼進 `{ "mcpServers": { ... } }` 裡面。`${VAR}` 佔位符會在 MCP 伺服器啟動時從殼層繼承 `AGENTMEMORY_URL` / `AGENTMEMORY_SECRET`;未設定的變數會傳入空字串,shim 會回退到 `http://localhost:3111`。接好一次,就能同時涵蓋本機與遠端(k8s / 反向代理)部署。
| 代理 | 設定檔 | 備註 |
|---|---|---|
| **Cursor(僅 MCP)** | `~/.cursor/mcp.json` | 合併進 `mcpServers`,或使用 `agentmemory connect cursor`。網站上也提供一鍵式 deeplink。 |
| **Cursor(完整外掛)** | `.cursor-plugin/` | Cursor Marketplace 上架中(送審審核中),或透過 Cursor Settings → Plugins → 本機 checkout 安裝。會註冊 7 個自動擷取 hooks(sessionStart、beforeSubmitPrompt、preToolUse、postToolUse、postToolUseFailure、stop、sessionEnd)+ 17 個 skills + MCP 伺服器,`AGENTMEMORY_URL` / `AGENTMEMORY_SECRET` 由 Cursor 的外掛儀表板管理。可在 Cursor IDE 與 `cursor-agent` CLI 中運作;CLI 的 print-mode 提示會在會話結束時從會話逐字稿回填。 |
| **Claude Desktop** | `claude_desktop_config.json`(Application Support) | 合併進 `mcpServers`。編輯後重新啟動 Claude Desktop。 |
| **Cline / Roo Code / Kilo Code** | Cline MCP 設定(Settings UI → MCP Servers → Edit) | 同樣的 `mcpServers` 區塊。 |
| **Devin CLI(MCP + hooks)** | `~/.config/devin/config.json` | `agentmemory connect devin` 會合併 MCP 條目;`--with-hooks` 會再加上六個原生自動擷取 hooks(SessionStart、UserPromptSubmit、PreToolUse、PostToolUse、Stop、SessionEnd),使用 Devin 的小寫工具比對器。用 `devin mcp list` 和 devin 內的 `/hooks` 驗證。 |
| **Devin CLI(完整外掛)** | `plugin/.devin-plugin/` | 從 checkout 執行 `devin plugins install ./plugin`,會把全部 17 個 skills 註冊為 `/agentmemory:` 斜線指令,並加上 MCP 伺服器。Devin 外掛 hooks 無法觸發 `SessionStart`/`SessionEnd`,因此要搭配 `connect devin --with-hooks` 才能完整擷取會話。 |
| **Devin(雲端)** | Settings → Connections → MCP servers | 新增一個自訂 MCP(STDIO):指令 `npx`,參數 `-y @agentmemory/mcp@latest`,環境變數 `AGENTMEMORY_URL` 指向網路可連接的 agentmemory 部署,並加上 `AGENTMEMORY_SECRET`(雲端會話無法連到 localhost — 見 [`deploy/`](../deploy/))。把密鑰存進 Devin Secrets,然後用「Test listing tools」驗證全部 54 個工具都出現。 |
| **Gemini CLI** | `~/.gemini/settings.json` | `gemini mcp add agentmemory npx -y @agentmemory/mcp --scope user`(自動合併)。 |
| **GitHub Copilot CLI(僅 MCP)** | `~/.copilot/mcp-config.json` | `agentmemory connect copilot-cli` 會合併 `mcpServers.agentmemory`;Copilot 會在下次啟動或執行 `/mcp` 後取得它。 |
| **GitHub Copilot CLI(完整外掛)** | Copilot plugin install | 執行 `copilot plugin install rohitg00/agentmemory:plugin`,從 GitHub 子目錄安裝外掛。 |
| **OpenClaw** | OpenClaw MCP 設定 | 同樣的 `mcpServers` 區塊。更深入的整合:`openclaw plugins install ./integrations/openclaw` 會接管 OpenClaw 的記憶槽位(自動從 `memory-core` 切換過來);請設定 `plugins.entries.agentmemory.hooks.allowConversationAccess=true`,否則回合擷取會被靜默封鎖。見 [`integrations/openclaw`](../integrations/openclaw/)。 |
| **Codex CLI(僅 MCP)** | `.codex/config.toml` | TOML 格式:`codex mcp add agentmemory -- npx -y @agentmemory/mcp`,或手動新增 `[mcp_servers.agentmemory]`。 |
| **Codex CLI(完整外掛)** | Codex plugin marketplace | 先執行 `codex plugin marketplace add rohitg00/agentmemory`,再執行 `codex plugin add agentmemory@agentmemory`。會註冊 MCP + 6 個生命週期 hooks + 17 個 skills。請在你的宿主上信任 hooks 並驗證擷取是否生效;參見[Codex 設定與驗證](../docs/plugins/codex-local.md)。 |
| **OpenCode(僅 MCP)** | `opencode.json` | 格式不同:頂層 `mcp` 鍵,指令為陣列:`{"mcp": {"agentmemory": {"type": "local", "command": ["npx", "-y", "@agentmemory/mcp"], "enabled": true}}}`。 |
| **OpenCode(完整外掛)** | `plugin/opencode/` | 22 個自動擷取 hooks,涵蓋會話生命週期、訊息、工具、錯誤。專案歸屬是以會話為單位,因此一個橫跨多個倉庫的 OpenCode 行程,會把每個會話各自歸入它自己的專案。提供兩個斜線指令(`/recall`、`/remember`)。把 `plugin/opencode/` 複製到你的 OpenCode 工作區,並在 `opencode.json` 中加入外掛條目。完整的 hook 對照表 + 差異分析見 [`plugin/opencode/README.md`](../plugin/opencode/README.md)。 |
| **pi** | `~/.pi/agent/extensions/agentmemory` | `agentmemory connect pi` 會把捆綁的擴充功能安裝到 pi 的自動探索目錄(代理啟動時召回、代理結束時捕捉、`memory_search` / `memory_save` / `memory_health` 工具、`/agentmemory-status`)。在執行中的 pi 裡,`/reload` 即可套用。[`integrations/pi`](../integrations/pi/) 也是一個 pi 套件(從 checkout 執行 `pi install ./integrations/pi`)。 |
| **Hermes Agent** | `~/.hermes/config.yaml` | `cp -r integrations/hermes ~/.hermes/plugins/agentmemory` 搭配 `memory.provider: agentmemory`,即可取得 6-hook 記憶提供者(prefetch、回合捕捉、session end、pre-compress、MEMORY.md 鏡像、system prompt block)。用 `hermes plugins doctor` 和 `hermes memory status` 驗證。見 [`integrations/hermes`](../integrations/hermes/)。 |
| **Qwen Code** | `~/.qwen/settings.json` | `agentmemory connect qwen` 會寫入標準的 `mcpServers` 區塊。hook 的負載欄位與 Claude Code 相容,因此既有的 12-hook 腳本不用修改就能運作;透過同一個 `settings.json` 中的 `hooks` 區塊接上它們。 |
| **Antigravity IDE / 2.0** | `~/.gemini/config/mcp_config.json` | `agentmemory connect antigravity --with-hooks` 會在共用的自訂目錄中安裝 MCP 和擷取 hooks。參見[Antigravity 設定與限制](../docs/plugins/antigravity.md)。 |
| **Antigravity CLI**(`agy`) | `~/.gemini/config/mcp_config.json` | `agentmemory connect antigravity-cli --with-hooks` 使用與目前 IDE 版本相同的 MCP 和 hook 設定。既有安裝應使用 `--force` 刷新;參見[升級說明](../docs/plugins/antigravity.md)。 |
| **Kiro** | `~/.kiro/settings/mcp.json` | `agentmemory connect kiro` 會寫入使用者層級的設定。工作區層級的覆寫請放在你程式碼旁的 `.kiro/settings/mcp.json`。 |
| **Warp** | `~/.warp/.mcp.json` | `agentmemory connect warp` 會寫入標準的 `mcpServers` 區塊。Warp 也會自動從 `.claude/skills/` 探索 skills;一旦安裝了 Claude Code 外掛,8 個 agentmemory skills(`remember`、`recall`、`recap`、`handoff`、`forget`、`commit-context`、`commit-history`、`session-history`)就會原生出現在 Warp 的斜線指令選單中。 |
| **Cline(CLI)** | `~/.cline/mcp.json` | `agentmemory connect cline` 會寫入標準的 `mcpServers` 區塊。VS Code 擴充功能使用者:透過 Cline Settings → MCP Servers → Edit JSON 貼上同一個區塊。 |
| **Continue.dev** | `~/.continue/config.yaml`(建議)或 `config.json`(舊版) | 當兩者都不存在時,`agentmemory connect continue` 會從零建立 `config.yaml`;若已有 `config.json`,則會修改既有檔案。**若你已經有 `config.yaml`**,轉接器會印出可直接貼在 `mcpServers:` 下的確切區塊;它不會靜默改寫你的 yaml,因為要安全保留註解與錨點需要一個套件未隨附的 YAML 解析器。Continue 的 `mcpServers` 使用陣列格式(而非物件)。 |
| **Zed** | `~/.config/zed/settings.json` | `agentmemory connect zed` 會寫入 `context_servers`(Zed 自己的鍵,**不是** `mcpServers`)。遠端 MCP 伺服器可改用 `{"url": "..."}` 接上。 |
| **Droid(Factory.ai)** | `~/.factory/mcp.json` | `agentmemory connect droid` 會寫入標準的 `mcpServers` 區塊。專案層級的覆寫請放在 `/.factory/mcp.json`。傳入 `--with-hooks` 以取得原生自動擷取。 |
| **DeepSeek Harness** | `$DSH_HOME/cordis.patch.yml` | `agentmemory connect dsh` 會在每個 Harness profile 都會載入的家目錄層級 patch layer 中,附加一列 `@deepseek-ai/dsh-mcp-client`;工具會以 `mcp__agentmemory__*` 註冊。傳入 `--with-hooks` 也接上自動擷取:捆綁的 Claude Code hook 腳本會透過 Harness 官方的 `@deepseek-ai/dsh-hooks-claude-code` 橋接器(SessionStart、UserPromptSubmit、PreToolUse、PostToolUse、Stop)執行,透過寫入 `$DSH_HOME/agentmemory.hooks.json` 的清單檔運作。未設定 `DSH_HOME` 時預設為 `~/.dsh`。 |
| **Goose** | Goose MCP 設定介面 | 同樣的 `mcpServers` 區塊;使用 `goose configure` → Add Extension → MCP。也支援直接編輯 `~/.config/goose/config.yaml`,但其格式使用 `extensions:` + `cmd`(而非 `mcpServers:` + `command`)。 |
| **Aider** | 不適用 | 直接呼叫 REST API:`curl -X POST http://localhost:3111/agentmemory/smart-search -d '{"query": "auth"}'`。 |
| **任何代理(32+)** | 不適用 | `npx skillkit install agentmemory` 會自動偵測宿主並合併設定。 |
**沙箱化的 MCP 客戶端**(Flatpak / Snap / 限制較嚴格的容器)若無法連到宿主的 `localhost`:請在 `env` 區塊中也設定 `"AGENTMEMORY_FORCE_PROXY": "1"`,並讓 `AGENTMEMORY_URL` 指向沙箱實際能連到的路徑(例如你的 LAN IP)。
### 程式化存取(Python / Rust / Node)
agentmemory 把它的核心操作註冊為 iii 函式(`mem::remember`、`mem::observe`、`mem::context`、`mem::smart-search`、`mem::forget`)。任何擁有 iii SDK 的語言都可以透過 `ws://localhost:49134` 直接呼叫它們,不需要為每種語言準備獨立的 REST 用戶端。
```bash
pip install iii-sdk # Python
cargo add iii-sdk # Rust
npm install iii-sdk # Node
```
```python
from iii import register_worker
iii = register_worker("ws://localhost:49134")
iii.connect()
iii.trigger({
"function_id": "mem::smart-search",
"payload": {"project": "demo", "query": "how do tokens refresh"},
})
```
完整範例:[`examples/python/`](../examples/python/)(快速開始 + 觀測/召回流程)。對於沒有 iii 執行階段的宿主,`:3111` 上的 REST 仍然可用。
### 從原始碼建置
```bash
git clone https://github.com/rohitg00/agentmemory.git && cd agentmemory
npm install && npm run build && npm start
```
若已安裝釘住版本的執行檔,這會以本機 `iii-engine` 啟動 agentmemory;若選擇使用 Docker Compose,則透過它啟動。REST、串流和檢視器預設綁定 `127.0.0.1`。macOS/Linux 的自動安裝執行檔路徑需要 `curl`、POSIX `sh` 和 `tar`。
手動安裝 `iii-engine`。**agentmemory 目前把 `iii-engine` 釘在 `v0.22.1`**,與其 `iii-sdk` 相依套件是同一個版本;worker 使用該引擎的 wire 協定,而 0.20.0 重組了 SDK 的介面,因此這兩者在 agentmemory 的每個版本中會一起移動。若你執行自己的引擎並確定版本相符,可用 `AGENTMEMORY_III_VERSION=` 覆寫。
- **macOS arm64:** `mkdir -p ~/.local/bin && curl -fsSLo iii.tar.gz https://github.com/iii-hq/iii/releases/download/iii/v0.22.1/iii-aarch64-apple-darwin.tar.gz && echo "2b309019b909a896cae874dc947e2cdf877b4f3c51dd026b79850af858517fa4 iii.tar.gz" | shasum -a 256 -c - && tar -xzf iii.tar.gz -C ~/.local/bin && chmod +x ~/.local/bin/iii`
- **macOS x64:** 把 `aarch64-apple-darwin` 換成 `x86_64-apple-darwin`
- **Linux x64:** 換成 `x86_64-unknown-linux-gnu`
- **Linux arm64:** 換成 `aarch64-unknown-linux-gnu`
- **Windows:** 從 [iii-hq/iii releases v0.22.1](https://github.com/iii-hq/iii/releases/tag/iii%2Fv0.22.1) 下載 `iii-x86_64-pc-windows-msvc.zip`,並把 `iii.exe` 解壓到 `%USERPROFILE%\.agentmemory\bin\iii.exe`
每個封存檔在發布頁面上都有對應的 `.sha256` 檔案;換平台時,請在上面的檢查中使用該檔案的雜湊值(Windows 上用 `Get-FileHash`)。`npx @agentmemory/agentmemory` 中的自動安裝程式會釘住這些雜湊值,並拒絕任何不符合的封存檔。
或使用 Docker(捆綁的 `docker-compose.yml` 會拉取 `iiidev/iii:0.22.1`)。完整文件:[iii.dev/docs](https://iii.dev/docs)。
### Windows
agentmemory 可在 Windows 10/11 上執行,但光有 Node.js 套件還不夠;你還需要釘住版本 iii-engine v0.22.1 的執行階段作為背景行程。CLI 不會自動解壓 Windows 的 ZIP,因此原生 Windows 使用者必須手動安裝 `iii.exe`、使用 WSL2,或選擇 Docker Desktop。
原生 Windows 的自動化 MCP 接線只支援 `agentmemory connect copilot-cli`。對於 Claude Code、Codex、Cursor 以及其他每個原生 Windows 代理,請把 [其他代理](#other-agents) 中的手動 MCP 區塊複製到該代理的 Windows 設定中。只有當目標代理也安裝在同一個 WSL 環境中時,在 WSL 中執行 `connect` 才是合適的作法;它不會編輯 Windows 宿主代理的設定。
**選項 A:預建的 Windows 執行檔(建議)**
```powershell
# 1. Open https://github.com/iii-hq/iii/releases/tag/iii%2Fv0.22.1 in your browser
# (agentmemory pins the engine to the same release as its iii-sdk;
# v0.22.1 is the current pair)
# 2. Download iii-x86_64-pc-windows-msvc.zip
# (or iii-aarch64-pc-windows-msvc.zip if you're on an ARM machine)
# 3. Extract iii.exe to agentmemory's private engine directory:
New-Item -ItemType Directory -Force "$HOME\.agentmemory\bin"
# Copy iii.exe to $HOME\.agentmemory\bin\iii.exe
# 4. Verify:
& "$HOME\.agentmemory\bin\iii.exe" --version
# Should print: 0.22.1
# 5. Then run agentmemory as usual:
npx -y @agentmemory/agentmemory@latest
```
**選項 B:Docker Desktop**
```powershell
# 1. Install Docker Desktop for Windows
# 2. Start Docker Desktop and make sure the engine is running
# 3. Select Docker explicitly and run agentmemory:
$env:AGENTMEMORY_USE_DOCKER = "1"
npx -y @agentmemory/agentmemory@latest
```
**選項 C:僅獨立 MCP(不需引擎)。** 若你的代理只需要 MCP 工具,不需要 REST API、檢視器或 cron 工作,可以完全略過引擎:
```powershell
npx -y @agentmemory/agentmemory@latest mcp
# or via the shim package:
npx -y @agentmemory/mcp
```
**Windows 診斷:** 若 `npx -y @agentmemory/agentmemory@latest` 失敗,重新加上 `--verbose` 執行以查看實際的引擎 stderr。常見的失敗情況:
| 症狀 | 解決方法 |
|---|---|
| `The engine process started but the REST API never responded.` | 確認四個衍生連接埠都是空的,確認釘住的 `iii.exe` 仍存活,然後加上 `--verbose` 重新執行並檢查擷取到的引擎 stderr |
| `Could not start iii-engine` | `iii.exe` 和 Docker 都沒有安裝。見上方選項 A 或 B |
| 連接埠衝突 | `netstat -ano \| findstr :3111` 查看是什麼佔用了連接埠,然後終止它或使用 `--port ` |
| 即使已安裝 Docker,仍跳過 Docker 回退 | 確認 Docker Desktop 確實在執行(系統匣圖示) |
> 注意:iii **engine** 是預先建置好的執行檔,不是 cargo crate,所以不要嘗試 `cargo install` 它。(iii **SDK** 發布在 crates.io、npm 和 PyPI 上,但 agentmemory 不需要它們。)支援的引擎安裝方式全都釘在 v0.22.1:上面的預建執行檔、agentmemory 的 macOS/Linux 自動安裝路徑(需要 `curl`、POSIX `sh` 和 `tar`),以及 Docker 映像檔 `iiidev/iii:0.22.1`。單純的上游 `install.sh | sh` 會安裝最新版引擎,agentmemory 不支援這種方式。請使用 `npx -y @agentmemory/agentmemory@latest`;在 macOS/Linux 上,它會把釘住版本的引擎抓取到 `~/.agentmemory/bin`。
---
部署
為託管主機提供的一鍵式範本。每個範本都附帶一個自成一體的 Dockerfile,會從 npm 拉取 `@agentmemory/agentmemory`,並從官方的 `iiidev/iii` Docker Hub 映像檔複製 iii engine 執行檔進去;不需要預先建置好的 agentmemory 映像檔。持久化儲存會掛載在 `/data`;首次開機的 entrypoint 會把 npm 捆綁的 iii 設定(綁定 `127.0.0.1`)覆寫成一份為部署調整過的設定,改為綁定 `0.0.0.0` 並使用絕對的 `/data` 路徑,產生 HMAC 密鑰,然後在執行 agentmemory CLI 之前,透過 `gosu` 把權限從 `root` 降為 `node`。


Render 的一鍵部署按鈕需要倉庫根目錄下有 `render.yaml`,而我們特意讓根目錄保持乾淨。請使用 [`deploy/render/`](.././deploy/render/README.md) 中說明的 Render Blueprint 流程,手動指向倉庫內的 blueprint。
完整的設定細節(HMAC 擷取、檢視器 SSH 通道、輪替、備份、最低成本)位於 [`deploy/`](.././deploy/README.md):
- [`deploy/fly`](.././deploy/fly/README.md):單台機器,`auto_stop_machines = "stop"`;閒置時最省錢。
- [`deploy/railway`](.././deploy/railway/README.md):Hobby 方案固定費用,磁碟區在儀表板中管理。
- [`deploy/render`](.././deploy/render/README.md):Blueprint 流程,付費方案會自動建立磁碟快照。
- [`deploy/coolify`](.././deploy/coolify/README.md):透過 [Coolify](https://coolify.io/self-hosted) 自行架設在你自己的 VPS 上;同一套 Docker Compose 堆疊,主機和資料都由你自己掌控。
只有連接埠 `3111` 會對外發布。容器內 `3113` 上的檢視器仍綁定在 loopback;每個範本的 README 都記載了連接它所需的 SSH 通道模式。
---

每個編碼代理在會話結束時都會遺忘一切,而每個新會話的開始,都是你重新解釋一次你的技術棧。agentmemory 在背景執行,移除了這個步驟。
```text
Session 1: "Add auth to the API"
Agent writes code, runs tests, fixes bugs
agentmemory silently captures every tool use
Session ends -> observations compressed into structured memory
Session 2: "Now add rate limiting"
Agent already knows:
- Auth uses JWT middleware in src/middleware/auth.ts
- Tests in test/auth.test.ts cover token validation
- You chose jose over jsonwebtoken for Edge compatibility
Zero re-explaining. Starts working immediately.
```
### 對比內建代理記憶
每個 AI 編碼代理都內建了記憶功能:Claude Code 有 `MEMORY.md`,Cursor 有 notepads,Cline 有 memory bank。這些都像便利貼一樣運作。agentmemory 則是便利貼背後那個可搜尋的資料庫。
| | 內建(CLAUDE.md) | agentmemory |
|---|---|---|
| 規模 | 上限 200 行 | 無上限 |
| 搜尋 | 把所有內容載入上下文 | BM25 + 向量 + 圖(僅 top-K) |
| Token 成本 | 240 條觀測達 22K+ | ~1,900 個 token(少 92%) |
| 跨代理 | 每個代理各自的檔案 | MCP + REST(任何代理) |
| 協調 | 無 | 租約、訊號、動作、例程 |
| 可觀測性 | 手動讀檔 | 連接埠 3113 的即時檢視器 |
---

### 記憶管線
```text
PostToolUse hook fires
-> SHA-256 dedup (5min window)
-> Privacy filter (strip secrets, API keys)
-> Store raw observation
-> Synthetic compression by default
(LLM-written compression only with a provider + AGENTMEMORY_AUTO_COMPRESS=true)
-> Vector embedding when an embedding provider is active
-> Index in BM25, plus vectors when enabled
Stop / SessionEnd hook fires
-> Summarize session
-> Knowledge graph extraction (if GRAPH_EXTRACTION_ENABLED=true)
-> Slot reflection (if SLOT_REFLECT_ENABLED=true)
SessionStart hook fires
-> Load project profile (top concepts, files, patterns)
-> Hybrid search (BM25 + vector + graph)
-> Token budget (default: 2000 tokens)
-> Inject into conversation
```
### 4 層記憶整合
以人腦處理記憶的方式為模型,包括睡眠時的記憶整合。
| 層級 | 內容 | 類比 |
|------|------|---------|
| **Working(工作記憶)** | 來自工具使用的原始觀測 | 短期記憶 |
| **Episodic(情節記憶)** | 壓縮後的會話摘要 | 「發生了什麼」 |
| **Semantic(語意記憶)** | 擷取出的事實與模式 | 「我知道什麼」 |
| **Procedural(程序記憶)** | 工作流程與決策模式 | 「該怎麼做」 |
記憶會隨時間衰減(艾賓浩斯曲線)。經常被存取的記憶會被強化。過期的記憶會自動被清除。矛盾會被偵測並解決。
### 會捕捉什麼
| Hook | 捕捉內容 |
|------|----------|
| `SessionStart` | 專案路徑、會話 ID |
| `UserPromptSubmit` | 使用者提示(經隱私過濾) |
| `PreToolUse` | 檔案存取模式 + 強化後的上下文 |
| `PostToolUse` | 工具名稱、輸入、輸出 |
| `PostToolUseFailure` | 錯誤情境 |
| `PreCompact` | 在壓縮前重新注入記憶 |
| `SubagentStart/Stop` | 子代理生命週期 |
| `Stop` | 會話結束摘要 |
| `SessionEnd` | 會話完成標記 |
### 主要功能
| 功能 | 說明 |
|---|---|
| **自動捕捉** | 每次工具使用都透過 hooks 記錄,不需人工操作 |
| **語意搜尋** | BM25 + 向量 + 知識圖譜,以 RRF 融合 |
| **記憶演化** | 版本管理、取代機制、關係圖 |
| **召回衛生** | 被取代的記憶版本會離開搜尋索引;KV 中的版本鏈保留完整歷史 |
| **近似重複提示** | 當新內容與既有記憶高度相似時,儲存回應會附上建議性的 `similarTo` 比對結果 |
| **按代理範圍劃分** | `agentId` 貫穿 REST、MCP 和搜尋索引的儲存與召回,支援共享或隔離模式 |
| **寫入時溯源** | 每條觀測和記憶都帶有不可變的來源通道(user、agent、tool、import 或 shared),在捕捉、儲存和匯入時蓋上戳記 |
| **自動遺忘** | TTL 過期、矛盾偵測、重要性驅逐 |
| **隱私優先** | API 金鑰、密鑰、`` 標籤在儲存前就會被移除 |
| **自我修復** | 斷路器、提供者回退鏈、健康監控 |
| **Claude 橋接** | 與 MEMORY.md 雙向同步 |
| **知識圖譜** | 實體擷取 + BFS 遍歷 |
| **團隊記憶** | 團隊成員之間的命名空間共享 + 私有 |
| **引用溯源** | 把任何記憶回溯到原始觀測 |
| **Git 快照** | 記憶狀態的版本、回滾、diff |
---

三路串流檢索,結合三種訊號:
| 串流 | 作用 | 何時啟用 |
|---|---|---|
| **BM25** | 具詞幹化與同義詞擴展的關鍵字比對 | 永遠開啟 |
| **Vector(向量)** | 稠密嵌入上的餘弦相似度 | 已設定嵌入提供者 |
| **Graph(圖)** | 透過實體比對進行知識圖譜遍歷 | 查詢中偵測到實體 |
以 Reciprocal Rank Fusion(RRF,k=60)融合,並做會話多樣化處理(每個會話最多 3 筆結果)。
當向量索引已有資料時,`mem::search`(`memory_recall` 背後)會使用混合的 BM25 + 向量排序器。沒有嵌入時則使用 BM25。當圖資料存在時,`smart-search` 還能額外融合結構化的圖比對結果,即使在無金鑰模式下也是如此。教訓召回在專用的記憶體內 BM25 索引上執行,而非每次查詢都掃描整個語料庫。被取代的記憶版本會從每一條召回路徑中排除;版本鏈保留它們的歷史。
向量可在崩潰或強制終止後存活。向量索引最多每 `AGENTMEMORY_INDEX_SAVE_INTERVAL_MS`(10 分鐘)以分桶方式儲存一次。期間新增或移除的每個向量,也會立即寫入狀態儲存中的一份小型待處理日誌,下次啟動時會重播它而不呼叫嵌入提供者。每次成功儲存都會清空該日誌。重播後仍沒有向量的文件,會在背景以每批 `AGENTMEMORY_VECTOR_BACKFILL_MAX`(500)筆的方式重新嵌入,直到沒有剩餘為止;被中止的回填會在下次啟動時繼續。`/agentmemory/status` 和檢視器會顯示待處理日誌大小與回填狀態。無金鑰安裝則完全不寫入任何內容。
BM25 開箱即可對希臘文、西里爾文、希伯來文、阿拉伯文和帶重音的拉丁文進行分詞。對於中文 / 日文 / 韓文的記憶,安裝選用的分詞器(`npm install @node-rs/jieba tiny-segmenter`),把 CJK 文字段切成詞級 token;若未安裝,agentmemory 會優雅地退回整段分詞,並在 stderr 上印出一次性提示。
### 嵌入提供者
無金鑰安裝會停用向量嵌入:`mem::search` 使用 BM25,而 `smart-search` 也可以使用既有的結構化圖資料。若要選擇加入免費的裝置端語意嵌入,請把以下內容加進 `~/.agentmemory/.env` 並重新啟動 agentmemory:
```env
EMBEDDING_PROVIDER=local
```
一般的 npm 安裝已包含選用的 `@huggingface/transformers` 執行階段。第一次的嵌入請求會下載 `Xenova/all-MiniLM-L6-v2`,因此需要網路存取,且可能耗時較久;之後的推論則在裝置端執行。遠端提供者會依其金鑰自動偵測,除非 `EMBEDDING_PROVIDER` 覆寫了它們。
| 提供者 | 模型 | 成本 | 備註 |
|---|---|---|---|
| **本地(建議選用)** | `all-MiniLM-L6-v2` | 免費 | 第一次模型下載後即為裝置端運算,召回率比僅用 BM25 高 +8pp |
| Gemini | `gemini-embedding-001` | 免費額度 | 支援 100+ 種語言,768/1536/3072 維(MRL),輸入上限 2048 token。取代已棄用的 `text-embedding-004`([2026 年 1 月 14 日停用](https://ai.google.dev/gemini-api/docs/deprecations)) |
| OpenAI | `text-embedding-3-small` | $0.02/1M | 品質最高 |
| Voyage AI | `voyage-code-3` | 付費 | 針對程式碼優化 |
| Cohere | `embed-english-v3.0` | 免費試用 | 通用型 |
| OpenRouter | 任何模型 | 依情況而異 | 多模型代理 |
---

54 個工具、6 個資源、3 個提示,以及 17 個 skills。
> **MCP shim 與完整伺服器的差異:** 已發布的 `@agentmemory/mcp` 套件只是一個薄 shim。只有當它能透過 `AGENTMEMORY_URL`(代理模式)連到一個執行中的 agentmemory 伺服器時,才會展示完整的 54 個工具。若沒有可連接的伺服器,shim 會回退到本機的 7 個工具組(`memory_save`、`memory_recall`、`memory_smart_search`、`memory_sessions`、`memory_export`、`memory_audit`、`memory_governance_delete`)。`AGENTMEMORY_TOOLS=core|all` 這個環境變數是*伺服器端*的旗標;在 shim 的 `env` 區塊中設定它不會有任何效果。若你在 Cursor / OpenCode / Gemini CLI 中只看到 7 個工具,請啟動 `npx -y @agentmemory/agentmemory@latest`(或 Docker 堆疊),並設定 `AGENTMEMORY_URL=http://localhost:3111`。
### 54 個工具
三種工具曝光範圍,由小到大:`AGENTMEMORY_TOOLS=core` 把可見範圍縮減到 8 個核心工具(`memory_save`、`memory_recall`、`memory_consolidate`、`memory_smart_search`、`memory_sessions`、`memory_diagnose`、`memory_lesson_save`、`memory_reflect`);下方的基礎集是註冊表中 14 個基礎工具;預設值(`AGENTMEMORY_TOOLS=all`)則展示全部 54 個。
基礎工具(14 個)
| 工具 | 說明 |
|------|-------------|
| `memory_recall` | 搜尋過去的觀測 |
| `memory_compress_file` | 壓縮 markdown 檔案,同時保留結構 |
| `memory_save` | 儲存一則洞見、決策或模式 |
| `memory_file_history` | 關於特定檔案的過去觀測 |
| `memory_patterns` | 偵測重複出現的模式 |
| `memory_sessions` | 列出最近的會話 |
| `memory_smart_search` | 混合語意 + 關鍵字搜尋 |
| `memory_vision_search` | 搜尋圖片觀測 |
| `memory_timeline` | 按時間排序的觀測 |
| `memory_profile` | 專案檔案(概念、檔案、模式) |
| `memory_export` | 匯出所有記憶資料 |
| `memory_relations` | 查詢關係圖 |
| `memory_commit_lookup` | 某個 git commit 背後的會話 |
| `memory_commits` | 某個會話記錄到的 commits |
擴充工具(總共 54 個,預設曝光範圍)
| 工具 | 說明 |
|------|-------------|
| `memory_patterns` | 偵測重複出現的模式 |
| `memory_timeline` | 按時間排序的觀測 |
| `memory_relations` | 查詢關係圖 |
| `memory_graph_query` | 知識圖譜遍歷 |
| `memory_consolidate` | 執行 4 層整合 |
| `memory_claude_bridge_sync` | 與 MEMORY.md 同步 |
| `memory_team_share` | 與團隊成員分享 |
| `memory_team_feed` | 最近共享的項目 |
| `memory_audit` | 操作的稽核紀錄 |
| `memory_governance_delete` | 帶稽核紀錄的刪除 |
| `memory_snapshot_create` | Git 版本化快照 |
| `memory_action_create` | 建立帶依賴關係的工作項目 |
| `memory_action_update` | 更新動作狀態 |
| `memory_frontier` | 依優先序排列的未阻塞動作 |
| `memory_next` | 單一最重要的下一步動作 |
| `memory_lease` | 獨佔式動作租約(多代理) |
| `memory_routine_run` | 實例化工作流例程 |
| `memory_signal_send` | 代理間訊息傳遞 |
| `memory_signal_read` | 讀取附回執的訊息 |
| `memory_checkpoint` | 外部條件閘門 |
| `memory_mesh_sync` | 實例之間的 P2P 同步 |
| `memory_sentinel_create` | 事件驅動的監看器 |
| `memory_sentinel_trigger` | 由外部觸發哨兵 |
| `memory_sketch_create` | 暫時性的動作圖 |
| `memory_sketch_promote` | 提升為永久項目 |
| `memory_crystallize` | 壓實動作鏈 |
| `memory_diagnose` | 健康檢查 |
| `memory_heal` | 自動修復卡住的狀態 |
| `memory_facet_tag` | 維度:值標籤 |
| `memory_facet_query` | 依面向標籤查詢 |
| `memory_verify` | 追溯來源 |
### 6 個資源 · 3 個提示 · 17 個 Skills
| 類型 | 名稱 | 說明 |
|------|------|-------------|
| 資源 | `agentmemory://status` | 健康狀態、會話數、記憶數 |
| 資源 | `agentmemory://project/{name}/profile` | 各專案的智慧情報 |
| 資源 | `agentmemory://project/{name}/recent` | 某專案最近的觀測 |
| 資源 | `agentmemory://memories/latest` | 最新 10 筆有效記憶 |
| 資源 | `agentmemory://graph/stats` | 知識圖譜統計 |
| 資源 | `agentmemory://team/{id}/profile` | 共享的團隊檔案 |
| 提示 | `recall_context` | 搜尋並回傳情境訊息 |
| 提示 | `session_handoff` | 代理之間的交接資料 |
| 提示 | `detect_patterns` | 分析重複出現的模式 |
| Skill | `/recall` | 搜尋記憶 |
| Skill | `/remember` | 儲存到長期記憶 |
| Skill | `/session-history` | 最近的會話摘要 |
| Skill | `/forget` | 刪除觀測/會話 |
此表只列出四個核心 skills。完整集合是 9 個可呼叫 skills 加上 8 個參考 skills;見上方關於原生 skills 的小節。
### 獨立 MCP
不需要完整伺服器,就能供任何 MCP 客戶端使用。以下兩種方式都可以:
```bash
npx -y @agentmemory/agentmemory@latest mcp # canonical (always available)
npx -y @agentmemory/mcp # shim package alias
```
或加入你代理的 MCP 設定:
大多數代理(Cursor、Claude Desktop、Cline、Roo Code、Gemini CLI):
```json
{
"mcpServers": {
"agentmemory": {
"command": "npx",
"args": ["-y", "@agentmemory/mcp"],
"env": {
"AGENTMEMORY_URL": "http://localhost:3111"
}
}
}
}
```
把 `agentmemory` 條目合併進宿主既有的 `mcpServers` 物件,而不是取代整個檔案。對於無法連到宿主 `localhost` 的沙箱化客戶端,請在 `env` 區塊中加入 `"AGENTMEMORY_FORCE_PROXY": "1"`,並把 `AGENTMEMORY_URL` 設為沙箱能連到的路徑。
OpenCode(`opencode.json`):
```json
{
"mcp": {
"agentmemory": {
"type": "local",
"command": ["npx", "-y", "@agentmemory/mcp"],
"enabled": true
}
},
"plugin": ["./plugins/agentmemory-capture.ts"]
}
```
從倉庫複製外掛檔案:
```bash
mkdir -p ~/.config/opencode/plugins
cp plugin/opencode/agentmemory-capture.ts ~/.config/opencode/plugins/
cp plugin/opencode/commands/*.md ~/.config/opencode/commands/
```
---

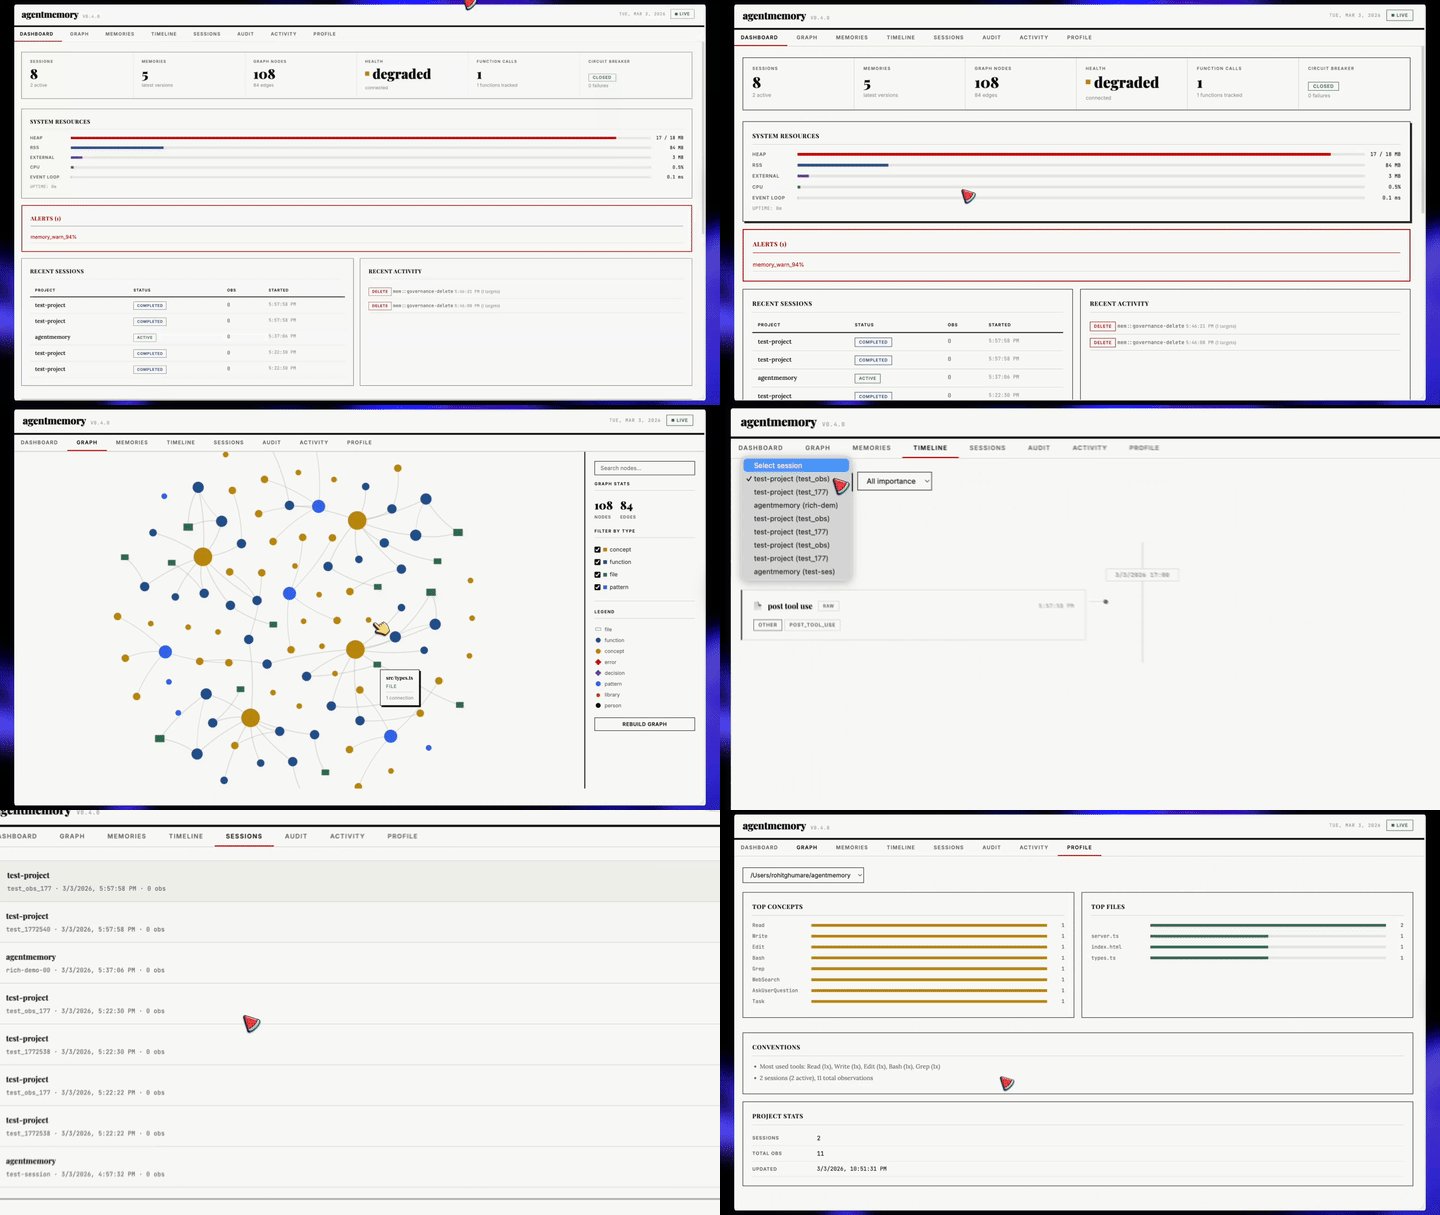
在連接埠 `3113` 自動啟動。檢視器連線時會載入一份快照(`GET /agentmemory/viewer/snapshot`),然後套用即時串流事件:新的記憶、教訓、觀測、稽核條目、圖變化和健康狀態更新都會自動出現,不需要輪詢或重新載入頁面。其他僅有的請求是你點擊的動作、「載入更多」分頁和搜尋。當串流中斷時,檢視器會顯示目前數字有多舊,並以退避策略重新連線,再從一份快照重新同步。
- **分成四組、共 12 個分頁**,具備即時計數、深層連結(`#memories/`、`#sessions/?obs=`、`#graph/`、`#health/consolidation`)、鍵盤快捷鍵和行動版選單。
- **Memories:** 伺服器端搜尋、依專案/代理/類型篩選、含版本鏈與字詞 diff 的詳細面板、溯源連結、可複製 id / MCP 呼叫 / curl 指令的按鈕、編輯(產生新版本)、確認後遺忘、批量遺忘,以及 JSON 匯出。
- **Sessions:** 內嵌的觀測時間軸,工具輸入與輸出清晰可讀,支援篩選與分頁,並顯示每個會話產生的記憶與教訓。
- **Graph:** 搜尋、附帶關係與來源的節點詳情、不只靠顏色辨識的圖例,以及縮放控制。
- **Health:** `GET /agentmemory/status` 的即時版本。每個問題都附帶解決方法,還有狀態後端、索引儲存狀態、圖溯源壓實進度,以及附上真實門檻值的整合說明。
- **Audit、Activity、Profile、Replay、Lessons、Actions 和 Crystals** 分頁,每個分頁的空狀態都會說明這個區段是什麼、為什麼是空的,以及填滿它的指令,並在每個術語和數字上都附有 `?` 詞彙提示。
```bash
open http://localhost:3113
```
檢視器伺服器預設綁定 `127.0.0.1`,並在把請求轉送給 REST API 時附上伺服器密鑰,因此不需要額外設定。由 REST 提供的 `/agentmemory/viewer` 端點遵循一般的 bearer-token 規則,並把沒有 token 的瀏覽器重新導向到檢視器連接埠。CSP 標頭使用每回應獨立的 script nonce,並停用行內處理常式屬性(`script-src-attr 'none'`)。
---
:3113 上的檢視器展示你的代理**記住了什麼**。[iii console](https://iii.dev/docs/console) 展示你的代理**做了什麼**:每個記憶操作都是一個 OpenTelemetry trace,每個 KV 條目都可編輯,每個函式都可呼叫,每個串流都可掛接監看。同一份記憶的兩個視窗:一個以產品為形,一個以引擎為形。
觀察一次 `memory_smart_search` 的觸發,以瀑布圖的形式看到 BM25 掃描 → 嵌入查找 → RRF 融合 → 重新排序器。在 KV 瀏覽器中編輯卡住的整合計時器。用調整過的負載重播一個 `PostToolUse` hook。釘選 WebSocket 串流,即時觀察觀測資料落地。
agentmemory 免費提供這一切,因為每個函式呼叫和觸發器都經由 iii 觸發;沒有自訂內容,也沒有需要插樁的地方。
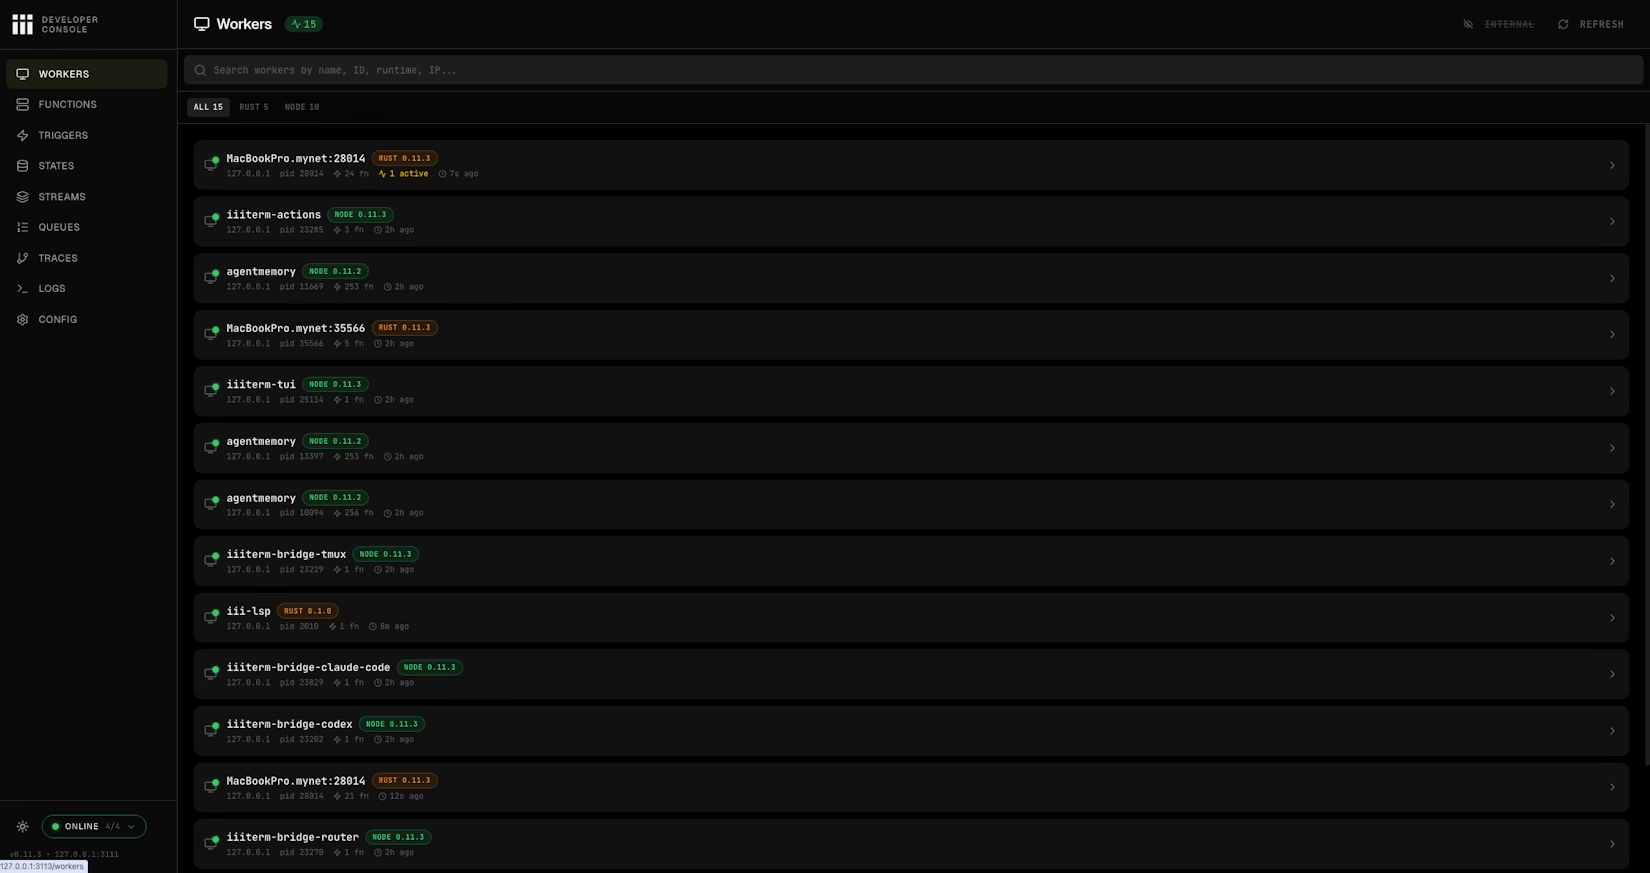
Workers 頁面:每個已連接的 worker,包括 agentmemory 本身,顯示 PID、函式數、執行階段和最後上線時間。
**已經內建安裝。** 主控台隨釘住版本的 iii engine(0.22+)一起提供;不需要另外安裝。第一次啟動會在引擎旁邊下載主控台執行檔。
**與 agentmemory 一起啟動:**
```bash
agentmemory console
```
這會針對 agentmemory 解析出的連接埠(REST、串流、橋接)執行釘住版本引擎的 `iii console`,並在檢視器連接埠之上一個連接埠提供服務,預設為 `http://localhost:3114`。`--console-port N` 可選用另一個連接埠;`--port` 和 `--instance` 會以和 `stop` 相同的方式選取 agentmemory 實例;任何其他旗標都會被原樣傳遞,例如 `--enable-flow` 用於實驗性的架構圖頁面。
手動執行同樣的事情,在 `agentmemory` 不在 PATH 中時很有用:
```bash
~/.agentmemory/bin/iii console --port 3114 \
--engine-port 3111 \
--ws-port 3112 \
--bridge-port 49134
```
**你可以在主控台中做的事:**
| 頁面 | 用途 |
|------|-----------|
| **Workers** | 查看每個已連接的 worker 及其即時指標,包括 agentmemory worker 本身。 |
| **Functions** | 直接以 JSON 負載呼叫 agentmemory 的任何函式;方便測試 `memory.recall`、`memory.consolidate`、`graph.query`,不需要接入用戶端。 |
| **Triggers** | 重播 HTTP、cron、事件和狀態觸發器:手動觸發整合 cron、重試某個 HTTP 路由、發出狀態變更。 |
| **States** | KV 瀏覽器,對會話、記憶槽位、生命週期計時器和嵌入索引提供完整的 CRUD;可就地編輯值。 |
| **Streams** | 即時 WebSocket 監視器,顯示流經 iii 串流的記憶寫入、hook 事件和觀測更新。 |
| **Queues** | 持久化佇列主題 + dead-letter 管理。重播或捨棄失敗的嵌入 / 壓縮工作。 |
| **Traces** | OpenTelemetry 瀑布圖 / 火焰圖 / 服務分解視圖。依 `trace_id` 過濾,精確查看單次 `memory.search` 產生了哪些函式、DB 呼叫和嵌入請求。 |
| **Logs** | 結構化的 OTEL 日誌,已與 trace/span ID 過濾並關聯。 |
| **Config** | 執行階段設定:精確查看你的引擎目前使用哪些 workers、提供者和連接埠。 |
| **Flow** | (選用,`--enable-flow`)每個 worker、觸發器和串流的互動式架構圖。 |
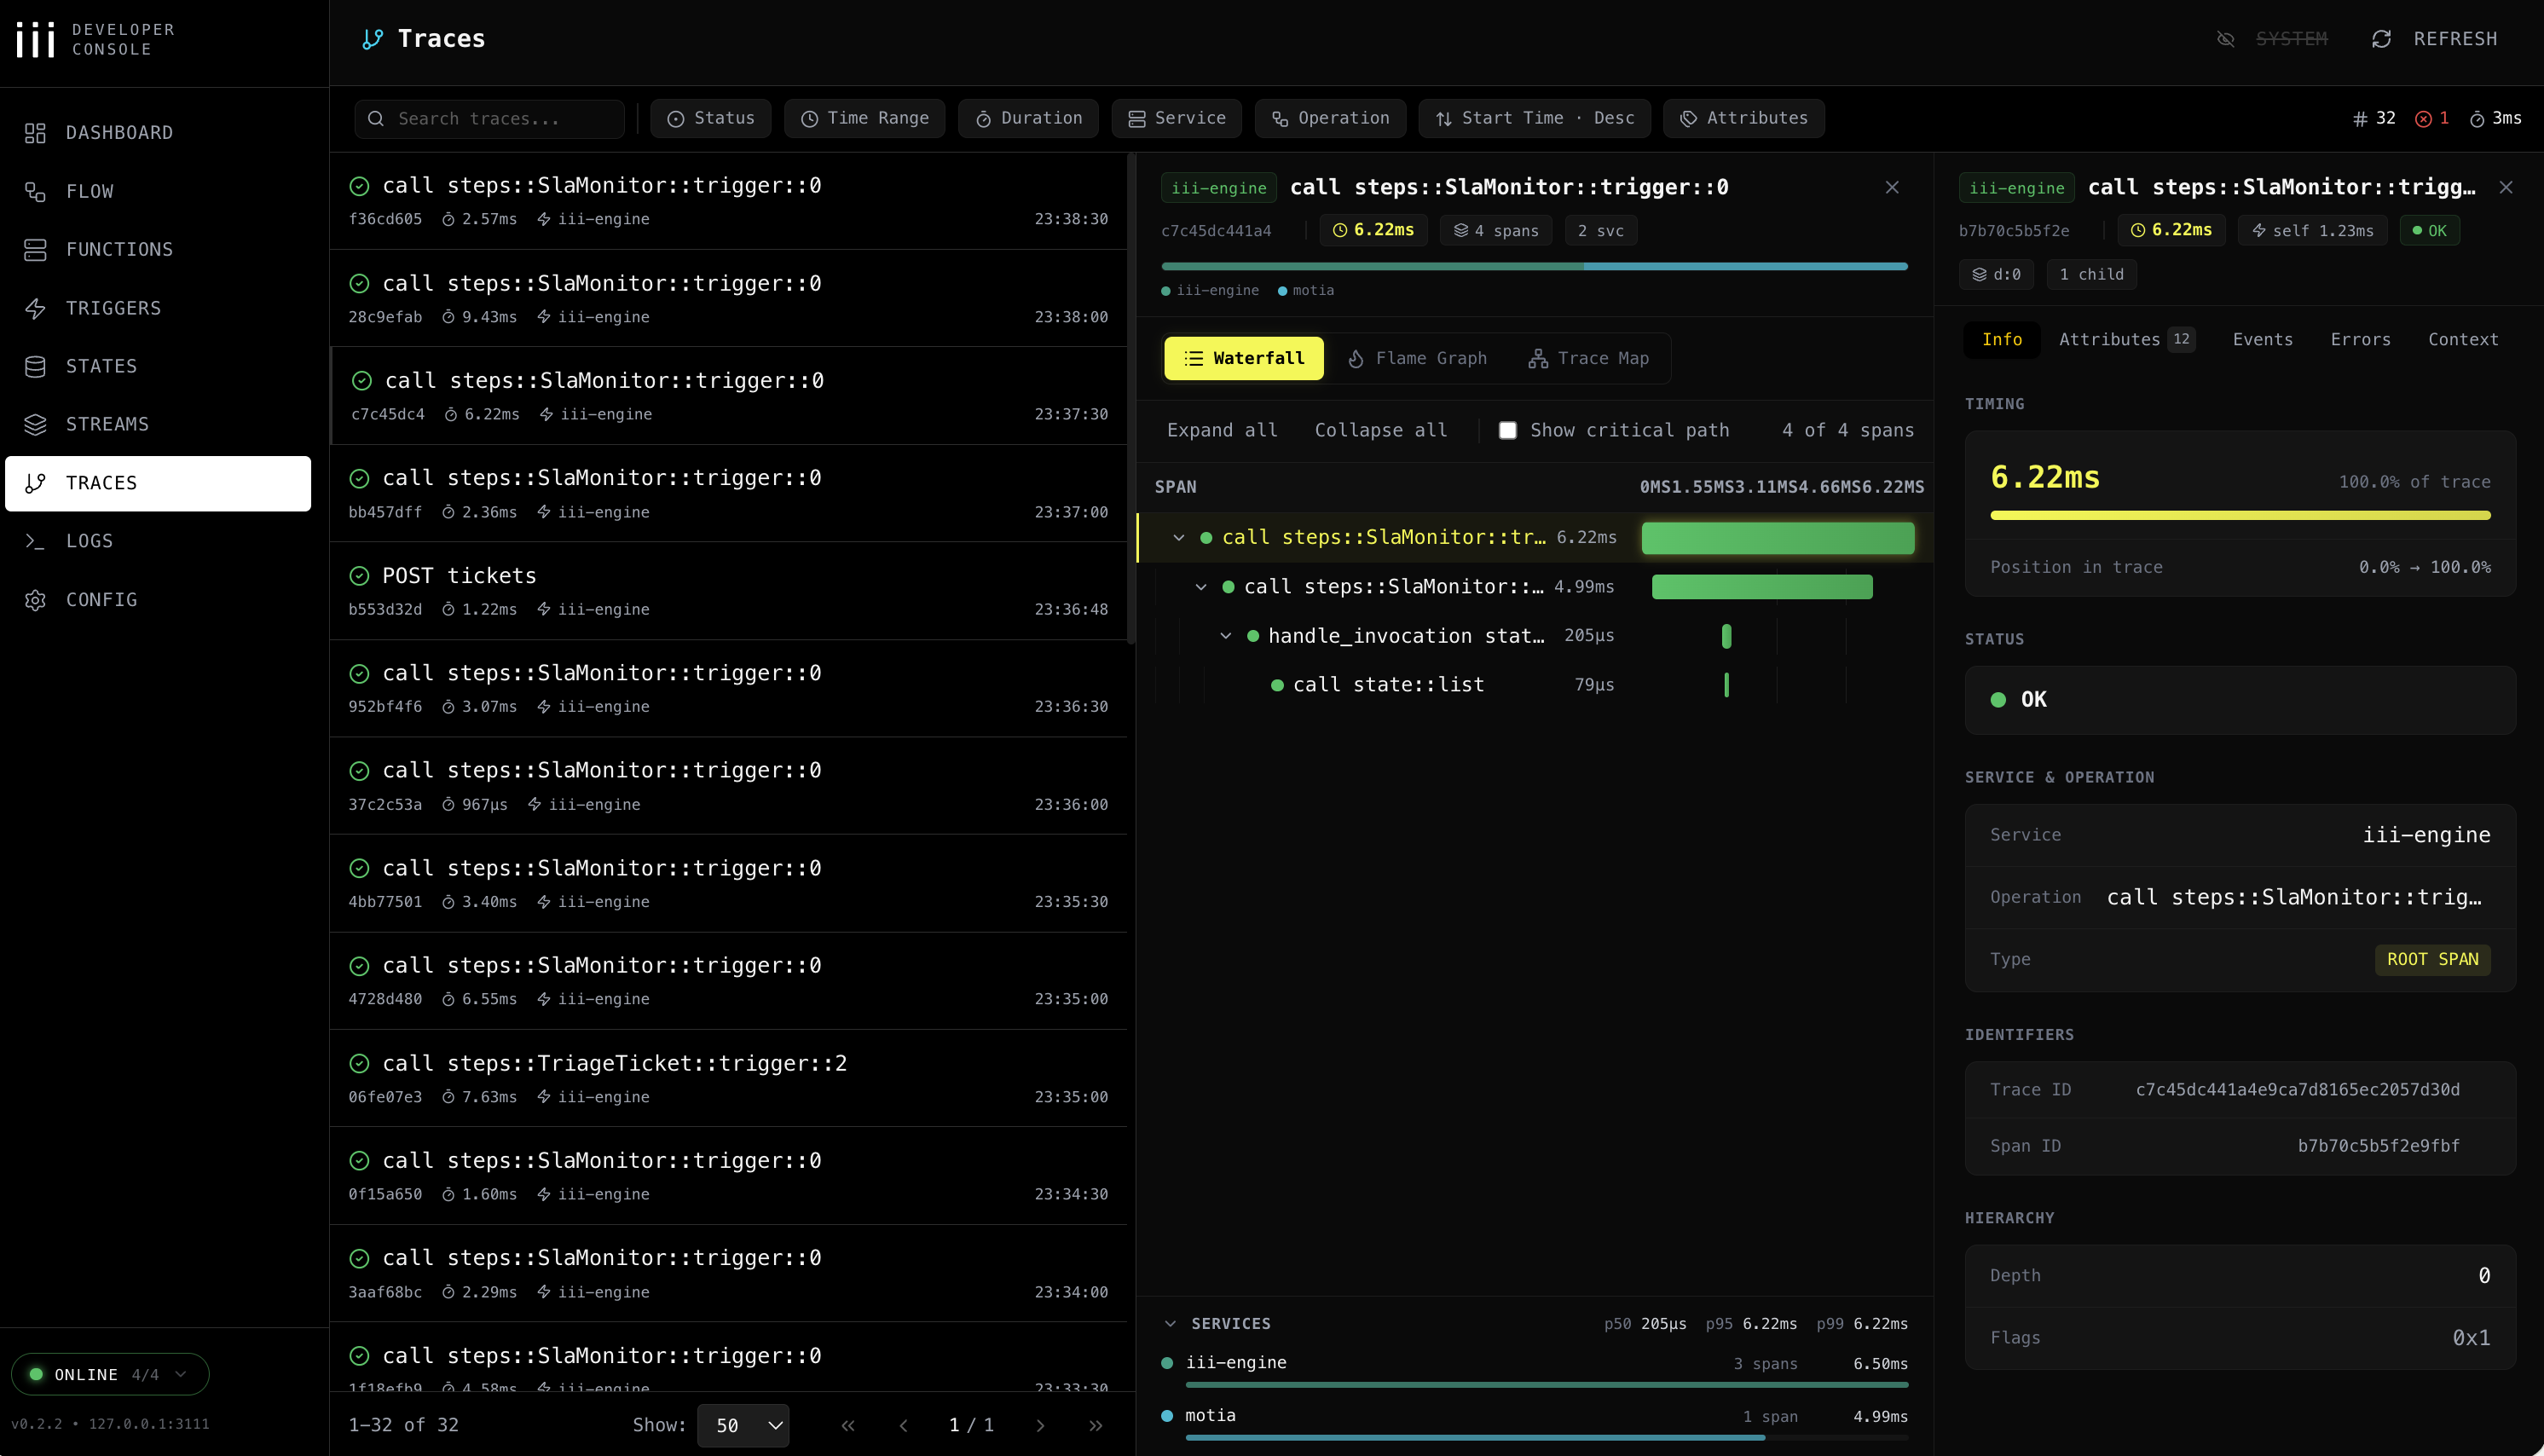
Traces:每個記憶操作的瀑布圖 / 火焰圖 / 服務分解視圖。
**Traces 預設已開啟:**
`iii-config.yaml` 預設啟用了 `iii-observability` worker(`exporter: memory`、`sampling_ratio: 0.1`,包含 metrics + logs)。不需要額外設定;agentmemory 一啟動,每個記憶操作就會發出主控台可以讀取的結構化日誌,其中十分之一(`sampling_ratio: 0.1`)還會發出一個 trace span。
若你想改為匯出到 Jaeger/Honeycomb/Grafana Tempo,把 `exporter: memory` 改為 `exporter: otlp`,並依 iii 的可觀測性文件設定收集器端點。
> **提醒:** 主控台本身不強制要求驗證;請讓它維持綁定在 `127.0.0.1`(預設值),絕對不要公開曝露它。
---

agentmemory **本身就是一個執行中的 [iii](https://iii.dev) 實例**。三種原語(worker、function、trigger)組成了這個執行階段;KV 狀態、串流和 OTEL traces 來自隨 iii 一起發布的 iii-state、iii-stream 和 iii-observability workers。你沒有安裝 Postgres、Redis、Express、pm2 或 Prometheus,因為 iii 已經取代了它們。
這意味著只要多一條指令,就能為 agentmemory 擴展出一整項全新的能力。
### 用更多 workers 擴展 agentmemory
agentmemory 所需的內建元件已經在 `iii-config.yaml` 中,並隨它一起啟動:`iii-state`(KV)、`iii-queue`(事件訂閱者的持久化重試)、`iii-pubsub`、`iii-cron`、`iii-stream`,以及 `iii-observability`(每個函式的 OTEL traces、metrics 和日誌)。[iii worker 註冊表](https://workers.iii.dev) 中的其他任何東西都能接入同一個引擎:把 `iii-config.yaml` 複製到 `~/.agentmemory/iii-config.yaml`(CLI 會優先使用這個檔案而非捆綁版本,並仍會把連接埠與資料路徑渲染進去),加入條目,用 `~/.agentmemory/bin/iii update worker` 安裝一次 worker 執行階段,然後重新啟動 agentmemory。
```yaml
workers:
# ...the bundled entries...
- name: database # SQL-backed state adapter when you outgrow the KV defaults
- name: iii-sandbox # run code that came out of memory_recall inside a throwaway VM
- name: mcp # extra MCP servers next to agentmemory's, same engine
```
| Worker | 在 agentmemory 之上多得到什麼 |
|---|---|
| [`database`](https://workers.iii.dev/workers/database) | 當你超出預設的記憶體內 KV 時,提供 SQL 支援的狀態配接器 |
| [`iii-sandbox`](https://workers.iii.dev/workers/iii-sandbox) | 讓 `memory_recall` 找出的程式碼在一個用過即丟的 VM 中執行,而不是在你的殼層中 |
| [`mcp`](https://workers.iii.dev/workers/mcp) | 在 agentmemory 的 MCP 伺服器旁架設額外的 MCP 伺服器,共用同一個引擎 |
在引擎 0.22.x 上,請保留上述內建元件的 `iii-` 前綴名稱;不帶前綴的 `http`、`state`、`queue`、`pubsub` 和 `cron` 條目,是 agentmemory 將隨 0.23 遷移過去的獨立註冊表 workers。
完整的註冊表:[workers.iii.dev](https://workers.iii.dev)。那裡的每個 worker 都是透過 agentmemory 所使用的同一套原語組成的,而你已經在用的 agentmemory 本身就是其中之一。
### 引擎設定與綁定位址
`agentmemory start` 會依序尋找第一個存在的檔案來讀取引擎設定:`AGENTMEMORY_III_CONFIG`、目前目錄下的 `./iii-config.yaml`、`~/.agentmemory/iii-config.yaml`,然後才是捆綁的 `iii-config.yaml`。每次啟動時,它都會把該檔案(資料路徑、連接埠、狀態後端)渲染進 `~/.agentmemory/data/iii-config.runtime.yaml`,並用渲染後的副本啟動引擎,所以要編輯的是來源檔案,而不是渲染後的檔案。來源檔案中的 `host:` 值會原樣保留。
捆綁的 `iii-config.yaml` 故意綁定 `127.0.0.1`,這個預設值在容器內也同樣適用。在容器中啟動的 CLI 會監聽容器自己的 loopback,因此對外發布的連接埠連不到任何東西。若要讓容器化的 CLI 透過對外發布的連接埠提供服務,請把 `AGENTMEMORY_III_CONFIG` 設為一份綁定 `0.0.0.0` 的設定。打包好的 `iii-config.docker.yaml` 就是這樣一份設定:它把 `iii-http`、`iii-stream` 和引擎連接埠都綁定到 `0.0.0.0`,並把狀態儲存在 `/data` 下,所以要在那裡掛載一個可寫入的磁碟區。請保持 `AGENTMEMORY_SECRET` 已設定,並只對外發布你需要的連接埠,綁定在 `127.0.0.1` 上,或放在你信任的代理後面。
這個倉庫的 `docker-compose.yml` 不會經過 CLI 的設定查找流程:它把 `iii-config.docker.yaml` 掛載在 `/app/config.yaml`,而 `iii-engine` 容器會以 `--config /app/config.yaml` 啟動。一鍵式 [部署範本](../deploy/) 會在它們的 entrypoint 中寫入自己的 `0.0.0.0` 設定。
### 儲存後端:file(預設)對比 redis
`iii-state` 和 `iii-stream` 預設使用 iii-engine 捆綁的檔案型 KV 儲存:每個範圍一個 JSON 檔案,保存在引擎行程的記憶體中,並依計時器寫回磁碟。這對單一使用者的本機安裝來說是正確的預設值;而有多個併發寫入者的共享常駐行程,則可以改用 Redis 取得真正的逐鍵寫入,代價是每次操作都要多一次網路往返(每個 `state::*` 呼叫仍會在同一個 Redis 連線上序列化,所以這是把檔案儲存的鎖換成一個 socket,而不是換來平行處理)。
設定 `AGENTMEMORY_STATE_BACKEND=redis`(再加上 `AGENTMEMORY_REDIS_URL`),即可把這兩個 workers 都切換到 iii-engine 內建的 `redis` 配接器,它會把每個鍵存成一個 Redis hash 欄位(`HSET`),而不是每次寫入都重寫整個範圍:
```env
# ~/.agentmemory/.env
AGENTMEMORY_STATE_BACKEND=redis
AGENTMEMORY_REDIS_URL=redis://localhost:6379
```
`AGENTMEMORY_STATE_BACKEND` 預設為 `file`;不設定它會保持現行行為不變,而一個無法識別的值(除了 `file` 或 `redis` 以外的任何值)會是啟動錯誤,而不是靜默回退。`/agentmemory/status` 和檢視器的 Health 頁面(State store 那一列)會回報目前啟用的是哪個後端,以及它是否有回應,但絕不會顯示 URL。
**只支援純 `redis://`。** 釘住版本的引擎(0.22.1)建置其 Redis 客戶端時沒有包含 TLS 支援,因此 `rediss://` 這種 URL(大多數受管理的 Redis 服務,例如 Upstash、Redis Cloud,以及開啟傳輸加密的 ElastiCache,預設都只接受 TLS)會連線失敗。這個連線是未加密的,因此 Redis 密碼和每一筆儲存的記憶都會以明文傳輸:請指向本機的 Redis,或你信任的私有網路上的 Redis。若要用其他的 Redis,請在 agentmemory 主機上執行一條加密通道(stunnel、SSH 或 VPN),讓那段純 `redis://` 的連線留在該主機內,而通道的上游連線則是加密且經過驗證的。若 Redis 密碼含有單引號,請將其百分號編碼(`%27`);引擎會在解析之前,先把這個 URL 展開進它的 YAML 設定中。
**每個 `--instance` 要用各自的 Redis 伺服器。** 引擎的 Redis 鍵前綴(`state:`、`stream::`)是固定的,因此指向同一個資料庫的兩個 agentmemory 實例(`--instance 1`、`--instance 2`……)會互相覆寫對方的資料。分開的資料庫索引(`redis://localhost:6379/1`)可以讓儲存的資料分開,但引擎是透過單一個 Redis pub/sub 頻道(`stream::events`)轉送即時檢視器事件的,而 Redis pub/sub 不理會資料庫索引,所以每個實例的檢視器仍會顯示另一個實例的即時事件。當你同時執行多個實例時,請讓每個實例擁有自己的 Redis 伺服器(或連接埠)。
**什麼維持不變,什麼不一樣。** agentmemory 的每項功能在 Redis 上都能運作:會話、觀測、記憶(remember、supersede、evolve、forget)、搜尋與索引分桶、教訓、圖、稽核日誌及其月份範圍、匯出與匯入、治理刪除、整合狀態、檢視器快照及其即時串流,以及健康監控。引擎會把每個範圍儲存為一個 Redis hash(`HSET`/`HGET`/`HGETALL`),並觸發與檔案儲存相同的狀態觸發器。有三個引擎層級的差異由 agentmemory 內部自行處理:
- Redis 回傳某個範圍的紀錄時沒有固定順序。agentmemory 會依記錄 id 中的建立時間、再依其時間戳記,把它們排成最舊在前,讓列表、分頁和匯出區塊的順序與檔案儲存一致。
- 引擎在 Redis 上以一個 Lua 腳本套用部分更新,而該腳本會把空陣列變成空物件。agentmemory 會在 Redis 上自行套用這些更新(在逐鍵鎖之下讀取、變更、寫入),因此像 `tags: []` 這樣的欄位能保持為陣列。
- 舊版的稽核日誌檢查會從 Redis 讀取舊的範圍,而不是在磁碟上尋找檔案儲存的檔案。
有一個差異需要你介入:**Redis 重新啟動後,引擎會停止向檢視器轉送即時事件**,直到 agentmemory 重新啟動為止。資料仍會正常儲存和讀取。健康監控每 30 秒會透過 Redis 傳送一個測試事件;若收不到回應,`/agentmemory/status` 和檢視器的 Health 頁面會顯示「即時更新沒有送達檢視器」,並附上解決方法:重新啟動 agentmemory。若 Redis 已經掛掉,狀態回報會顯示「狀態儲存沒有回應」,以及如何檢查它(`redis-cli -u "$AGENTMEMORY_REDIS_URL" ping`)。列出一個非常大的範圍時,會用一次 `HGETALL` 讀取整個 hash,成本和檔案儲存把它留在記憶體中一樣。
**建議的 Redis 設定。** 預設的 `save 3600 1 300 100 60 10000` 快照策略在當機時可能損失好幾分鐘的寫入,比檔案儲存 5 秒的清盤窗口還糟。對於任何你會在意遺失的內容,請設定 `appendonly yes`。請設定 `maxmemory-policy noeviction`;`allkeys-lru` 之類的設定一旦 Redis 達到記憶體上限,就會靜默丟棄記憶。
原生(非 Docker)啟動,以及每個一鍵式 [部署範本](../deploy/)(它們會覆寫捆綁的 `iii-config.yaml` 並以原生方式啟動),都會讀取 `AGENTMEMORY_STATE_BACKEND`/`AGENTMEMORY_REDIS_URL`,並把它們渲染進啟動時用的 iii-config。URL 本身永遠不會寫進那份渲染後的檔案,只會有一個 `${AGENTMEMORY_REDIS_URL}` 參照,由引擎行程在啟動時從自己的環境展開。只有這個倉庫自己的 Docker Compose 路徑(`AGENTMEMORY_USE_DOCKER=1`,或是恢復一個已經以該方式啟動的引擎)會以唯讀方式掛載 `iii-config.docker.yaml`,且不會進行渲染;`agentmemory start` 偵測到這種組合時會發出警告。要手動切換那個檔案,請依照 [iii-state](https://workers.iii.dev/workers/iii-state) 和 [iii-stream](https://workers.iii.dev/workers/iii-stream) worker 文件中展示的同一種 `name: redis` / `config: redis_url: ...` 格式,並讓 `redis_url` 指向容器能連到的 Redis。`docker-compose.yml` 會把 `AGENTMEMORY_REDIS_URL` 傳進引擎容器,因此在那裡 `redis_url: '${AGENTMEMORY_REDIS_URL}'` 可以運作,並讓 URL 不出現在掛載的檔案中。
渲染後的設定不會把 URL 寫進 `~/.agentmemory/data/iii-config.runtime.yaml`,但引擎自己的設定 worker 啟動後,仍會把*展開後*的值持久化到 `~/.agentmemory/config/iii-state.yaml` 和 `iii-stream.yaml`(iii-engine 的 `${VAR}` 展開發生在該 worker 儲存其種子資料之前,它儲存的是解析後的值,而不是參照)。請把那個目錄視為存放憑證的地方:在任何共享主機上執行 `chmod 700 ~/.agentmemory`,並優先使用一個範圍僅限於 agentmemory 所需的 Redis ACL 使用者,而不是資料庫的管理員憑證。
**遷移不是自動的。** 切換 `AGENTMEMORY_STATE_BACKEND` 時,兩側都是從空儲存開始;沒有任何機制會把既有資料從 file 複製到 Redis,或反過來。請從你要離開的後端匯出,再匯入到你要搬去的那個後端。下面的流程在 bash 和 zsh 下(包括 `bash -u`)執行結果相同。但像 `AUTH=(${AGENTMEMORY_SECRET:+-H "Authorization: Bearer $AGENTMEMORY_SECRET"})` 這樣的陣列寫法則不是:zsh 會把這個標頭保留成一個格式錯誤的單字,而 bash 會把它拆成兩個,因此只要設定了 `AGENTMEMORY_SECRET`,兩邊的請求都會得到 401:
```bash
# 0. Use the generated secret when none is exported:
AGENTMEMORY_SECRET="${AGENTMEMORY_SECRET:-$(cat ~/.agentmemory/secret 2>/dev/null)}"
# 1. On the old backend, while agentmemory is still running on it:
if [ -n "${AGENTMEMORY_SECRET:-}" ]; then
curl -fsS -H "Authorization: Bearer $AGENTMEMORY_SECRET" http://localhost:3111/agentmemory/export > backup.json
else
curl -fsS http://localhost:3111/agentmemory/export > backup.json
fi
# 2. Confirm backup.json is a usable export before switching backends:
jq -e '.version and .exportedAt' backup.json > /dev/null || {
echo "backup.json is not a valid export; do not switch backends" >&2
exit 1
}
# 3. Switch AGENTMEMORY_STATE_BACKEND (and AGENTMEMORY_REDIS_URL if needed),
# restart agentmemory against the new backend, then:
if [ -n "${AGENTMEMORY_SECRET:-}" ]; then
jq -n --slurpfile d backup.json '{exportData: $d[0], strategy: "merge"}' | \
curl -fsS -H "Authorization: Bearer $AGENTMEMORY_SECRET" -X POST http://localhost:3111/agentmemory/import \
-H 'Content-Type: application/json' -d @-
else
jq -n --slurpfile d backup.json '{exportData: $d[0], strategy: "merge"}' | \
curl -fsS -X POST http://localhost:3111/agentmemory/import \
-H 'Content-Type: application/json' -d @-
fi
```
`/agentmemory/export` 也接受 `?maxSessions=` 和 `?offset=`,用於把大型語料庫分成幾次呼叫來處理;匯入時的 `strategy` 可以是 `merge`(預設、安全)、`replace` 或 `skip`。
### iii 取代了什麼
| 傳統技術棧 | agentmemory 使用 |
|---|---|
| Express.js / Fastify | iii HTTP Triggers |
| SQLite / Postgres + pgvector | iii KV State + 記憶體內向量索引 |
| SSE / Socket.io | iii Streams(WebSocket) |
| pm2 / systemd | iii engine 的 worker 監管 |
| Prometheus / Grafana | iii OTEL + 健康監控 |
| 自訂外掛系統 | `iii worker add ` |
**219 個原始檔 · ~52,000 行程式碼 · 2,500+ 測試 · 311 個函式 · 60 個 KV 範圍**,全部基於三種原語。沒有 `agentmemory plugin install`。外掛系統就是 iii 本身。
---

### LLM 提供者
agentmemory 會從你的環境自動偵測提供者。設定提供者可讓 LLM 驅動的操作可用,但只設定提供者並不會啟用 LLM 撰寫的觀測壓縮。那條路徑需要同時具備提供者和 `AGENTMEMORY_AUTO_COMPRESS=true`。
| 提供者 | 設定 | 備註 |
|----------|--------|-------|
| **No-op(預設)** | 不需設定 | LLM 驅動的 compress/summarize 被停用。合成壓縮和 BM25 召回仍可正常運作。若你以前依賴 Claude 訂閱回退,請見下方的 `AGENTMEMORY_ALLOW_AGENT_SDK`。 |
| Anthropic API | `ANTHROPIC_API_KEY` | 按 token 計費 |
| MiniMax | `MINIMAX_API_KEY` | 與 Anthropic 相容 |
| Gemini | `GEMINI_API_KEY` | 也會啟用嵌入功能 |
| OpenRouter | `OPENROUTER_API_KEY` | 任何模型 |
| OpenAI API | `OPENAI_API_KEY` | 預設 `gpt-5.6-luna`,可用 `OPENAI_MODEL` 覆寫 |
| **本地(Ollama / LM Studio / vLLM / llama.cpp)** | `OPENAI_API_KEY=local` + `OPENAI_BASE_URL=http://localhost:11434/v1`(Ollama)或 `http://localhost:1234/v1`(LM Studio)+ `OPENAI_MODEL=<你的模型>` | 任何相容 OpenAI API 的伺服器。零成本,在你自己的硬體上執行。見下方的 [本地模型](#local-models-ollama--lm-studio--vllm)。 |
| Claude 訂閱回退 | `AGENTMEMORY_ALLOW_AGENT_SDK=true` | 僅限選擇加入。會產生 `@anthropic-ai/claude-agent-sdk` 會話;它過去曾造成無上限的 Stop-hook 遞迴,因此不再是預設值。 |
### 本地模型(Ollama / LM Studio / vLLM)
agentmemory 可以和任何相容 OpenAI API 的伺服器溝通,因此任何開放 `/v1/chat/completions` 的服務都能不改程式碼直接運作。不需要付費金鑰,不需要雲端,沒有速率限制;完全在你自己的硬體上執行。
**Ollama**(預設連接埠 `11434`):
```bash
ollama pull qwen3:8b # or qwen3:4b, gpt-oss:20b, qwen3-coder:30b, etc.
ollama serve
```
```env
# ~/.agentmemory/.env
OPENAI_API_KEY=ollama # any non-empty string; Ollama ignores it
OPENAI_BASE_URL=http://localhost:11434/v1
OPENAI_MODEL=qwen3:8b
```
**LM Studio**(預設連接埠 `1234`):
打開 LM Studio → Local Server 分頁 → Start Server。從選擇器中挑選任何聊天模型(Qwen 3、gpt-oss、DeepSeek R1 等)。
```env
# ~/.agentmemory/.env
OPENAI_API_KEY=lmstudio # any non-empty string; LM Studio ignores it
OPENAI_BASE_URL=http://localhost:1234/v1
OPENAI_MODEL=qwen3-8b # match the model name from LM Studio
```
**vLLM / llama.cpp / Text Generation Inference**:格式相同。把 `OPENAI_BASE_URL` 指向你伺服器開放的任何 URL,並把 `OPENAI_MODEL` 設為你伺服器能接受的名稱。
**記憶工作的模型選擇**:壓縮和摘要是短任務(輸入 < 2K token,輸出 < 500 token),7B 的指令微調模型就很夠用。建議:
| 模型 | 大小 | 原因 |
|-------|------|-----|
| `qwen3:8b` | ~5.2 GB | 在 16 GB 機器上均衡的預設選擇;擅長擷取和工具形態的文字 |
| `qwen3:4b` | ~2.6 GB | 最小還算合理的選擇;適合壓縮,圖擷取較弱 |
| `qwen3-coder:30b` | ~19 GB | 在 24-32 GB 硬體上,針對程式碼情境會話的最佳本地選擇(30B MoE,啟用 3.3B) |
| `gpt-oss:20b` | ~14 GB | 強力的通用模型,適合 16 GB RAM |
| `deepseek-r1:8b` | ~5.2 GB | 推理蒸餾模型;較慢但擷取結果更乾淨 |
Qwen 3 模型預設會思考,可能在輸出任何內容之前,就把整個 token 預算都燒在推理上。設定 `AGENTMEMORY_LLM_NOTHINK=1`,為圖擷取提示附加 `/no_think`;若擷取結果回傳空白,就調高 `MAX_TOKENS`(16384 可行)。
推理型模型(o1 風格,帶有 `` 區塊)可能回傳空的 `content`,而 `reasoning` 欄位你的本地伺服器可能不會顯示出來。若擷取結果回傳空白,先切換成非推理型模型。`OPENAI_REASONING_EFFORT=none` 這個環境變數,也可以在模仿 OpenAI 推理格式的 Ollama Cloud 思考模型上停用思考。
本地嵌入作為選用的相依套件隨附,但預設不會啟用。設定 `EMBEDDING_PROVIDER=local` 即可選擇加入 `Xenova/all-MiniLM-L6-v2`(384 維)。第一次的嵌入請求會下載模型;之後的推論則在裝置端進行。若未設定此項或遠端嵌入金鑰,向量會維持停用,`mem::search` 使用 BM25,而 `smart-search` 仍可以加入既有的圖比對結果。
### 成本意識的模型選擇
當同時設定提供者和 `AGENTMEMORY_AUTO_COMPRESS=true`,啟用 LLM 撰寫的背景壓縮時,它會對每一筆觀測執行,因此模型選擇會明顯改變每月支出。擷取到的工作負載資料:635 次請求 / 888K token / 35 小時的實際使用,對三個 OpenRouter 模型以 2026-05-23 的價格執行。
| 等級 | 模型 | 輸入 / 1M | 輸出 / 1M | 擷取到的 35 小時成本 | 備註 |
|------|-------|------------|-------------|---------------------------|-------|
| 建議 | `deepseek/deepseek-v4-flash-0731` | $0.07 | $0.14 | ~$0.07(估計) | 最新的 DeepSeek;壓縮工作負載中最便宜的建議選擇。 |
| 建議 | `deepseek/deepseek-v4-pro` | $0.435 | $0.87 | ~$0.46 | 壓縮 + 摘要品質穩固,成本約為 Sonnet 的 10 分之一。 |
| 建議 | `qwen/qwen3-coder` | $0.45 | $1.80 | ~$0.55 | 若你的會話高度偏向程式碼,具備強力的程式碼推理能力。 |
| 高階 | `anthropic/claude-sonnet-5` | $3.00 | $15.00 | ~$5.02(估計) | 與實測的 Sonnet 4.6 執行同樣的牌價;$2/$10 的早鳥價持續到 2026-08-31。 |
| 高階 | `openai/gpt-5.6-sol` | $5.00 | $30.00 | ~$9(估計) | 旗艦等級;用於常駐背景工作成本高昂。 |
| 避免 | `anthropic/claude-opus-5` | $5.00 | $25.00 | ~$8.40(估計) | 旗艦級模型;用於壓縮是過度花費。 |
已實測的列來自擷取到的執行結果;標記(估計)的列,是用各模型的牌價,依相同的 token 組合比例換算出來的。
當 `OPENROUTER_MODEL` 符合高階等級的模式時,agentmemory 會在執行階段印出警告。一旦你做出了知情的選擇,可設定 `AGENTMEMORY_SUPPRESS_COST_WARNING=1` 來消除它。
記憶工作在品質與成本之間的取捨:壓縮是一項品質門檻相對寬鬆的摘要任務(重新讀取摘要的是代理,不是使用者)。在這項任務上,DeepSeek V4 Flash / V4 Pro / Qwen3-Coder 的表現幾乎與 Sonnet 不相上下,成本卻低 10 到 70 倍。把高階等級的模型留給你會親自閱讀的查詢。
來源:[OpenRouter 上 Claude Sonnet 5 的定價](https://openrouter.ai/anthropic/claude-sonnet-5)、[DeepSeek V4 Flash](https://openrouter.ai/deepseek/deepseek-v4-flash-0731)、[DeepSeek 定價說明](https://api-docs.deepseek.com/quick_start/pricing/)。
### 多代理記憶(`AGENT_ID` + `AGENTMEMORY_AGENT_SCOPE`)
在多代理的設定中,當幾個角色共用一個 agentmemory 伺服器時(architect / developer / reviewer / researcher / support-agent),`AGENT_ID` 會在每次寫入上標記是哪個角色做的。`AGENTMEMORY_AGENT_SCOPE` 則控制召回時是否依該標記過濾。
```env
TEAM_ID=company
USER_ID=engineering-team
AGENT_ID=architect
AGENTMEMORY_AGENT_SCOPE=isolated # optional; default "shared"
```
兩種模式:
| 模式 | 標記寫入 | 過濾召回 | 何時使用 |
|------|------------|---------------|-------------|
| `shared`(預設) | 是 | 否 | 具稽核紀錄的跨代理上下文。Architect 可以看到 developer 記下的內容,但每一列都會記錄是誰說的。 |
| `isolated` | 是 | 是 | 嚴格分離。Architect 永遠看不到 developer 的觀測 / 記憶 / 會話。 |
設定了 `AGENT_ID` 後會被標記的內容:`Session.agentId`、`RawObservation.agentId`、`CompressedObservation.agentId`、`Memory.agentId`。這個角色會從 `api::session::start` → `mem::observe` → `mem::compress` → KV 一路流動。
在 isolated 模式下會被過濾的內容:`mem::smart-search`、`/agentmemory/memories`、`/agentmemory/observations`、`/agentmemory/sessions`。每個端點都接受 `?agentId=` 以逐次請求覆寫,也接受 `?agentId=*` 以完全跳出環境變數所設定的範圍。`/memories` 還接受 `?includeOrphans=true`,用來顯示 `agentId` 為 undefined 的、設定 `AGENT_ID` 之前留下的記憶。
在 SDK / REST 層級逐次呼叫覆寫:每個會改變狀態的端點(`/session/start`、`/remember`)都接受請求主體中的 `agentId` 欄位,它會優先於環境變數。這對於要把許多角色路由到同一個伺服器行程的執行階段很有用。MCP 的 `memory_save` 工具也提供同一個 `agentId` 欄位,獨立的 stdio 伺服器會同時轉送 `agentId` 和 `project`,而儲存的記憶會把 `agentId` 帶進搜尋索引,因此按代理範圍的搜尋,涵蓋的不只是觀測,還包括記憶。
當 `AGENT_ID` 未設定時,記憶會維持不分範圍(舊版行為,沒有標記、沒有過濾)。
### 連接埠
agentmemory + iii-engine 預設會綁定四個連接埠。若重新啟動時出現 port in use 的錯誤,這張表會告訴你該找哪個行程。
| 連接埠 | 行程 | 用途 | 環境變數覆寫 |
|------|---------|---------|--------------|
| `3111` | agentmemory | REST API + MCP HTTP + `/agentmemory/health` + `/agentmemory/livez` | `III_REST_PORT` |
| `3112` | iii-engine | 內部串流 worker(供 agentmemory + 檢視器使用) | `III_STREAM_PORT`(建議)或舊版的 `III_STREAMS_PORT` |
| `3113` | agentmemory | 即時檢視器(`http://localhost:3113`) | `III_VIEWER_PORT`,或用 `AGENTMEMORY_VIEWER_URL` 設定回報的 URL |
| `49134` | iii-engine | WebSocket;workers 在此註冊,OTel 遙測資料透過它傳輸 | `III_ENGINE_PORT` 或 `III_ENGINE_URL` |
`--port ` 會改變 REST 的錨點,並只在上面對應的明確連接埠或 URL 未設定時,衍生出串流 `N+1`、檢視器 `N+2`,以及引擎 WebSocket `N+46023`。它不會建立一個隔離的生命週期命名空間。要啟動第二個常駐行程,請用 `--instance 1`;它使用錨點 `3211`,預設為 `3211/3212/3213/49234`,並擁有自己獨立的 `instance-1` 資料與生命週期目錄。實例 1 到 50 都遵循同樣的模式。
釘住版本的引擎會以 `--no-update-check` 啟動(開機時不會對 GitHub 查詢更新或安全公告),並關閉 iii 的匿名使用量遙測:agentmemory 會為它所產生的引擎設定 `III_TELEMETRY_ENABLED=false`,除非你自己匯出了這個變數;捆綁的 compose 檔案做法相同。
崩潰執行後連接埠仍被佔用時的過期行程清理:
```bash
# macOS / Linux — find whatever is on each port and kill it
lsof -i :3111,3112,3113,49134
pkill -f agentmemory || true
pkill -f 'iii ' || true
# Windows
netstat -ano | findstr ":3111 :3112 :3113 :49134"
taskkill /F /PID
```
`agentmemory stop` 在優雅的原生關閉時,會乾淨地回收 worker 和引擎的 pidfile。在 Docker 模式下,它會清空原生 worker、停止那個經過驗證的確切引擎容器,並保留容器和它的 `/data` 掛載以供無損重啟;下次啟動時會驗證並恢復同一個容器。以 Docker 為後端的卸載需要 `agentmemory remove --keep-data`:它會移除 agentmemory 管理的共享檔案,同時保留經過驗證的容器、它的資料掛載,以及用於復原它們所需的生命週期紀錄。具破壞性的 Docker 資料刪除,刻意留給操作者在備份之後自行執行。CLI 也會拒絕把 Docker 或 VM 連接埠持有者(Docker 後端、vpnkit、colima)當作原生引擎來接管或發送訊號,除非傳入 `--force`。上面的手動清理僅適用於崩潰後兩個 pidfile 都沒留下的情況。
### 設定檔
把 agentmemory 的執行階段設定放進 `~/.agentmemory/.env`,而不是在每個殼層中匯出變數。若檢視器顯示像 `export ANTHROPIC_API_KEY=...` 這樣的設定提示,把它複製進這個檔案時去掉 `export` 前綴,寫成 `ANTHROPIC_API_KEY=...`,然後重新啟動 agentmemory。
行程環境變數仍然有效,且優先於檔案中的值。
在 Windows 上,同一個檔案位於 `%USERPROFILE%\.agentmemory\.env`:
```powershell
New-Item -ItemType Directory -Force $HOME\.agentmemory
notepad $HOME\.agentmemory\.env
```
若想用 Claude Code Pro/Max 訂閱而非 API 金鑰來測試,請明確選擇加入:
```env
AGENTMEMORY_ALLOW_AGENT_SDK=true
AGENTMEMORY_AUTO_COMPRESS=true
```
LLM 撰寫的觀測壓縮需要同時具備這兩行:能存取一個 LLM 提供者(包括這種明確的訂閱回退方式),以及 `AGENTMEMORY_AUTO_COMPRESS=true`。單獨設定提供者,預設的合成壓縮路徑仍會維持原樣。
只要設定了 LLM 提供者,整合(圖節點、教訓、結晶)就會預設開啟。若你想要不使用 LLM 運作,可明確設定 `CONSOLIDATION_ENABLED=false` 來退出。圖擷取是一個獨立的旗標:
```env
GRAPH_EXTRACTION_ENABLED=true
# CONSOLIDATION_ENABLED=false # opt out of auto-consolidation
```
### 環境變數
建立 `~/.agentmemory/.env`:
```env
# LLM provider (pick one — default is the no-op provider: no LLM calls)
# ANTHROPIC_API_KEY=sk-ant-...
# ANTHROPIC_BASE_URL=... # Optional: Anthropic-compatible proxy / Azure
# GEMINI_API_KEY=...
# OPENROUTER_API_KEY=...
# MINIMAX_API_KEY=...
# OPENAI_API_KEY=*** # NOTE: this same key auto-activates BOTH the
# # OpenAI LLM provider (here) AND the OpenAI
# # embedding provider (further below). Set
# # OPENAI_API_KEY_FOR_LLM=false to scope it
# # to embeddings only.
# OPENAI_BASE_URL=https://api.openai.com # Optional: override for Azure / vLLM / LM Studio / proxies
# # Azure: https://.openai.azure.com/openai/deployments/
# # Auto-detected from `.openai.azure.com` hostname; uses
# # api-key header + api-version query param.
# OPENAI_API_VERSION=2024-08-01-preview # Optional: Azure api-version query param
# OPENAI_MODEL=gpt-5.6-luna # Optional: default model
# OPENAI_TIMEOUT_MS=60000 # Optional: OpenAI-scoped alias for the outbound fetch
# # timeout. Takes precedence over AGENTMEMORY_LLM_TIMEOUT_MS
# # for back-compat with v0.9.17. New configs should
# # prefer the global AGENTMEMORY_LLM_TIMEOUT_MS below.
# OPENAI_REASONING_EFFORT=none # Optional: "low" | "medium" | "high" | "none"
# # Honored only by OpenAI's reasoning models (o1, o3,
# # gpt-*-reasoning) and providers that mirror that
# # schema (Ollama Cloud thinking models). Standard
# # chat models reject this field with 400. Set to
# # "none" for thinking models that return reasoning
# # but no content.
# OPENAI_API_KEY_FOR_LLM=false # Optional: set to false to skip OpenAI auto-detection
# # for LLM (useful if you only want OpenAI for embeddings)
# Opt-in Claude-subscription fallback (spawns @anthropic-ai/claude-agent-sdk);
# leave OFF unless you understand the Stop-hook recursion risk:
# AGENTMEMORY_ALLOW_AGENT_SDK=true
# Embedding provider (BM25-only when unset; local is an explicit opt-in)
# EMBEDDING_PROVIDER=local
# VOYAGE_API_KEY=...
# OPENAI_API_KEY=sk-...
# OPENAI_BASE_URL=https://api.openai.com # Override for Azure / vLLM / LM Studio / proxies
# OPENAI_EMBEDDING_MODEL=text-embedding-3-small
# OPENAI_EMBEDDING_DIMENSIONS=1536 # Required when the model is not in the known-models table
# OPENAI_EMBEDDING_BASE_URL=https://... # Embeddings only; falls back to OPENAI_BASE_URL
# OPENAI_EMBEDDING_API_KEY=sk-... # Embeddings only; wins over OPENAI_API_KEY when set
# Outbound LLM / embedding timeout
# AGENTMEMORY_LLM_TIMEOUT_MS=60000 # Default: 60 000 ms (60 s). Applies to every
# raw-fetch provider (Gemini, OpenRouter, MiniMax,
# OpenAI LLM, OpenAI/Cohere/Voyage/OpenRouter
# embedding). For the OpenAI LLM path, the
# OpenAI-scoped OPENAI_TIMEOUT_MS alias (above)
# takes precedence when set, for back-compat
# with v0.9.17.
# Increase for slow networks or large batch calls;
# decrease to fail-fast on rate-limit holds.
# Search tuning
# BM25_WEIGHT=0.4
# VECTOR_WEIGHT=0.6
# TOKEN_BUDGET=2000
# Auth (generated into ~/.agentmemory/secret on first start when unset)
# AGENTMEMORY_SECRET=your-secret
# VIEWER_ALLOWED_ORIGINS=https://memory.example.com
# AGENTMEMORY_IMPORT_ROOT=~/projects
# Ports (defaults: 3111 API, 3113 viewer)
# III_REST_PORT=3111
# Engine usage telemetry (iii). Off unless you set it; true opts in.
# III_TELEMETRY_ENABLED=false
# Features
# AGENTMEMORY_AUTO_COMPRESS=false # OFF by default. Requires an LLM
# provider as well. When both are on,
# every PostToolUse hook calls your
# LLM provider to compress the
# observation — expect significant
# token spend on active sessions.
# AGENTMEMORY_SLOTS=false # OFF by default. Editable pinned
# memory slots — persona,
# user_preferences, tool_guidelines,
# project_context, guidance,
# pending_items, session_patterns,
# self_notes. Size-limited; agent
# edits via memory_slot_* tools.
# Pinned slots addressable for
# SessionStart injection.
# AGENTMEMORY_REFLECT=false # OFF by default. Requires SLOTS=on.
# Stop hook fires mem::slot-reflect:
# scans recent observations, auto-
# appends TODOs to pending_items,
# counts patterns in
# session_patterns, records touched
# files in project_context. Fire-
# and-forget; does not block.
# AGENTMEMORY_INJECT_CONTEXT=false # OFF by default. When on:
# - SessionStart may inject ~1-2K
# chars of project context into
# the first turn of each session
# (this is what actually reaches
# the model — Claude Code treats
# SessionStart stdout as context)
# - PreToolUse fires /agentmemory/enrich
# on every file-touching tool call
# (resource cleanup, not a token
# fix — PreToolUse stdout is debug
# log only per Claude Code docs)
# Observations are still captured via
# PostToolUse regardless of this flag.
# GRAPH_EXTRACTION_ENABLED=false
# AGENTMEMORY_LLM_NOTHINK=1 # Local reasoning models only: ask the
# model to skip its hidden thinking pass
# during graph extraction. Faster runs;
# relation quality can drop slightly.
# CONSOLIDATION_ENABLED=false # on by default when an LLM provider is configured
# LESSON_DECAY_ENABLED=true
# OBSIDIAN_AUTO_EXPORT=false
# AGENTMEMORY_EXPORT_ROOT=~/.agentmemory
# CLAUDE_MEMORY_BRIDGE=false
# SNAPSHOT_ENABLED=false
# Storage and durability
# AGENTMEMORY_STATE_BACKEND=file # file (default) or redis; see "Storage backend" below
# AGENTMEMORY_REDIS_URL=redis://localhost:6379 # Required with redis, plain redis:// only
# AGENTMEMORY_STATE_SAVE_INTERVAL_MS=2000 # How often the engine writes file state to disk.
# A hard kill loses at most this window.
# AGENTMEMORY_INDEX_SAVE_INTERVAL_MS=600000 # Minimum time between search index saves;
# shutdown and deletes still save at once.
# AGENTMEMORY_GRAPH_COMPACT_ON_BOOT=true # One-time background trim of oversized graph
# provenance; false skips it
# Sessions
# AGENTMEMORY_SESSION_SWEEP_ENABLED=true # Hourly sweep marks sessions left active past
# the threshold as abandoned. Deletes nothing;
# new activity makes the session active again.
# AGENTMEMORY_SESSION_SWEEP_STALE_HOURS=24
# Capture filters (hooks)
# AGENTMEMORY_CAPTURE_ALLOW= # Comma or space list of tool names or globs;
# when set, only these tools are captured
# AGENTMEMORY_CAPTURE_DENY= # Extra names or globs to skip, added to the
# defaults: memory_*, toolsearch,
# listmcpresources, fetchmcpresource
# AGENTMEMORY_CAPTURE_OUTPUT_MAX=8000 # Max characters of tool output per observation
# AGENTMEMORY_PRE_COMPACT_BUDGET=1500 # Token budget for PreCompact context; 0 disables
# Audit log
# AGENTMEMORY_AUDIT_RETENTION_MONTHS=0 # Drop month scopes older than N months; 0 keeps all
# AGENTMEMORY_AUDIT_INDEX_PERSIST=false # 1 or true records index migration and cleanup
# rows (debugging only)
# Team
# TEAM_ID=
# USER_ID=
# TEAM_MODE=private
# Tool visibility: "all" (54 tools, default) or "core" (8 tools, lean)
# AGENTMEMORY_TOOLS=core
```
---

連接埠 `3111` 上有 138 個端點。REST API 預設綁定 `127.0.0.1`。受保護的端點需要 `Authorization: Bearer `,而網狀同步端點要求兩端都明確設定 `AGENTMEMORY_SECRET`。
**驗證預設是開啟的。** 當 `AGENTMEMORY_SECRET` 未設定時(無論是在殼層中或 `~/.agentmemory/.env` 中),伺服器會在第一次啟動時產生一個隨機密鑰,並以 `0600` 權限存進 `~/.agentmemory/secret`。每個捆綁的客戶端在與本機伺服器溝通時都會從那裡讀取它:CLI、檢視器、`plugin/scripts` 下的 hooks、MCP 伺服器和 `@agentmemory/mcp` shim、由 `agentmemory connect` 寫入的設定,以及捆綁的 OpenCode、Pi、OpenClaw、Hermes 和檔案系統監看整合。儲存的密鑰只會被送到 loopback 的 URL(`localhost`、`127.0.0.0/8`、`::1`)。明確設定的 `AGENTMEMORY_SECRET` 永遠優先,而遠端客戶端仍需要設定它。Docker 和 `deploy/` 的 entrypoint 已經會自行產生並匯出自己的密鑰。要手動呼叫 API:
```bash
curl -H "Authorization: Bearer $(cat ~/.agentmemory/secret)" http://localhost:3111/agentmemory/health
```
**寫入請求的規則。** 對 REST API 和檢視器發出的 `POST`、`PUT`、`PATCH` 和 `DELETE` 請求,只要帶有主體,就必須送出 `Content-Type: application/json`(可以帶 `charset` 參數);而 `Origin` 標頭,如果存在,就必須是設定的 REST 或檢視器連接埠的 loopback 來源,或是列在 `VIEWER_ALLOWED_ORIGINS` 中(以逗號分隔,例如 `https://memory.example.com`)。不送出 `Origin` 標頭的客戶端(CLI、hooks、MCP、curl、伺服器對伺服器)不受影響。檢視器也接受它自己的來源。
**檔案路徑。** 讀寫檔案的端點(`/compress-file`、`/replay/import-jsonl`、`/graph/import-graphify`)只接受 `~/.agentmemory`、該實例的資料目錄,或列在 `AGENTMEMORY_IMPORT_ROOT` 中的目錄下的路徑(用 `:` 分隔多個目錄,Windows 上用 `;`)。`/replay/import-jsonl` 也接受它預設的 `~/.claude/projects`。`/obsidian/export` 限制在 `AGENTMEMORY_EXPORT_ROOT` 內,`/migrate` 限制在 `~/.agentmemory` 內。每次檢查之前都會先解析 symlink。
**密鑰清除。** API 金鑰、bearer token、PEM 私鑰區塊,以及嵌在 URL 中的憑證(`scheme://user:password@host`),在文字儲存之前,會在每一條寫入路徑上被遮蔽:observations、remember、evolve、slots、lessons、actions、sketches、signals、checkpoints、imports、jsonl replay、mesh sync、team shares、壓縮與摘要輸出、crystals 和 graph 節點。
主要端點
| 方法 | 路徑 | 說明 |
|--------|------|-------------|
| `GET` | `/agentmemory/health` | 健康檢查(永遠公開) |
| `GET` | `/agentmemory/status` | 哪裡有問題、如何解決(瀏覽器回傳 HTML,否則回傳 JSON) |
| `GET` | `/agentmemory/viewer/snapshot` | 檢視器顯示的一切,在單次回應中 |
| `POST` | `/agentmemory/session/start` | 開始會話 + 取得上下文 |
| `POST` | `/agentmemory/session/end` | 結束會話 |
| `POST` | `/agentmemory/observe` | 捕捉觀測(見下方的捕捉傳遞) |
| `GET` | `/agentmemory/capture` | 捕捉收件匣、dead letters 和離線暫存 |
| `POST` | `/agentmemory/capture/retry` | 重試 dead-letter 捕捉 |
| `POST` | `/agentmemory/capture/drain` | 立即送出本機離線暫存 |
| `POST` | `/agentmemory/smart-search` | 混合搜尋 |
| `POST` | `/agentmemory/context` | 產生上下文 |
| `POST` | `/agentmemory/remember` | 儲存到長期記憶 |
| `POST` | `/agentmemory/forget` | 刪除觀測 |
| `POST` | `/agentmemory/enrich` | 檔案上下文 + 記憶 + bug |
| `GET` | `/agentmemory/profile` | 專案檔案 |
| `GET` | `/agentmemory/export` | 匯出所有資料 |
| `POST` | `/agentmemory/import` | 從 JSON 匯入 |
| `POST` | `/agentmemory/graph/query` | 知識圖譜查詢 |
| `POST` | `/agentmemory/graph/compact` | 壓實過大的圖溯源資料 |
| `POST` | `/agentmemory/team/share` | 與團隊分享 |
| `GET` | `/agentmemory/audit` | 稽核紀錄 |
完整端點列表:[`src/triggers/api.ts`](../src/triggers/api.ts)
**捕捉傳遞。** Hooks 會把每筆觀測連同一個 `eventId` 傳送一次到 `POST /agentmemory/observe`。當負載本身帶有 id 時(例如 Claude Code 的 `tool_use_id`),就使用宿主自己的呼叫 id;否則就用會話、hook 類型、工具名稱、輸入、輸出和宿主時間戳記的雜湊值。伺服器會把事件寫進狀態儲存中的捕捉收件匣,儲存該觀測,然後移除收件匣條目。狀態碼說明了發生了什麼:
| 狀態 | `status` 欄位 | 意義 |
|---|---|---|
| `201` | `accepted` | 已儲存。`observationId` 是新的觀測。 |
| `202` | `accepted`(`state: "retrying"`) | 已接受,但儲存失敗。伺服器會重試它,重新啟動後也會重試。 |
| `200` | `duplicate` | 這個 `eventId` 已經被接受過。`observationId` 是既有的觀測;不會儲存任何新內容。 |
| `400` / `422` | `rejected` | 負載無效,或儲存徹底失敗(該事件會被保留為 dead letter)。 |
| `503` | `rejected`(`retryable: true`) | 收件匣已滿(`AGENTMEMORY_CAPTURE_INBOX_MAX`)。Hooks 會暫存該事件並稍後送出。 |
失敗的事件會每隔 `AGENTMEMORY_CAPTURE_RETRY_INTERVAL_MS`(10 秒)以倍增退避的方式重試,最多重試 `AGENTMEMORY_CAPTURE_MAX_ATTEMPTS`(5)次。仍然失敗的事件會留在收件匣中成為 dead letter,列在 `/agentmemory/status` 和檢視器的 Health 頁面上,並可以用 `POST /agentmemory/capture/retry`(`{"eventId": "..."}` 或 `{"all": true}`)重試。已接受的事件 id 會被記住 `AGENTMEMORY_CAPTURE_DEDUP_HOURS`(168 小時,最多 `AGENTMEMORY_CAPTURE_EVENTS_MAX` 個 id),因此在超時或重新啟動後重播的 hook 只會被儲存一次,而兩個各自帶有自己宿主 id 的獨立工具呼叫,即使內容完全相同,仍會被儲存兩次。當一筆觀測被刪除時(forget、刪除會話、驅逐、自動遺忘,或是取代整個儲存的匯入),它的事件會在觀測被移除之前先被標記為已刪除,因此在同一個時間窗內重播該事件,會被當作重複而不儲存任何內容。狀態儲存每 2 秒才寫一次磁碟,所以一個已經被回應的事件,可能暫時只存在於記憶體中。為了涵蓋這種情況,每個 `2xx` 回應都會附帶伺服器的 `bootId`(每次啟動都是新的)、`acceptedAt` 和 `durableAfterMs`(檔案儲存為儲存間隔加 1.5 秒,redis 上為 1.5 秒,其中持久性是操作者自己的設定)。Hooks 會把事件留在本機暫存中,直到那個時間窗過去,才在之後的呼叫中順手刪除它,不會另外發送請求。若那時 `bootId` 已經改變,就表示伺服器重啟過,hook 會用同一個 `eventId` 再送一次該事件;已經落到磁碟上的事件不會被儲存兩次。伺服器自己也會在啟動時和每個重試間隔送出這類事件,因此即使之後沒有任何 hook 執行,重啟也不會造成任何損失。較舊的 hooks 會忽略這些額外欄位,而針對較舊伺服器的新 hooks,仍會在收到 `2xx` 時照舊捨棄該事件。
當伺服器當機、沒有及時回應,或回傳 5xx 時,hook 會把觀測附加到一個本機暫存檔 `/capture-spool/-.jsonl`(可用 `AGENTMEMORY_CAPTURE_SPOOL_DIR` 覆寫此目錄)。這個檔案僅限你的使用者存取(權限 600),密鑰的清除方式與伺服器相同,它最多容納 `AGENTMEMORY_CAPTURE_SPOOL_MAX_BYTES`(5 MiB),並丟棄超過 `AGENTMEMORY_CAPTURE_SPOOL_MAX_AGE_HOURS`(168)的條目。滿了之後,新的條目會被丟棄並計數,`/agentmemory/status` 會回報這個情況。hook 仍會在其時間限制內以 0 退出,且伺服器健康時不會增加任何請求。暫存會在下次啟動時,以及之後第一個成功連到伺服器的 hook,在背景行程中送出,代理不需要等待。事件 id 讓這一切是安全的:在超時之前就已送達的觀測不會被儲存兩次。`npx @agentmemory/agentmemory capture` 會顯示暫存和伺服器收件匣,`--drain` 會立即送出暫存,`GET /agentmemory/capture` 則以 JSON 回傳同樣的內容。設定 `AGENTMEMORY_CAPTURE_SPOOL=false` 可關閉暫存功能。
**壓實圖溯源資料。** 每個知識圖譜節點和邊,都只保留它所來自的最新 32 筆觀測的 id。在這個上限出現之前寫入的儲存,每個熱門節點可能持有數千個 id,這會讓圖搜尋和檢視器變慢,甚至讓 worker 掉線。agentmemory 會自行修正這個問題:在升級後的第一次啟動時,它會在背景把每個節點、邊、被取代的邊(時間性的圖歷史)和快取的快照修剪到這個上限,分成小批次執行,批次之間有停頓,讓搜尋、捕捉和檢視器都能持續運作。它會儲存進度,重啟後繼續執行,完成後就不再執行。`/agentmemory/status` 和檢視器的 Health 頁面會顯示它是 pending、running(附上目前的範圍和位置)、done 或 failed。設定 `AGENTMEMORY_GRAPH_COMPACT_ON_BOOT=false` 可關閉它。
要手動執行它,呼叫 `POST /agentmemory/graph/compact`。它會走訪名稱和 edge-key 索引,而不是列出每個節點和邊,並且可以安全地重複執行。當它修剪了 id,會寫入一筆 `graph_compact` 稽核條目。
```bash
curl -X POST http://localhost:3111/agentmemory/graph/compact -H "Content-Type: application/json" -d '{}'
```
在大型儲存上,或當呼叫回傳 504 時,請分批執行。傳入 `scope`(`nodes`、`edges` 或 `history`)、`offset` 和 `limit`,然後用回傳的 `nextOffset` 再次呼叫,直到它是 `null`。對 `nodes`、`edges` 和 `history` 都這樣做,最後再用一次 `{"scope":"snapshot"}` 呼叫結束,因為分批執行不會動到快取的快照。
```bash
curl -X POST http://localhost:3111/agentmemory/graph/compact -H "Content-Type: application/json" -d '{"scope":"nodes","offset":0,"limit":200}'
curl -X POST http://localhost:3111/agentmemory/graph/compact -H "Content-Type: application/json" -d '{"scope":"snapshot"}'
```
---

```bash
npm run dev # Hot reload
npm run build # Production build
npm test # 2,500+ tests
npm run test:integration # API tests (requires running services)
```
**先決條件:** Node.js >= 20,並具備 npm/npx;[iii-engine](https://iii.dev/docs) v0.22.1 或 Docker。macOS/Linux 的自動引擎安裝還需要 `curl`、POSIX `sh` 和 `tar`;原生 Windows 則使用手動安裝的釘住版本 `iii.exe`、WSL2 或 Docker Desktop。

[Apache-2.0](../LICENSE)


