Using Inline Installation
Once you've published your app or extension, you may be wondering how users will find and install your app. For users who browse the Chrome Web Store and find your item, its a very easy one-click process to install it. However, if a user is already on your site, it can be cumbersome for them to complete the installation - they would need to navigate away from your site to the store, complete the install process, and then return.
As of Google Chrome 15, you can initiate app and extensions installations "inline" from your site. These apps and extensions are still hosted in the Chrome Web Store, but users no longer have to leave your site to install them.
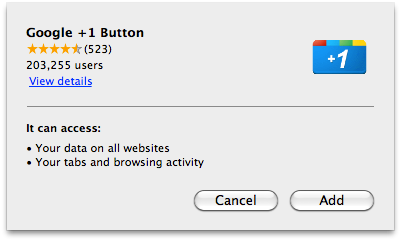
 When users install the app, they will see an installation confirmation dialog
similar to the one pictured on right. Just like the dialog displayed when
installing directly from the Chrome Web Store, it lists all of the permissions
that your app or extension is requesting. Additionally, this dialog includes the
average Chrome Web Store rating and the number of users, giving users extra
confidence about what they are about to install.
Overview
Inline installation is composed of two parts: a declarative
<link> tag and a call to the JavaScript function
chrome.webstore.install(). In addition, you must also verify
an association between the site that triggers inline installation and
the relevant item(s) in the Chrome Web Store.
Adding a Chrome Web Store link
The HTML page on your site from which you want inline installation to occur
must contain one or more <link> tags in the
<head> section referencing the items
that the user can install. Each <link> tag must have
the following format:
<link rel="chrome-webstore-item" href="https://chrome.google.com/webstore/detail/itemID">
The URL in the <link> tag must be
exactly as specified above, except that you should replace
itemID with the actual ID value for your item.
To determine the ID value for a specific item, go to the
Chrome Developer Dashboard
and click the name of the relevant app or extension. The ID value for that
item will be shown in the browser address bar; it is a string of
32 Latin characters at the end of the URL in the address bar.
Do not use the URL in the address bar as the URL in the
<link> tag (the URL in the address bar uses
a new format that includes the app name – this new format does not work
for inline installation). Instead, copy the ID value from the URL in the
address bar and paste the ID value into the URL specified in the
<link> tag above.
As an example, the <link> tag for the
Google Drive
app would look like this:
<link rel="chrome-webstore-item"
    href="https://chrome.google.com/webstore/detail/apdfllckaahabafndbhieahigkjlhalf">
Triggering inline installation
To actually begin inline installation, the
chrome.webstore.install(url, successCallback,
failureCallback)
function must be called. This function
can only be called in response to a user gesture, for example within a click event
handler; an exception will be thrown if it is not. The function can have the
following parameters:
<link> tag on your page with the
chrome-webstore-item relation, you can choose which item you'd
like to install by passing in its URL here. If it is omitted, then the first
(or only) link will be used. An exception will be thrown if the passed in URL
does not exist on the page.
User interface elements for inline installation
One of the key concepts behind inline installation is that it allows you, the app developer, to choose when to prompt the user to install the app or extension. If the item is critical to your site, you may wish to have a modal dialog or other distinctive noticeable user interface element for prompting the user. If the item only provides secondary functionality, inline installation may be hidden away on a secondary page of your site.
Since inline installation has to be triggered via a user gesture (for example, a mouse click) it is therefore suggested that you tie the action to a clickable user interface element such as a button. It is suggested that you use the same button label as the Chrome Web Store itself (in English, this is "Add to Chrome").
Checking if an item is already installed
You may wish to only show user interface elements that prompt the user to install the item if it's not already installed.
To check if an app is already installed, you can use the
chrome.app.isInstalled property. By querying it from a page
contained within your app's
URLs, you can show
or hide interface elements as appropriate. For example:
<button onclick="chrome.webstore.install()" id="install-button">Add to Chrome</button>
<script>
if (chrome.app.isInstalled) {
  document.getElementById('install-button').style.display = 'none';
}
</script>
Extensions can communicate with the embedding page via content scripts to let it know that they are already installed. For example, you could have a content script that targets the installation page:
var isInstalledNode = document.createElement('div');
isInstalledNode.id = 'extension-is-installed';
document.body.appendChild(isInstalledNode);
Then your installation page can check for the presence of that DOM node, which signals that the extension is already installed:
<button onclick="chrome.webstore.install()" id="install-button">Add to Chrome</button>
<script>
if (document.getElementById('extension-is-installed')) {
  document.getElementById('install-button').style.display = 'none';
}
</script>
Verified site requirement
For security reasons, inline installations can only be initiated by a page on
a site that is verified
(via Webmaster Tools) as being
associated with that item in the Chrome Web Store. Note that if you verify
ownership for a domain (for example, http://example.com) you can
initiate inline installation from any subdomain or page (for example,
http://app.example.com or
http://example.com/page.html).
