Workspaces - Persistent authoring in the DevTools
Introduction
Chrome DevTools lets you make changes to elements of the webpage or the CSS and see your changes immediately. But what good is that to your authoring workflow if you have to copy-and-paste the changes to an external editor all the time? Workspaces helps you make those changes persist to disk without having to leave the Chrome DevTools to do so.
With Workspaces, you can edit any type of source file from within the Sources panel and save your changes to disk. And you can map resources served from a local web server to files on disk, so when you change and save those those files, you can view them as if they were being served. And if you have the right mapping set up, Style changes on the Elements panel persist to disk automatically.
Bringing Your Project Into Workspaces
To make a local folder’s source files editable in the Sources panel, right-click in the left panel of Sources and select Add Folder to Workspace. This launches you into a file dialog where you can choose a new folder to add to your Workspaces. (It does not add the currently highlighted folder to your Workspaces.)

Click Allow when Chrome brings up the yellow banner at the top saying “DevTools requests full access to [path to your folder]”.
You can now edit any of the source files in that folder or its subfolders in Chrome. “Source files” in this case is not limited to HTML and CSS and Javascript, but can be anything, including markdown and JSON.
Mapping a Network Resource
The real power of Workspaces lies in being able to map a local file to a URL (or “Network Resource”). Whenever Chrome loads the mapped URL, it displays the workspace folder contents in place of the network folder contents. It’s as if it’s being served on the web, but you can modify it with DevTools and save the changes persistently to the local file.
To map your website to a local workspace folder:
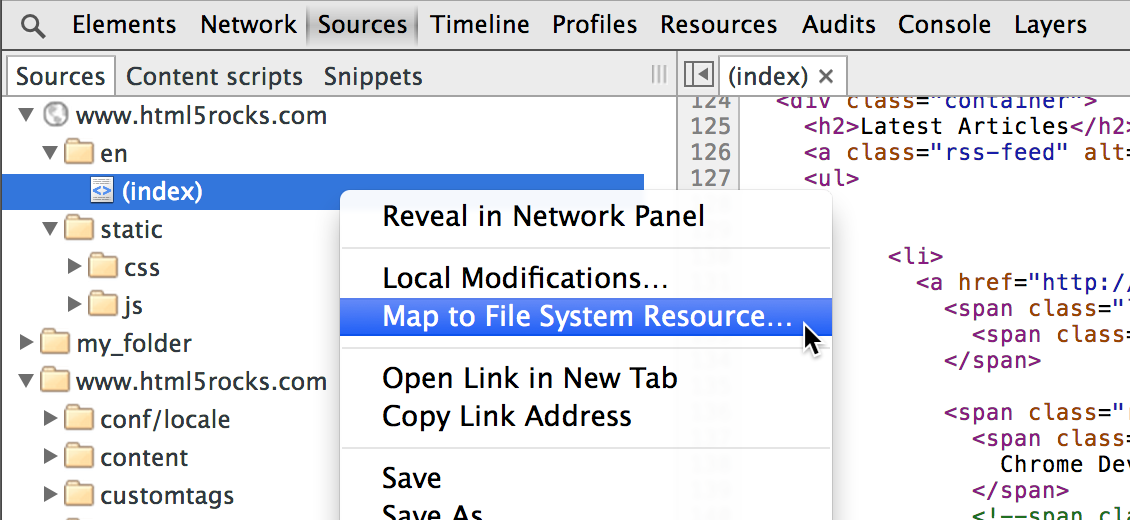
- In the Sources panel, right-click or Control+click on a file on the website.
- Select Map to File System Resource.
- Select the corresponding file from the list (you may have to type in a filename or a partial search string to find the file that you want).
- Reload the page in Chrome.

The Sources panel should now show just the contents of your site's local workspace folder, not the localhost sources.
You can also do this the other way around, mapping a workspace folder to a URL, using Map to Network Resource. Keep in mind that not all network resource files may be loaded into the browser to map from local files, but all of your local files should be available to map to a URL. Mapping one file within a workspace should map most of the website to that workspace.
Caveats
Workspaces makes a lot of your workflow simpler, without having to keep switching back and forth between your Chrome browser and an external editor. However, of course, there are a few things to be aware of:
- Only style changes in the Elements panel are persisted; changes to the DOM are not persisted.
- Style changes on the elements panel are persisted immediately, as long as you have the CSS file mapped to a local copy (that is, the changes from the elements panel persist to the file without you explicitly having to save).
- If you are mapping files from a remote server instead of a local server, when you refresh the page, Chrome reloads the page from the remote server again. Your changes still persist to disk and are reapplied if you continue editing in Workspaces.
File Management With Workspaces
In addition to editing existing files, you can also add and delete files in the local directory you’re using for Workspaces.
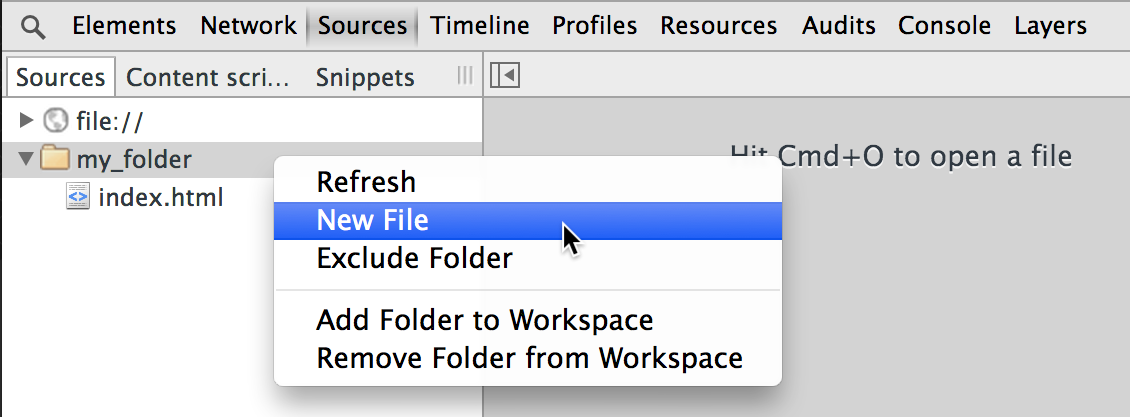
Add File
Right-click on a folder in the left Sources panel and select New File.

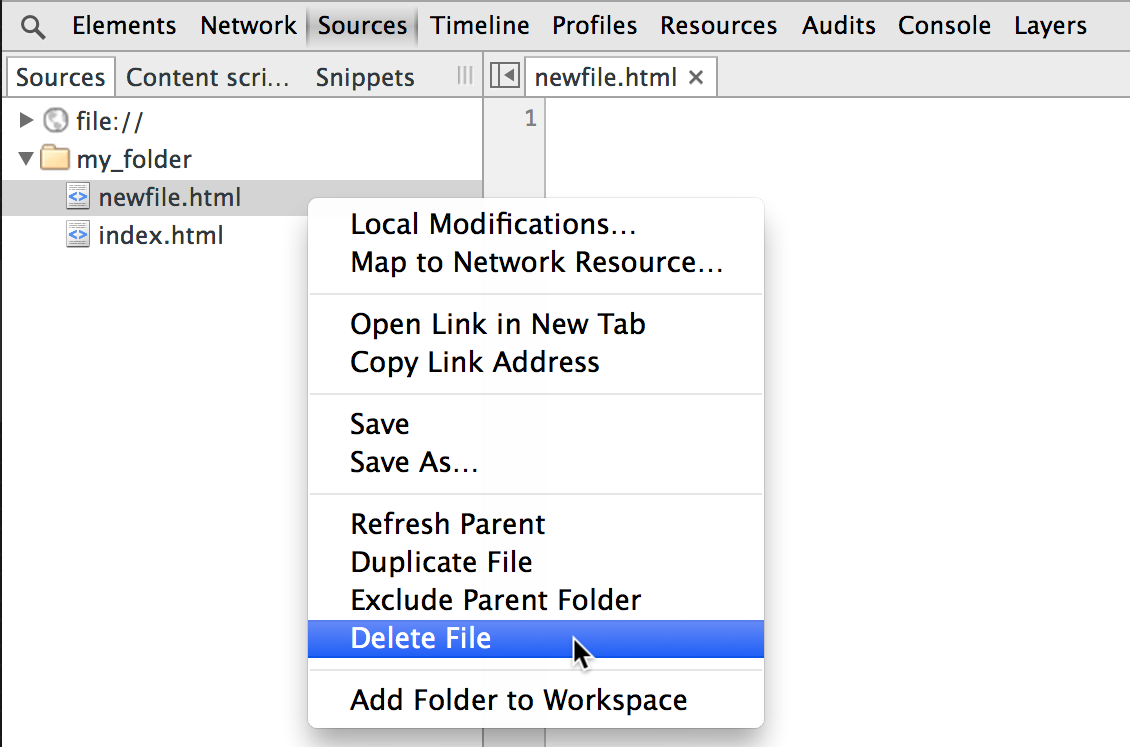
Delete File
Right-click on a file in the left Sources panel and select Delete File.

You can also duplicate a file by selecting Duplicate File. The new file shows up in the Sources panel and you can enter a new name for it (it doesn’t just create “Copy of myfile.txt”).
Refresh
Now that you can create (or delete) files directly in Workspaces, the Sources directory will also automatically refresh and show these new files. If not, you can always right-click on a folder and select Refresh from the pop-up menu to force a refresh.
This is also useful if you happen to change your files open in another editor and want the changes to show up in DevTools. Usually DevTools catches your refreshes automatically, even from an external editor, but if you have to recompile an HTML file or a CSS file, you may need to do a refresh.
Search For Files and Across Files
When searching for a loaded file normally in DevTools, you press Ctrl + O (Cmd + O on Mac) to open a dialog and search for a file name. You can still do this in Workspaces, only it searches through both the remote loaded files AND the local files in your Workspace folder.
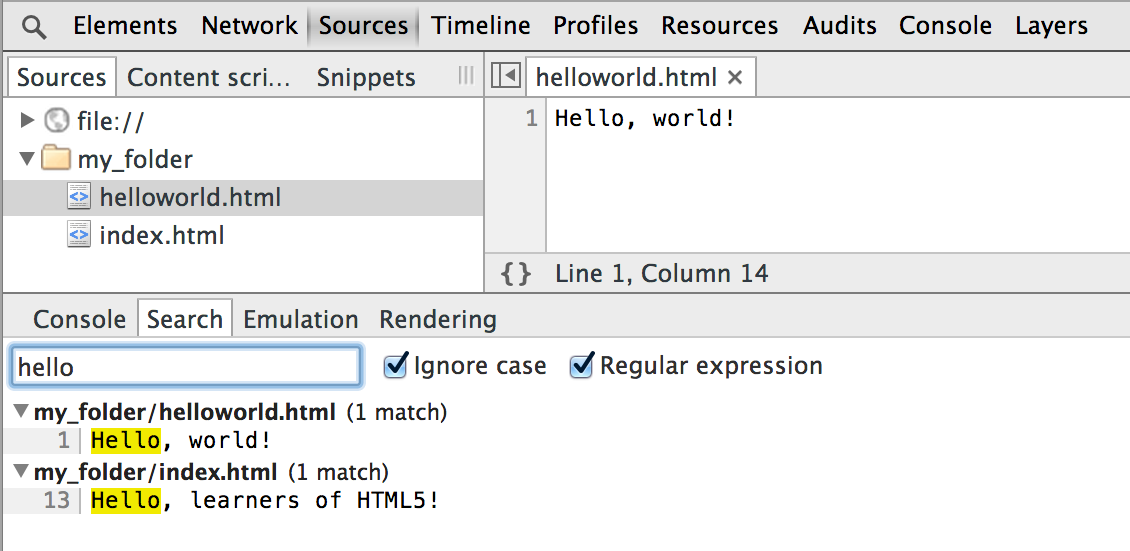
There is also a mechanism for searching through the text of files, so you can search for strings across all of the files in your workspaces as well as all of the files loaded into DevTools. You can either search for a string or for a regular expression, and we match every occurrence in every file or page.
To search for text across multiple files in Workspaces:
- Open the console drawer by pressing the Escape key, and click the Search tab next to Console to open the Search window
OR
Press Ctrl + Shift + F (Cmd + Opt + F on Mac) to open the Search window. - Type your query into the Search Sources box, and press Enter. If your query is a regular expression or needs to be case-insensitive, click the appropriate box.

