Downloadable Product
A downloadable product can be anything that you can deliver as a file, such as an eBook, music, video, software application, or an update. You can offer an album for sale, and sell each song individually. You can also use a downloadable product to deliver an electronic version of your product catalog.
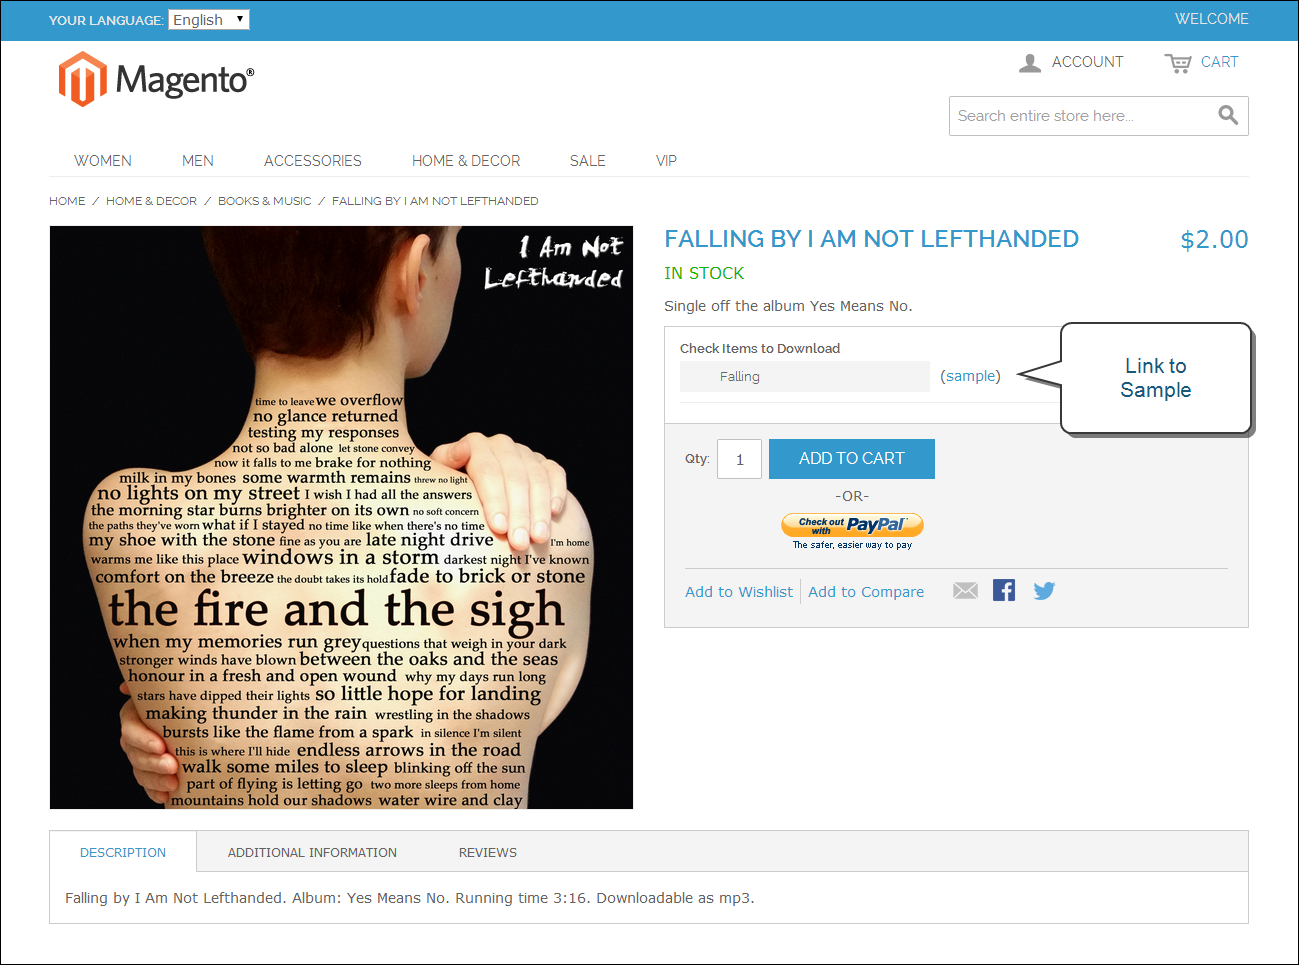
Because the actual download doesn’t become available until after the purchase, you can provide samples, such as an excerpt from a book or a clip from an audio file, that the customer can try from the product page.
Download with Sample
Downloadable products can be configured to require that the customer log in to an account to receive the link, or can be sent by email and shared with others. The status of the order before the download becomes available, default values, and other delivery options are set in the configuration.
The files for download can be either uploaded to your server, or linked to on a different server on the Internet.
Downloadable product file names can include letters and numbers. You can to use either a dash or underscore character to represent a space between words. Any invalid characters in the file name are replaced with an underscore.
Creating a Downloadable Product
The following instructions take you through the process of creating a downloadable product with the basic fields. Each required field is marked in the Admin with a red asterisk (*). After you complete the required settings and save the product, you can add images and complete the remaining product information as needed.
 Step 1: Choose the Attribute Set
The first step is to choose the attribute set, which is used as a template for the product record. The product in this example is based on the Default attribute set, which includes a standard of set of fields that can be used for most products.
|
1.
|
On the Admin menu, go to Catalog > Manage Products. |
|
2.
|
In the upper-right corner of the Manage Products page, click the Add Product button. |
|
3.
|
In the Create Product Settings section, do the following: |
|
a.
|
Attribute Set is currently set to “Default.” You can leave it as it is, or select another. |
|
b.
|
Set Product Type to “Downloadable Product,” and click the Continue button. |
Create Product Settings
 Step 2: Complete the Basic Product Information
The basic set of required fields must be completed before the product record can be saved. The Product Information panel groups related fields by topic and the required fields are marked with a red asterisk (*).
|
1.
|
In the Product Information panel, select General. Then, complete the required fields as follows: |
|
a.
|
Enter the product Name as you want it to appear in all catalog listings. |
|
b.
|
In the Description box, enter the main description that will appear on the Product Detail page. |
|
c.
|
Enter a Short Description of the product. |
|
d.
|
Assign a unique SKU for the product. |
|
e.
|
Set Status to “Enabled.” |
|
f.
|
Set Visibility to “Catalog, Search.” |
|
2.
|
In the Product Information panel, select Prices. Then, complete the required fields as follows: |
|
a.
|
Enter the Price that you will charge for the product. |
The price entered here becomes the base price of the download and is listed in the catalog before the customers selects items for download. Any additional price that is associated with an individual download is added to the base price.
|
b.
|
Set Tax Class to the appropriate tax classification for the product. |
|
3.
|
In the Product Information panel, select Inventory. Then, do the following: |
|
a.
|
If you do not need to keep track of inventory for the product, set Manage Stock to “No.” |
|
b.
|
If you do need to keep track of inventory, set Manage Stock to “Yes.” Then, do the following: |
- Set Manage Stock to “Yes.”
- In the Qty field, type the quantity of the item that is currently in stock.
- Set Stock Availability to “In Stock.”
|
4.
|
In the Product Information panel, select Categories. Then, do the following: |
|
a.
|
In the category tree, click to expand the section where the item belongs. |
|
b.
|
Select the checkbox of each additional category where you want the product to appear. |
|
5.
|
To make the product available on multiple websites, it must be assigned to each one. (This option appears only if you have multiple websites.) To configure the scope of the product, do the following: |
|
a.
|
In the Product Information panel, select Websites. |
|
b.
|
Select the checkbox of each website where the product will be available for sale. |
|
6.
|
After completing these steps, click the Save and Continue Edit button. |
 Step 3: Complete the Download Information
|
1.
|
In the Product Information panel, select Downloadable Information. |
|
2.
|
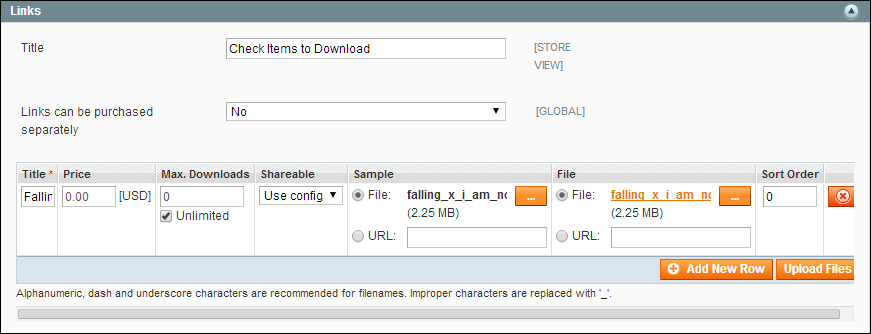
In the Links section, do the following: |
|
a.
|
Enter a Title for the list of downloadable products. |
|
b.
|
Set Links can be purchased separately to one of the following: |
- If you want to offer multiple download links, such as to sell individual songs on an album, select “Yes.”
- To offer a single download of this item, select “No.”
|
3.
|
Click the Add New Row button, and do the following: |
|
a.
|
Enter the Title and Price of the download. |
|
b.
|
To limit the number of downloads a customer can make, enter the number in the Max number of downloads field. To allow unlimited downloads, select the Unlimited checkbox. |
|
c.
|
Set Sharable to your preference. |
- To require that customers log in to their accounts to access the download link, select “No.”
- To send the link by email, which the customer can then share with others, select “Yes.”
|
4.
|
Under Sample, use one of the following methods to deliver a sample of the downloadable product. |
- Select the File option. Then, click the Browse
 button, and select the sample file to upload to the server.
- Select the URL option. Then, paste the full URL of the sample file.
|
5.
|
Under File, use one of the following methods to deliver the actual downloadable product. |
- Select the File option. Then, click the Browse
 button, and select the file to upload.
- Select the URL option. Then, paste the full URL of the file that is available for download.
|
6.
|
In the Sort Order field, enter a number to indicate the sequence that this download will be listed with other downloads on the product page. |
|
7.
|
To add another download, click the Add New Row button, and repeat the process. |
Links
|
8.
|
When complete, if uploading files to the server, click the Upload Files button. |
|
9.
|
Click the Save and Continue Edit button. |
 Step 4: Complete the Samples Information
|
1.
|
Click to expand the Samples section. |
|
2.
|
Enter a Title for the section of samples on the product page. |
|
3.
|
Click the Add New Row button. Then, do one of the following: |
- Select the File option. Then, click the Browse
 button, and select the sample file to upload.
- Select the URL option. Then, paste the full URL of the sample file.
Add New Sample
|
4.
|
To add a new row, click the Add New Row button, and repeat the process. |
|
5.
|
When complete, click the Save button. |
|
6.
|
When prompted to refresh the index and cache, click the links in the message at the top of the workspace, and follow the instructions. |
At this point, the product should be visible on the assigned category page of your catalog. Until a product image is uploaded, a placeholder appears in its place.
Things to Remember
-

|
Downloadable products can be uploaded to the server, or linked to from another server on the Internet.
|

|
You can determine the number of times a customer can download a product.
|

|
Customers purchasing downloadable products can be required to log in before going through checkout.
|

|
The delivery of a downloadable product can be made when the order is in either a “Pending” or “Invoiced” state.
|
 button, and select the sample file to upload to the server.
 button, and select the file to upload.
 button, and select the sample file to upload.


