Magento 1.x Security Patch Notice
For Magento Open Source 1.5 to 1.9, Magento is providing software security patches through June 2020 to ensure those sites remain secure and compliant. Visit our information page for more details about our software maintenance policy and other considerations for your business.
Creating a Page
Most pages are designed to be read by search engines first, and by people second. Keep in mind the needs of each of these two very different audiences when choosing the page title, URL key, and meta data, as well as when writing the content. The process of adding a new page to your store is essentially the same for adding a new home page, or any other type of page. You can include text, images, blocks of content, variables, and widgets.
 Step 1: Add a New Page
|
1.
|
On the Admin menu, select CMS > Pages > Manage Content. |
|
2.
|
Click the Add New Page button. |
|
3.
|
In the Page Information section, do the following: |
Page Information
|
a.
|
Enter a Title for the new page. |
|
b.
|
Enter a URL Key for the page that is based on the Title. Use all lowercase characters, with hyphens instead of spaces. |
The URL Key is added to the base URL to create the online address for the page.
|
c.
|
In the Store View list, select each view where this page will be available. |
|
d.
|
Set Status to “Disabled.” (This will be changed when the page is ready to publish.) |
|
4.
|
With the required fields complete, click the Save and Continue Edit button. |
 Step 2: Choose the Page Layout
|
1.
|
In the Page Information panel on the left, select Design. |
|
2.
|
In the Page Layout section, set Layout to one of the following to determine the column layout of the page. |
- 1 column
- 2 columns with left bar
- 2 columns with right bar
- 3 columns
Page Layout
 Step 3: Complete the Content
|
1.
|
In the Page Information panel on the left, select Content. |
|
2.
|
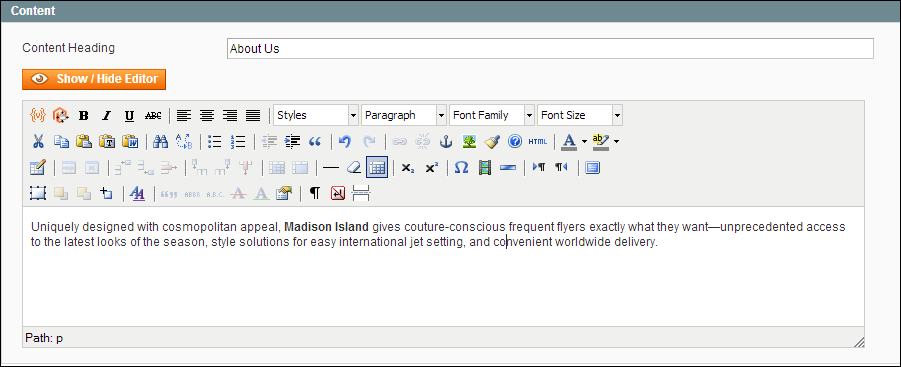
In the Content Heading box, type the text you want to appear as the main heading at the top of the page. |
Complete the remaining content, as you want it to appear in the main content column, according to the page layout selected. The content can include text, images, variables, and widgets with dynamic data.
|
3.
|
Click the Show / Hide Editor button to display the WYSIWYG editor. You can format the text from the toolbar. |
WYSIWYG Editor
|
4.
|
Click the Show / Hide Editor button again to return to the HTML mode. You can work in either mode that you prefer. |
|
5.
|
Click the Save and Continue Edit button. |
 Step 5: Publish the Page
|
1.
|
In the panel on the left, select Page Information. |
|
2.
|
Set Status to “Published.” |
|
3.
|
Click the Save Page button. |
When the page is complete, it can be added to the navigation of your store, linked to other pages, or added as a link in the footer.
 Step 6: Make a New Home Page (Optional)
|
1.
|
Complete the steps to create a new page. |
|
2.
|
On the Admin menu, select System > Configuration. |
|
3.
|
In the panel on the left under General, select Web. Then, click to expand the Default Pages section. |
|
4.
|
Set CMS Home Page to the new page. |
|
5.
|
Click the Save Config button. |
|
6.
|
In the message at the top of the workspace, click the Cache Management link. |
|
7.
|
Select the checkbox for the invalid Layout cache. Then, click the Submit button to refresh the cache. |


