Magento 1.x Security Patch Notice
For Magento Open Source 1.5 to 1.9, Magento is providing software security patches through June 2020 to ensure those sites remain secure and compliant. Visit our information page for more details about our software maintenance policy and other considerations for your business.
Setting Up Store Hierarchy
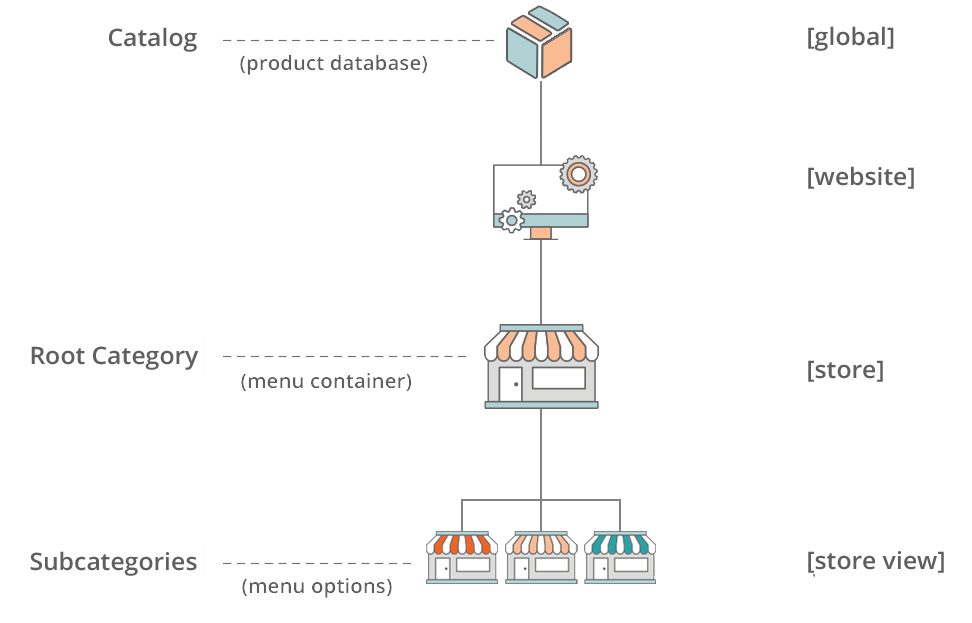
Before you begin, carefully plan your store hierarchy in advance because it is referred to throughout the configuration. Each store can have a separate root category, which makes it possible to have an entirely different set of navigation for each store.
Multisite Store Hierarchy
Also consider the prices and product attributes that are needed for each store view. Magento allows for only one standard price with a tiered pricing structure, per .
If you want to use a different pricing structure for a specific customer group in a store view, you must create a unique SKU for each view.
Manage Stores
 To set up a new website:
|
1.
|
On the Admin menu, select System > Manage Stores. |
|
2.
|
From Manage Stores, click the Create Website button. Then, do the following: |
Website Information
|
a.
|
Enter the Name of the website. The name is for internal reference, and can refer to the domain of the site or anything else distinguish it from other sites in the hierarchy. |
|
b.
|
Enter a Code that will be used on the server to point to the domain. |
The code must begin with a lowercase (a-z) letter, and can include any combination of letters (a-z), numbers (0-9), and the underscore (_) symbol.
|
c.
|
(Optional) Enter a Sort Order number to determine the sequence in which this site is listed with other sites. Enter a zero to make this site appear at the top of the list. |
|
3.
|
When complete, click the Save Website button. |
 To set up a new store:
|
1.
|
Before you begin, set up the root category that will be used for this store. |
|
2.
|
On the Admin menu, select System > Manage Stores. |
|
3.
|
From Manage Stores, click the Create Store button. Then, do the following: |
New Store
|
a.
|
Set Website to the site that is the parent of this store. |
|
b.
|
Enter a Name for the store. The name is for internal reference to distinguish it from other stores in the hierarchy. For example: Outlet Sales Store. |
|
c.
|
Set Root Category to the root category that will be used for the main navigation of the store. The root category can be the same as used for other stores, or unique to this store. For example: Outlet Sales Root. |
|
4.
|
When complete, click Save Store. |
 To set up a new store view:
|
1.
|
On the Admin menu, select System > Manage Stores. |
|
2.
|
From Manage Stores, click the Create Store View button. Then, do the following: |
Store View Information
|
a.
|
Set Store to the parent store of this view. |
|
b.
|
Enter a Name for this store view. The name appears in the “language chooser” in the header of the store. For example: French. |
|
c.
|
Enter a Code in lowercase characters to identify the view. For example: french. |
|
d.
|
To activate the view, set Status to “Enabled.” |
|
e.
|
(Optional) Enter a Sort Order number to determine the sequence in which this view is listed with other views. |
|
3.
|
When complete, click the Save Store View button. |


