Adding a Language
Most of the text that appears to be hard-coded on pages throughout your store can be instantly changed to a different language by changing the locale of the view. Changing the locale doesn’t actually translate the text word-for-word, but simply references a different translation table that provides the interface text that is used throughout the store. The text that can be changed includes navigational titles, labels, buttons, and links such as “My Cart” and “My Account.”
There is a wide selection of language packs available on Magento Connect. You can also use the Inline Translation tool to touch up any remaining interface text that was not translated for the locale, or to fine-tune the translated text.
After changing the language of the locale, the remaining content that you have created, including product names and descriptions, categories, CMS pages, blocks, and polls must be translated separately for each store view.
Language Packs on Magento Connect
 Step 1: Install a Language Pack
|
1.
|
Log in to your Magento account. |
|
2.
|
Go to Magento Connect, and find the language pack that you want to download. Read the terms of the license, and click the checkbox to proceed. |
|
3.
|
Click the Install Now button. Then, do the following: |
|
a.
|
Click the Get the Extension Key button. |
|
b.
|
Click the Select button. Then, copy the license key. |
|
4.
|
Return to the Admin of your store. Then on the Admin menu, select System > Magento Connect > Magento Connect Manager. |
|
5.
|
When prompted, log in to Magento Connect Manager. Then, do the following: |
|
a.
|
In the Install New Extensions section, paste your extension key. |
|
b.
|
Click the Install button. The language pack you have chosen appears below. |
Install Language Pack
|
c.
|
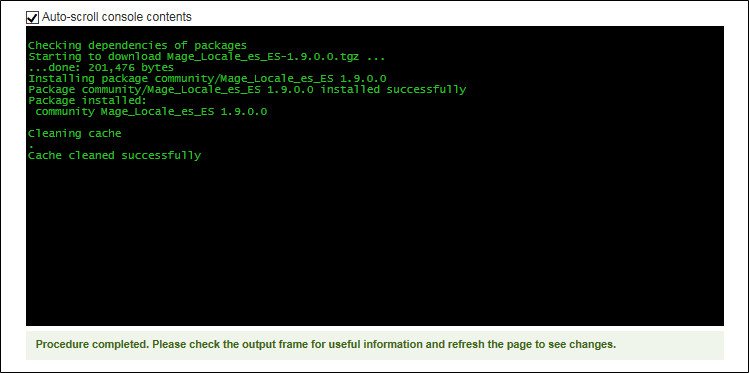
When ready to begin, click the Proceed button. |
You can follow the progress in the output frame. During the installation, the language pack is uploaded to the following folder on your server:
[magento]/app/locale
Output Frame
|
6.
|
To return to your store, click the Return to Admin link at the top of the page. |
 Step 2: Create a Store View for the Language
|
1.
|
On the Admin menu, select System > Manage Stores. |
|
2.
|
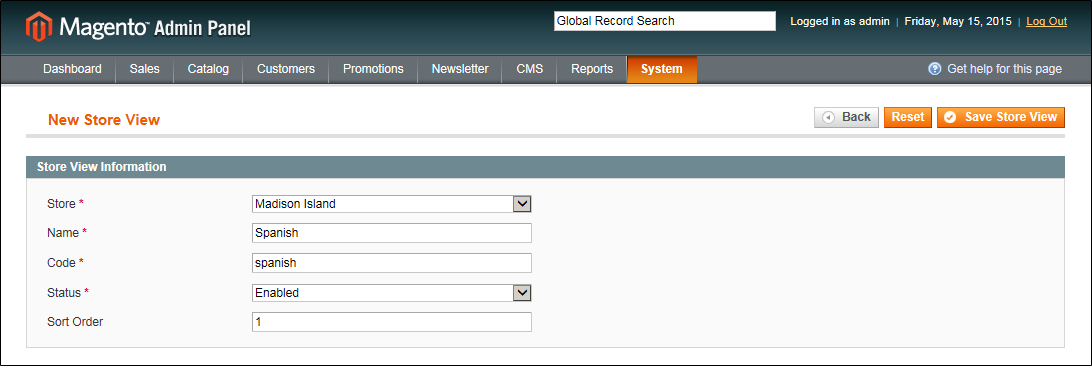
From Manage Stores, click the Create Store View button. Then, do the following: |
New Store View
|
a.
|
Select the Store that is the parent of the view. |
|
b.
|
Enter a Name for the store view. For example: Spanish. |
This is the name that appears in the “language chooser” in the header.
|
c.
|
Enter a Code in lowercase characters to identify the view. For example: spanish. |
|
d.
|
To activate the view, set Status to “Enabled.” |
|
e.
|
(Optional) Enter a Sort Order number to determine the sequence in which this view is listed with other views. |
|
3.
|
When complete, click the Save Store View button. |
 Step 3: Change the Locale of the Store View
|
1.
|
On the Admin menu, select System > Configuration. |
|
1.
|
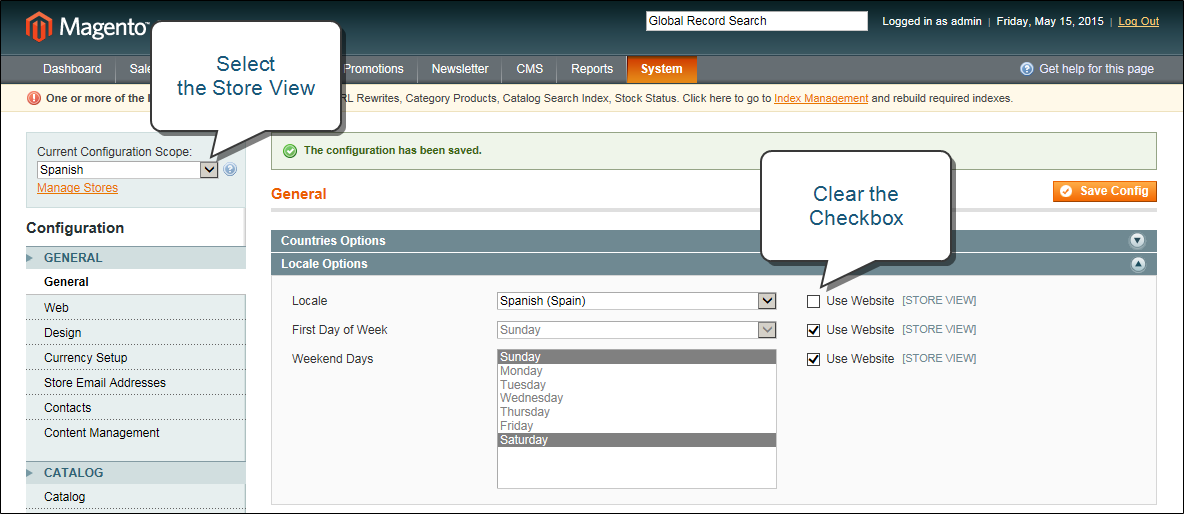
In the upper-left corner, set Current Configuration Scope to the store view. |
|
2.
|
Click to expand the Locale Options section. Then, do the following: |
|
a.
|
To the right of the Locale field, clear the Use Website checkbox. |
|
b.
|
Set Locale to the language that you want to assign to the view. |
If there are several variations of the language available, make sure to select the one that matches the language pack that you installed. For example, the Spanish language pack downloaded in this example works only when the locale is set to “Spanish (Spain).” You will need a different language pack to support a specific regional variation. You will need a different language pack to support the regional variations of other countries.
Change the Locale
|
3.
|
When complete, click the Save Config button. |


